Wednesday, May 31, 2006

Mistress of Spices - Asafoetida / Hing

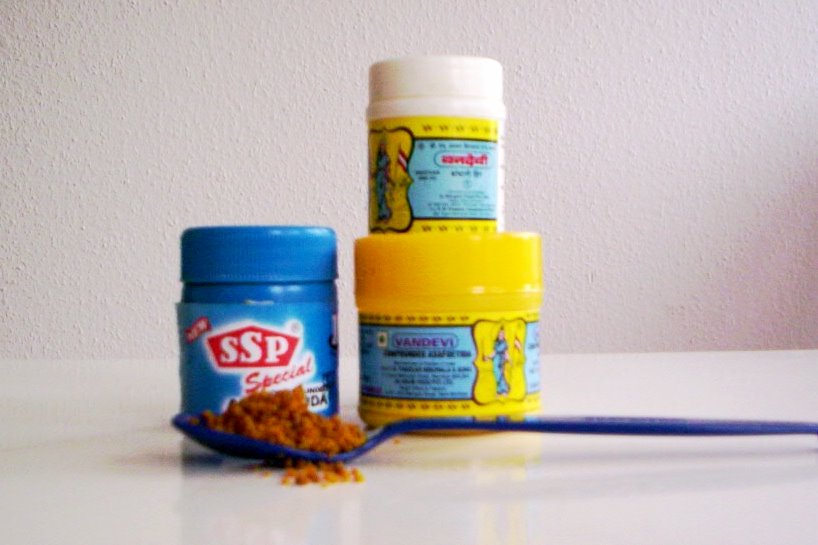
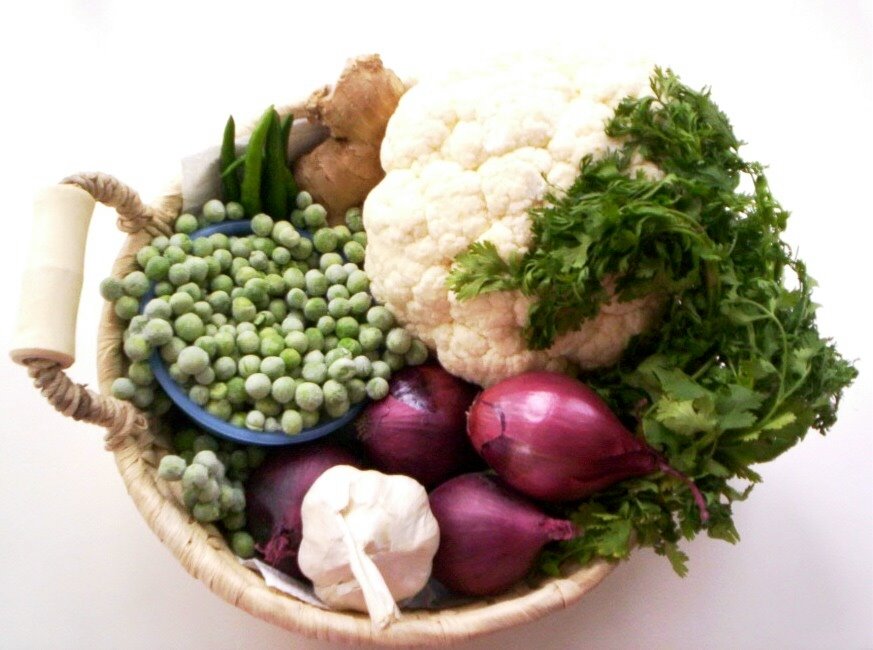
My stock of asafoetida

Mythili of Vindhu has urged us food-bloggers to write about our favourite spice for her event 'Mistress of Spices'. And no, we are not talking about Aishwarya Rai here, as Mythili too is prompt to point out. (A more apt title for Ms. AR would be 'Mistress of Failed Relationships', whaddya say? Anyway, her personal life is none of our business, right? Right??)

Coming back to the spices, I chose to write about Asafoetida because
a) It is one of my favourite spices. Meaning I would feel handicapped, if I didn't have it in my kitchen.
b) I use it a lot. A lot more than my mother and the women in my parents' families. It is the Konkani influence, I guess. (A proof of that is that my mother-in-law says the word 'Hingu' at least five times, when she is explaining a recipe to me, and that even when the recipe does not include asafoetida. )
c) I have three small plastic bottles of asafoetida in my kitchen drawer right now. Need I say more?

So, here are the facts regarding Asafoetida

Name

Asafoetida gets its name from the Persian aza, for resin, and the Latin foetidus, for stinking. Its pungent odour has earned itself a lot of mean names e.g. it is called Teufelsdreck in German (literally meaning Devil's Dung). C'mon, it's not that bad, is it? In many North Indian languages and in Marathi, it is called 'Hing'; in Konkani 'Hingu'; in Telugu 'Inguva' and in Tamil 'Perungaayam'. Please do let me know in your comment the name for asafoetida in your language, in case it is not mentioned here.

Cultivation and Harvest

Asafoetida is mainly grown in Iran (the country of its origin), Afghanistan and in India. Can you guess where it is grown in India? In the land of saffron, Kashmir. Surprising, isn't it? I didn't know this until I started looking for information about this spice on the internet, thanks to Mythili.

The plant of asafoetida is found in natural forests, where rarely anything else grows. It grows about 2 metres tall, and is useful only once it is about four years old. The older the plant, the more productive it is. The time to start harvesting the gum from the rather succulent stem and the root is just before flowering, which is in the months of March / April.

An incision is made in the upper part of the root/lower part of the stem and the exuding gum/latex is collected. Several incisions can be made in the root/stem till there is no more gum oozing. This process can last up to three months and one plant can yield up to 2 pounds of gum. The resinous gum is greyish-white when fresh, and darkens to a deep yellow/amber when dried. Chunks of asafoetida resin are broken off to be sold commercially. The gum is seldom sold in its pure form. It is often combined with Arabic gum, wheat/rice flour, turmeric, etc. and sold as Compounded Asafoetida.

Which brings us to its Culinary Uses

I will write here about the use of this spice only in Indian cuisine, because I am not familiar with any other.

1. Asafoetida is used in many ways in lentil and/or vegetable preparations. Three ways known to me are
a) Adding the powder/granules to the hot oil while making Tadka.
b) Adding the powder to the preparation just before turning the heat off and putting the lid on.
c) Adding water in which a piece of asafoetida has been dissolved to the preparation before putting the lid in the end.

2. Asafoetida is used as an important condiment in pickles, relishes/chutneys and papads.

Asafoetida is usually used only in minute quantities, because even a little of it goes a long way. Although its smell is strong (I like it actually) when raw, it turns into a pleasant aroma when cooked. Indian preparations with lentils and beans are quite unthinkable without the use of this spice. The reason being its medicinal properties.

Medicinal Properties

The biggest property of asafoetida is that it aids digestion. It can lesson flatulence and give relief from painful gas. Since lentils and beans are supposed to be hard to digest, it is always a good idea to add a pinch of this stinking gum to the dish.

A medicine that comes to my mind when I think of asafoetida is the Ayurvedic preparation, Hingashtak Choorna. Earlier, families used to have their own recipies of Hingashtak, because it is apparently easy to make, since the other herbs and spices, which go into it are easy to find in an Indian kitchen. I don't think it is made at home any longer. However, several boards advertising the Choorna of various brands are always hanging in drug stores/pharmacies back in Pune.

An interesting fact that I came across on this website was that it was believed that asafoetida enhanced singers' voices. In the days of the Moghul aristocracy, the court singers of Agra and Delhi would eat a spoonful of asafoetida with butter and practise on the banks of the river Yamuna.

A common home remedy up my sleeve for painful gas is to have a generous pinch of asafoetida dissolved in buttermilk or lukewarm water. You tend to give out a loud and hearty burp (A happy burp? ;-)) within minutes of drinking it, and that gives immediate relief. However, never have more than 1/8th of a teaspoon of asafoetida at one time. Otherwise, it can result in loose motions.

Do you know of any other home remedies using asafoetida? Please do let me know.

For some more information on this spice, please visit here.

(And by the way, can you guess what the white plastic bottle at the back in the picture on top is standing on?)

Couscous Paella

Clockwise from left: green pepper, red pepper (Do you like the straight-out-of-the-fridge matte finish on it?), leek, carrots, mushrooms, garlic


I made this Couscous dish the other day based on a recipe from a German book. Two main reasons that tempted me to try it out were:
a) I like cooking and experimenting with Couscous.
b) The quantity and combination of vegetables in the recipe appealed to me.

Making it was sure fun. So was photographing the colourful vegetables. However, the Couscous turned out to be way too bland for my taste. There aren't any spices listed in the recipe and I was aware of that. However, I thought that all those vegetables would lend their taste to the Couscous and make it tasty. I also added lots of Harissa paste, which was not mentioned in the recipe. My conclusion is that this dish needs many more spices. Although the book says that this dish can be had on its own for the main course, I now think that I shouldn't have believed it. Like I didn't trust the book when it asked for 500 grams of Couscous for 4 portions. (Now, portions are usually large in Germany. I never manage to finish mine when we eat out, although I have a large appetite.) So, I reduced the quantity of the Couscous by half to 250 grams. However, I did not scale down the quantity of the vegetables, because my husband and I like to have lots of vegetables in our food. Moreover, my husband has 'problems of a certain kind', if there is not enough fibre in the food. Oops, sorry, I was not supposed to write that. I hope, he does not read this post. ;-)

What I was saying is that this Couscous preparation cannot be had on its own. Hence, I prepared something to go with it, but only the following day, when we were finishing leftovers. (Yes, 250 grams still managed to make 4 portions. I can't imagine what I would have ended up with, had I used 500 grams, as asked in the recipe.) I'll blog about that 'something' in the next few days. Sorry, don't have the time for two posts right now.

Most important is, that this 'Paella' (I don't know why the book calls it that coz I don't see much of resemblance here.) is very good, if had with something spicy. Since it is loaded with vegetables, I would like to send it over to Cate for this week's ARF/5-A-Day event.

Here's the recipe for Couscous Paella

Serves 4.

Ingredients:

250 grams Couscous
One can of chopped tomatoes (The quantity is roughly 400 grams here in Europe.)
2 carrots
2 spring onions or one leek (I used the latter, as you can see in the picture.)
1 red bell pepper
1 green bell pepper (Using 2 green peppers should be fine too.)
250 grams white/brown mushrooms (I used white ones.)
2-3 cloves of garlic (Corresponding quantity of readymade garlic paste should be ok.)
2 tbsp olive oil
Harissa paste to taste (Please add only a little first, check, and add more, if required.)
salt to taste

Method:

1. Take the Couscous into a large container or shallow dish. Sprinkle about ¼ liter of water on it and mix it with the Couscous using your fingers so that it spreads evenly all over. Let the Couscous rest for about half an hour, after which the grains will have fluffed up nicely and will have grown about three times in quntity.

In the glass container: Couscous half-risen after about 15 minutes of mixing with water

2. In the meanwhile, cut the leek/spring onions (white as well as green part) into roundels. Peel the carrots, if you like, although it is not always necessary. Just rubbing them hard while washing them suffices often. Cut them in 5cm. long sticks.

3. De-stem and de-seed the bell peppers. Cut them in long slices. Clean the mushrooms with a soft brush. (I have come to know only recently that you are not supposed to wash them. Does anybody of you know why? Please enlighten.) Cut the mushrooms in bite-sized slices.

4. If using fresh garlic, peel it and chop it fine. Open the can of tomatoes. ( I always happen to open the can in such a way that the tin sheet stays attached to the can in at least two places. And to think that I am otherwise quite good with other tools and gadgets in the house. Does anybody of you have this problem too? Or is it that I require a new can opener?)

5. Heat the oil in a wide pan or wok. Once it is hot, add the carrot sticks. Sauté them for two seconds so that they are coated with oil, then close the pan with a lid and cook the carrots for 4-5 minutes. Add a sprinking of water to the pan, if you see the carrots sticking to the bottom.

6. Now add the sliced mushrooms, sliced bell peppers and sliced leek/spring onions. Sauté all vegetables on high heat for 5 minutes while stirring them often. The vegetables should cook, but should still be rather crunchy.

Vegetables cooking in the pan

7. Add the garlic pieces/paste, canned tomatoes, Harissa paste and salt now. Mix thoroughly. Cover and cook for 5 minutes.

8. Add the softened Couscous and again mix thoroughly. Cover the pan and cook for further 10 minutes. Stir the mixture occasionally while it is cooking.

Couscous Paella is ready when the vegetables are coated with cooked Coucous grains, like this.

Couscous Paella

Serve it on its own, if you don't mind it bland. I served it the first day like that, but it did not satisfy our taste buds. The following evening, I served it with a spicy preparation, and it was perfect. Watch this space for the recipe of that preparation. Bye for now!

Sunday, May 28, 2006

A Ton Of Protein # 4 - Moong Dal Usli

Moong Dal Usli

Ayurveda, as much as I have read about it, rates Moong Dal the highest amongst all lentils. Perhaps because it is the easiest to digest, and Ayurveda insists that foods be easy to digest. I don't know about other foods, but I am sure Moong Dal should be rather easy on the stomach, because in Maharashtrian households, a Khichdi made of rice and Moong Dal (Mugachya Daalichi Khichadi) is served to people when they are ill and later when they are still recovering.

Apart from the digestibility, I feel, that Moong beans and the dal are also quite versatile. They can be used in all possible forms and in all possible dishes. Sample this. Moong beans can be used as is, or after sprouting; the Dal can be used with the skin still on it (Moong Dal Chhilka) and without. Moreoever, the skinless Dal can be used to cook Dal, in Khichdis, as a thickening agent in soups, as a fried snack and in desserts too. The rich Moong Dal Halwa of North India is quite famous. Equally rich with ghee and coveted amongst Maharashtrians is the Mugachya daalicha Shira. More on that sometime later perhaps.

What I am writing about today is a Konkani breakfast dish, the Muga Daali Usli. Having this kind of a dish for breakfast was totally new to me when I got married. I was curious but also slightly apprehensive of having a Bhaji-like thing with bread early in the morning. Of course, being born and having grown up in a Maharashtrian family, I was hesitant to do a lot many things once a part of a Mangalorean Konkani family. Like eating coconut oil. It gave me a feeling in the beginning as though I were eating hair. I know it sounds gross, but my only association of coconut oil was with hair. But I am totally comfortable eating it now. I mean coconut oil. Anyway, more on that sometime later.

Coming back to the Moong Dal Usli, I totally love it now and it's on my breakfast menu quite often. It was earlier eaten with roasted puffed rice (Churmure in Marathi/Murmura in Hindi). However, it has become a common practise to have the Usli with white sliced bread now, maybe for the sake of convenience? I am actually a wholemeal bread freak, but I have noticed that this particular dish pairs better with white bread. Ayurveda will never approve of it, but there you go. :)

So, here goes the recipe for Moong Daal Usli

Serves 2 (hungry persons after a whole night's fast!).

Ingredients:

1 heaped cup Moong/Green gram Dal
2 ½ cups water
2 tsp oil
½ tsp mustard seeds
7-8 curry leaves (I used 12-15 because I used dried curry leaves)
3 green chillis (3 red chillis can also be used once in a while for a change)
salt to taste

½ inch piece ginger
a handful coriander leaves (or to taste)


At the base: Moong Dal; On the base (clockwise from top): dried curry leaves, fresh coriander leaves, green chillis; In the centre: ginger

Method:

1. Wash the Moong Dal and keep aside.

2. Make a slit in the green chillis, making sure not to cut them in two. In case using red chillis, break them in 2-3 pieces each.

3. Chop the ginger in tiny pieces. Chop the coriander leaves. Set aside.

4. Heat the oil in a pan. Once it is hot, add the mustard seeds. Once they splutter, add the curry leaves and chillis.

5. After about two seconds, add the water. Stir in salt.

6. Bring it to a boil, then add the washed Moong dal. The water will 'jump' high at this point. Take care not to burn yourself.

7. Reduce the heat to 'medium' and let it continue boiling gently. Do not cover the pan yet, or else the water will boil over.

8. Once the water is the same level as the Dal, cover the pan, but leave a gap for the steam to escape.

9. Stir the mixture every now and then, especially if you are not using a non-stick pan. The Dal can easily stick to the bottom.

10. The Usli is cooked, when the Dal is soft to touch (can be pressed easily with two fingers), and all the water is absorbed. It is ok, if the Dal looks somewhat mushy, that is how it is supposed to look - with half the grains still retaining their form and half of them mushy.

11. Add the chopped ginger and coriander leaves now, stir the Usli and cover the pan tightly for about five minutes for the ginger to release its aroma into the Usli.

12. Serve hot with some bread and a fruit juice for a tasty and satisfying breakfast.


Moong Dal Usli served with white sliced bread

Have this breakfast, and you'll be ready to face the day with a smile!

Jihva for ingredients

Wednesday, May 24, 2006

Date & Apple Shake

Date & Apple Shake served with potato crisps

Football fever is hightening every day here in Germany. All possible things are being sold in the shape of a football - bread rolls, cakes and pastries & tarts with icing made to look like a football. You name it, they have it. Pizzerias are advertising that they are open all throughout the tournament and are also offering special deals for larger groups. Almost every pub has hung a board outside saying that the patrons can enjoy the tournament inside on their large screen (and buy bottles after bottles of the local 'Alt' while watching the game). I am sure most of them are going to make so much business during that month, that they will afford to shut down the place for several weeks after the World Cup is over.

No wonder then that my 'goals' have changed temporarily. I am thinking football and thinking of eating football all the time. (Eating football?) What I mean is that I often find myself thinking of making something innovative for the 'Monthly Mingle' organised by Meeta. I prepared something a few weeks back, but could not sit quiet after that. So, what innovative thing did I make? Well, nothing. And that is because whatever I thought of making is being sold here in the shops anyway. For example, I thought of making a pastry with a football icing. But they are selling it now in shops, as I have already mentioned. (Copy-cats!) What I could have done is that I could have just photgraphed a readymade pastry and posted it as 'mine'. (They are never gonna know about this in the US and in India, are they?) But hey, what about integrity? Ah, those darn values!

The moral of the story is that I made only a milk shake to wash down my pizza. Well, it's just a milk shake, but then you can always have it, even well after the football season is over. Moreover, it's nutritious and tasty. Good enough to make your son the next David Beckham. (That's of course, if you are ready to accept somebody like Posh yuk! Spice as your daughter-in-law!)

Anyway, here's the recipe for Date & Apple Shake based on one by Tarla Dalal

Ingredients:

4 cups Low Fat Milk
1 large apple
10 black dates, deseeded and finely chopped
a few drops vanilla extract/essence or 2 tsp readymade/homemade vanilla sugar
3 to 4 ice-cubes (optional)

Clockwise from top left: vanilla bean, milk, apple, dates

Method:

1. Soak the dates in 1 cup warm water for about half an hour.

2. Chop the apple. You could peel it, if you like. But please don't forget, that there is a lot of nutrition right under the peel!

3. Mix all ingredients in a blender and blend them till you get a fairly smooth and frothy shake.

4. Garnish them with any chopped nuts or pieces of a bright-coloured fruit e.g. strawberries. My garnish were the special football glasses. ;-)

A few Notes:
1. In case using readymade vanilla sugar in sachets, just empty one of those into the blender without bothering to measure. The quantity in those sachets is normally 8 grams here in Europe. Hopefully it is the same in the US.

2. You can make vanilla sugar at home like this: Buy a vanilla bean as shown in the earlier picture, use the pulp in a cake or in any recipe that asks for it, and then insert the remaining outer cover in a jar filled with sugar. You’ll get wonderfully aromatic vanilla sugar in about a week.

3. You could use a banana instead of the apple, if you like.

4. This shake tastes equally good, when made without ice-cubes. On the other hand, if you want it really chilled, you could use vanilla ice-cream instead of the milk (barring that used for soaking dates), vanilla essence and ice-cubes. Visit here for another great recipe for a similar milk shake.

Enjoy the shake! Enjoy the game!! And may Brazil Germany win!!!

Monday, May 22, 2006

Flower Matar cha Rassa (Cauliflower & Green peas cooked in a green gravy)

Clockwise from top right: cauliflower, coriander leaves, red onions, garlic, frozen green peas, green chillis, ginger


Rassa, in Maharashtrian cuisine is basically a dish cooked with a gravy. Having said that, I must mention that there are not many Maharashtrian vegetarian dishes that would come under this heading. Vegetables are prepared most often by steam-cooking or by stir-frying. Very few vegetables are cooked to make Rassa, the most common being potatoes, onions, cauliflower, green peas and tomatoes. (Have I forgotten any?) However, there are quite a few recipes for Rassa with eggs, chicken and mutton in Maharashtrian cuisine, none of which will get to make an appearance on this blog, because I neither eat nor cook meat. I do eat eggs, but that's limited to cakes and muffins.

Moving further with the Rassa, this one is my mother's recipe and a big favourite in the family/amongst relatives. My mother is aware of this, and makes it a point to cook it whenever guests from within as well as outside family are invited over for lunch/dinner. I, too, have managed to impress many a guest at my place with this dish. It has a wonderful, complex flavour of coriander leaves, garlic, green chillis......I think it makes more sense if I just got on with the recipe now. Btw, does anyone of you know where the word 'Matar' for green peas originates from?

Recipe for Flower Matar cha Rassa

Serves 4.

Ingredients:

½ head of cauliflower or 3 packed cups cauliflower florets
1 cup green peas, fresh/frozen

For the paste:
1 medium-sized red onion
1-2 green chillis (These will be ground into a paste, so it’s better to go easy on them.)
½ loosely packed cup coriander leaves
2-3 fat cloves of garlic or 4-5 medium ones
¼ inch ginger piece
¼ cup green peas, fresh/frozen
1 tsp oil (not necessary, if cooking the onions in the microwave oven; see Step 3)
salt to taste
a few drops of lemon juice (optional)

1 tsp oil
¼ tsp cumin seeds

Method:

1. If using fresh cauliflower, cut it into small florets. Put those into salted water and let them stay in it for about five minutes. This will make the worms, if there are any, sink to the bottom of the container. Take the florets out into a colander then and let them drain. Skip this step, if using frozen cauliflower.
2. Steam the cauliflower (fresh/frozen) and green peas. This can be done in a covered pan using some water on the stove-top or in the microwave oven. We don't want to boil the veggies until very soft. They should retain the crunch in them, because we are going to cook them again later. If using frozen cauliflower, cut it now into smaller, bite-sized florets.
3. For the paste, chop the onions and sauté on some oil until soft. This can be done in the microwave oven and without oil. Roughly 1.5 minutes of cooking on HIGH should suffice. If using frozen green peas for the paste, thaw them by either dipping them for a while in warm water or using the DEFROST mode in your MW oven. (Are you getting a feeling that I am a microwave freak?)
4. Make a smooth paste by grinding the cooked onions, green peas and all other ingredients listed for the paste. Please note that adding salt at this stage is important, because the green chillis tend to turn bitter if ground without salt. The Rassa carries a somewhat unpleasant taste then.
5. Now heat oil in a pan. Add cumin seeds and let them splutter.
6. Add the ground paste and fry it only for a few seconds, not longer.
7. Add the cauliflower florets, green peas and about a cup of warm water.
8. Let the curry come to a gentle boil. Simmer it then for 3-4 minutes. Check the taste for salt and adjust the quantity. Please keep it in mind that there is already some salt in the paste.
9. Take it off the heat. Serve hot with rice or chapatis/phulkas and some Raita.

Flower Matar cha Rassa (right) served with Waran-Bhaat

Notes:
1. The green peas in the paste can be substituted with roasted peanuts. This, too, tastes great. However, the Rassa does not become as green then.
2. Boiled and diced potatoes can be added to the Rassa.
3. Readymade ginger-garlic paste can also be used instead of the fresh ingredients. It should be added at Step 7.

Apparently, cauliflower and green peas are rich in antioxidants. So, let me just send this post over to Sweetnicks for the next ARF/5-a-day event.

Tags: , , , ,

Friday, May 19, 2006

Do you know this vegetable? - Alsande / Chawlichya Shenga / Long beans / Cow-pea beans


All of you overwhelmed me today. No, you really did. I posted this picture last night and wanted to write the post too. However, I hardly managed to think straight with that sleepy head of mine, let alone writing a full post. So, I said 'Let me just publish a teaser and see what happens'. And what do I get today in the morning? 12 comments! Not one or two, but one dozen! And almost all of you have guessed it right. Well done, Friends. You are smart and you are quick. If you ever entered a quiz contest, and if there were a 'Buzzer Round' in it, you would surely win it. I assure you. So, this post is dedicated to Shilpa, Revathi, Nabeela, KrishnaArjuna, Nandita, Perspective, Faffer, (phew...another five to go) Suhaag, Nandan, Anon, Sumitha, Zoya...and many more who have guessed it right, but have not left a comment.

As Zoya has mentioned, this bean is called 'Chawlichi Sheng' in Marathi. Until I got married, it was never a part of my diet, but very much a part of my vocabulary. That too in the figurative sense. Ok, let me explain it. A slender and tall woman is called 'Chawlichi Sheng' in Marathi. For example, Anna Kournikova can be called a CS, or maybe Malaika Arora, or perhaps Halle Berry (basically all those women who I envy appreciate for their fitness).

Coming back to the long beans, I was saying that I had never eaten or cooked them before marriage, because it's not a part of the diet in my parents' families. However, after I got married and became a part of a Konkani family, I got to know/eat this vegetable. It makes a regular appearance on my mother-in-law's table. Maybe because I ate it at her place for the first time, I always prepare it the way my MIL does, although it can be cooked the Maharashtrian way too. Here's the way she prepares it.

Recipe for Alsande Upkari (Steam-cooked long beans)

Ingredients:

approx. ¼ kg. Long / cow-pea beans
1 medium sized boiled potato
a generous pinch asafoetida powder
salt to taste

1 tsp oil
½ tsp mustard seeds
3-4 dried red chillis, broken into two-three pieces each

2 tbsp gated coconut for garnishing (optional; I haven’t used)

Method:

1. Wash and top & tail the beans. Cut them in 1 inch long pieces.

2. Cut the potato in cubes. (The size does not really matter here, because the potato is boiled and hence the question of it taking less/more time to cook does not arise.)

3. Heat the oil in a pan. Once it is fairly hot, add the mustard seeds and let them splutter.

4. Add the broken red chillis. After a second or two, add the beans.

5. Sprinkle some water (about two tablespoons for non-stick and ¼ cup for regular pans). Add salt to taste. Stir the beans well and cover the pan with a lid.

6. Open the lid after three-four minutes. Some steam should be gathered inside now. Add the potato pieces.

7. Stir the beans again and let them cook until soft yet crunchy. (Can the beans then be called 'al dente'?)

8. Just before turning the heat off, open the pan and add the asafoetida powder. Stir the Upkari well, put the lid back and turn the heat off. (I know, this is different from the usual 'hing in the tadka/asafoetida in the hot oil' routine, but believe me, it tastes great like this.)

9. Serve after about 1o minutes, so that all the flavours get time to blend well with each other. Garnish it with grated coconut, if you like, before serving.

Alsande Upkari

The traditional practise in Konkani households is to add asafoetida water, which is simply a small piece of asafoetida dissolved in water. However, this means a tiny bit of preparation, and I also sometimes am left with excess of it, which I don't know where to use. So,adding asafoetida powder is the only bit that I do differently from my mother-in-law.

Sending this one over to Kalyn for her Weekend Herb Blogging event.

Tuesday, May 16, 2006

Cooking Rice in the Microwave Oven

Many of you must already be cooking rice successfully in the microwave oven. It is as uncomplicated as boiling water, once you get the hang of it. If you are doing it regularly, then you don't even think about it. Your hands use their memory to do all the steps. Somewhat like driving maybe?

However, I have come across many people, who use a microwave oven for years, but only for reheating and never for cooking anything. Since I use it regularly for cooking food as well, I am often asked questions about it. Hence this post.

I must make it clear at the beginning itself, that this is no fool-proof method, only a tried and tested one. You have to play around a little bit with that gadget to get the feel of it. Go ahead and experiment, it's not going to explode. :) Most of the home appliances made nowadays are rather strong and can sustain some abuse too. Try and see what happens by pushing all the buttons and turning all the knobs at least once. Many of you bloggers/readers are with science/engineering background, so I don't have to stress the importance of reading the user's manual either. Also, please check the wattage of your microwave, because the cooking times increase or decrease inversely proportional to it. I use a 700Watt microwave oven at the moment, so all timings mentioned here correspond to that.

Although what I am going to write here is not a 'recipe', I will still call it that for want of a better word.

Recipe for Cooking Rice in the MW oven

Ingredients:

Rice as per your need
Water, twice the amount of the rice and a little more

A few typical examples would be

½ cup rice & 1 cup + 2 tbsp water
¾ cup rice & 1 ¾ water
1 cup rice & 2 ¼ cups water
1 ½ cups rice & 3 ½ cups water


Method:

1. Take a glass (e.g. Pyrex) container. I have observed that cooking in porcelain/ceramic and plastic containers does not give satisfactory results, although they are microwave-friendly and can be used successfully for reheating food.

2. Take the required amount of rice in it and wash it a couple of times. Let's not forget that washing rice more often results in loss of important nutrients.

3. Add the appropriate amount of water to the rice.

Rice being soaked

Now, there are many theories regarding the rice being soaked in water before being cooked in the microwave. The recommended soaking times vary from 10 to 30 minutes. I have seen that soaking the rice reduces cooking time - but only by a minute or two. So, in the end effect, it's not really a time-saving idea. I, however, still always soak the rice for about 10 minutes. I somehow feel that it cooks better when soaked.

4. Place the vessel with rice and water in the centre of the microwave now. Set the time. This can vary for different microwaves with different power. Below are the times rice takes to cook in my microwave with 700Watt.

½ cup rice 9 minutes
¾ cup rice 12 minutes
1 cup rice 16 minutes
1¼ cups rice 20 minutes
1½ cups rice 23 minutes

Please note that rice will take less time, if your microwave has higher wattage and vice versa.

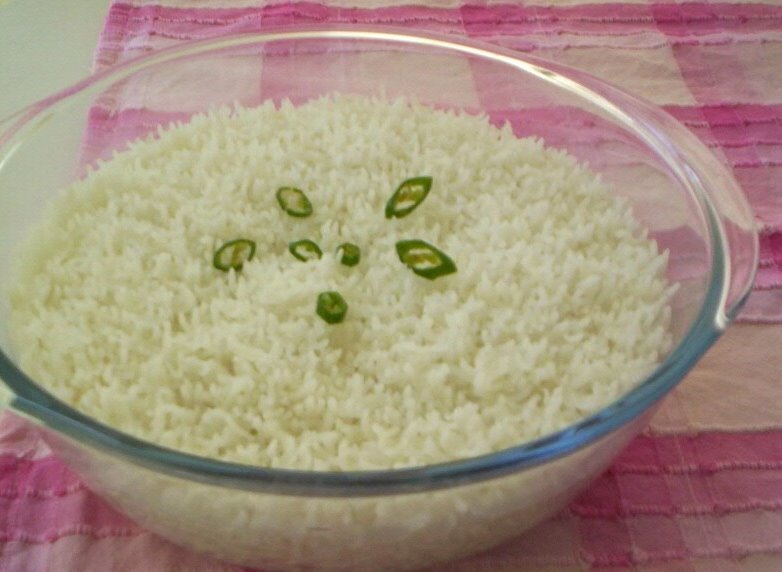
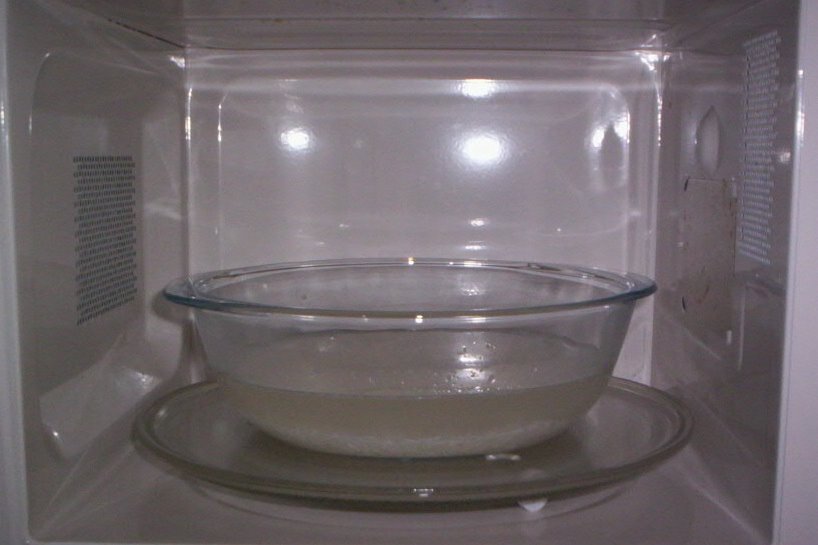
5. Once the rice is cooked, it will look like in the picture below. The rice grains will have attained their full cooked length, they will be somewhat separate and almost all the water will have dried out. The grains on the top surface will still be 'sleeping'.

Sleeping grains of cooked rice before standing time

However, leave the rice in the microwave for another five minutes for it to stand. Make sure that the microwave is turned off then. The standing time allows the rice to cook to its optimum. Once it has stood well, the rice grains will look pretty as they will be in a 'standing' position, as you can see in the very first picture in this post. (I don't have a high-resolution camera. It's a Kodak 3.2 mega pixels CX 7300. Hence my pictures are not as clear as I would have loved them to be. Sorry.)

A few things worth keeping in mind:

1. Do not cover the rice while cooking in the microwave at any stage. The water in it can boil over. Cover the vessel only after the standing time is over. If it is covered before the standing time is over, the rice grains do not stand up in a 'saluting' position. This, however, makes no difference to the taste and the texture of the rice.

2. Do not bother stirring the rice in between. It is neither necessary nor recommended.

3. You could add a few drops of lime juice to the rice while cooking, so that you get whiter looking rice. (Safedi ki chamkaar jyaada! :))

4. Adding a small blob of butter or a few drops of ghee while cooking gives the rice a pleasant sheen.

The advantages of cooking rice in the microwave oven are:

1. This versatile gadget doubles up as a rice cooker. It comes in handy especially when you are cooking several items at the same time and there is no gas burner/hot plate 'free' for rice.

2. You don't have to keep an eye on it (or keep an ear open for the pressue cooker whistle) once you have set the correct time.

3. Rice gets cooked very well with separate rice grains, which are ideal also for making various kinds of pulao.

4. Rice can be reheated in the same container as it was cooked in. Since it is cooked in a glass vessel, it can also be proudly put in front of guests as it is. Transfering it from the everyday vessel into a 'good' container is not necessary then.

I hope I have mentioned all the points that one needs to keep in mind when cooking rice in the microwave oven. In case I have forgotten any or you have some more tips, please feel free to point it out to me.


Tags: ,

Thursday, May 11, 2006

A Ton Of Protein # 3 - Lasnaachi Aamti (Garlic Dal)

In the picture : yellow - Toor dal, green - coriander leaves, white - garlic ('Lasoon' in Marathi, Knoblauch in German - do not forget to pronounce the 'k')
Garlic is something that you can't really take for granted in India, unlike in the rest of the world. There are many communities / religious groups, who do not eat garlic at all. And then there are those, who do not eat garlic on certain days, for example, when they are fasting or during Monsoon. (The rainy season is believed to lower the metabolism rate and apparently garlic makes it worse by causing flatulence. This period is called 'Chaaturmaas' in Maharashtra, literally meaning 'four months'.) Garlic is also a no-no at festival feasts and when there is a religious ceremony at home/in the family.
Which means that this Aamti/Maharashtrian Dal is prepared strictly on non-special days (which is roughly 340 days in a year). Having said that, I must mention that it is cooked practically on all 340 days at my maternal grandmother's place. My grandmother is no more, but my maternal uncles (mind you, I have five of them!) live in a kind of joint family. Meaning they have their separate houses (in Nashik, Maharashtra), but they are always found together. It is like they use their houses only for sleeping and having bath. :)
Coming back to the Aamti, they like eating it more with chapatis and less with rice. Whole chapatis are served, which are then crushed by individuals in their plates with the fingers (it is called 'kuskarleli poli' then) and mixed with the Dal till it becomes a semi-solid mass. This is how it looks before both are mixed.

Kuskarleli Poli (crushed chapati) with Lasnaachi Aamti in the centre

It is a rather common practice in Maharashtra (maybe elsewhere too?) to crush chapati and mix it with any dal, or with milk and some sugar. The latter version is eaten with gusto by the young ones. I think it is a very healthy practice without much ado, because the absorption of calcium from the milk is made easier for the body when it is accomanied by some kind of cereal. Our ancestors certainly knew more than we think they did.

Anyway, here is the recipe for Lasnaachi Aamti
Serves 3.

Ingredients:

¼ cup Toor Dal
1/8 tsp turmeric powder
½ - 1 tsp red chilli powder (Now, this Dal is not for the chicken-hearted. It is supposed to look fairly red and taste rather hot or ‘zanzaneet’ as they call it in Marathi. That's why I have served it with water in the earlier picture. :))
approx. 2 cups of warm water (Adding warm water gives a better flavour to any Dal, I feel.)
salt to taste

1 tsp oil
¼ tsp mustard seeds
6-7 medium garlic cloves (Reduce the quantity to 3-4 cloves, if they are fat, like in the picture at the end of this post)

chopped coriander leaves for garnishing

Method:

1. Pressure-cook the Toor Dal until soft.

2. Peel the garlic cloves. Slice them in the width, so that you have thin disc-like pieces.

3. Heat oil in a pan. Once the oil is hot, add mustard seeds and let them splutter. Add garlic discs immediately and sauté them till they turn golden brown.

4. Add cooked Toor Dal, turmeric powder, chilli powder and water.

5. Stir the mixture well and let it come to a rolling boil. Add salt. Continue boiling the Dal on high heat for about five minutes.

6. Turn the heat off, add some coriander leaves, stir and cover the pan.

7. Garnish with some more coriander leaves, before serving with rice or chapatis/phulkas.


Lasnaachi Aamti (All the garlic pieces have sunk to the bottom, and hence not visible here. The Aamti also does not look as red as it should, because the kind of chilli powder I have here imparts a lot of heat, but no colour to the dish.) :(

Preparing it for dinner is recommended, unless you don't mind going about with the 'dragon breath'.

Tuesday, May 09, 2006

Lots of Tulips and a Cheese Slicer


Yesterday, we drove down to Keukenhof Gardens near Amsterdam to see the tulips in bloom. The gardens are open for a limited period of about two months in spring every year. Since spring decided to make a delayed entry, the tulip season is almost upto the end of May this year.
My first connection with tulips and Holland is of the movie 'Silsila'. I still remember how I just wanted to be there as soon as I saw the song 'Dekha ek khwaab toh' with millions of tulips in it. I wondered how it would feel to be amongst so many flowers. I now know how it feels. And I also know that the feeling is so overwhelming that it is too difficult to be put in words. Actually, I said jokingly to my husband that I have become so used to the urban 'I-see-nature-only-on-my-balcony-and-nowhere-else' life, that I am getting stressed looking at all those wonderful flowers. :) And nature is supposed to de-stress you!

So, is this a non-food post then? No, there IS a food connection. And that is actually one of the souvenirs I bought at the gardens. Here it is.

As usual, while I was looking for a souvenir, it was the foodie in me looking for one too. (And no, I don't suffer of Split Personality Syndrome. :)) This Cheese Slicer is what both of us agreed upon. Isn't it nice? And very souvenir-ey? And it slices cheese too!


I tried using it on the block of Parmesan that I had in the fridge, and it gave me neat, thin shavings. Now I don't know whether to use it regularly or whether to just preserve it, so that I can pass it on as a family heirloom later.

What do you think I should do?

Friday, May 05, 2006

'Go Germany Go' Pizza

Does this ever happen to you? That you ask somebody a question, and before that person reacts, the answer occurs to you. Just like that. On its own. Ok, let me explain.

After Meeta of What's for lunch Honey? announced the event Monthly Mingle and 'Football' as the theme for the month, I kinda started thinking about it (practically almost all the time!). After thinking for a few days and not coming to anything concrete, I said, let me ask my husband whether he has any ideas. He is a great football fan, you know. (Like he wears a gawdy yellow shirt after Brazil win, and all those silly things, which I don't relate to.) Anyway, this was our conversation.

Me to him : (while he is shaving) We have this blogger event coming up, you know. The theme is football. I don't really think of anything good. I don't know what I should make.
He : (Half looking at me, half looking into the mirror) Make something related to football.
Me : (sarcastically) Brilliant!
(And as I am just about to begin as to how I can never rely upon him for ideas and how I ALWAYS come up with something great when he needs them from me, etc., etc., it occurs to me - all of a sudden - that I could make something with the German national flag.)
Me : YES! That's it. Thanks a lot.
He : (shrugging, slightly puzzled) That's all right.

And as soon as I had this image of the German National Flag in my mind,

the very instant I knew that I was going to make a pizza. The 'Go Germany Go' pizza. This is how it looked once I made it.

G3 Pizza, yet to be baked

It was rather simple to make. I must say, my husband was really pleased to see this one. (Did I tell you that he keeps shifting his loyalties between Brazil and Germany?)

Anyway, without further husband-bashing, I'll get on with the recipe.

Recipe for G3 Pizza

Ingredients:

  • One recipe pizza dough
  • One heaped cup pizza sauce ( I used readymade sauce again, but will definitely post the recipe soon. Sorry for now!)
  • approx. 150g. hard cheese (that’s approx. a cup; I used a combination of Cheddar and Edam)
  • approx. 100g. black deseeded olives (40 largish olives, to be precise)
  • ¾ each of medium-sized red and yellow peppers (For a better idea of size, please refer to the next picture. I used the very same peppers depicted in it.)

Clockwise from top : yellow pepper, red pepper, black deseeded olives (Here they look so much like Indian 'jambhool/jamun', don't they?)

Method:

1. Preheat the oven to 200°C.

2. Cut both peppers into thin slices. Cut the olives into half. Grate the cheese.

3. Roll out the dough onto a baking sheet into a rectangle. Spread the pizza sauce evenly over it.

4. Spread the cheese on it. (I know, this is normally supposed to be the other way around, but we won't see the veggies then. I was sceptical when I actually did this. I thought I was just going to ruin a pizza (and our dinner) with this whacky idea of mine, but no, that didn't happen. Phew!)

5. Now, arrange the olives and peppers carefully as shown in the earlier picture.

6. Bake the pizza at 200°C for 15 to 20 minutes. The pizza base should look brownish and the veggies slightly dried and at places, charred. Like this.

Supporters of Germany can have this one and make the German flag run in their veins. :)

Non-supporters of Germany can imagine that they are having 'Germans for lunch'. ;-)

In any which case, the pizza is best served with some beer and this.

:) Enjoy!

ARF/5-A-Day Tuesday

Monday, May 01, 2006

Methamba - Sweet & Savoury Mango Relish

This Maharashtrian relish is one of those almost-forgotten dishes, I feel. Those ones, which the earlier generation too doesn't think of that often. Anyway the trend in urban Maharashtrian households nowadays is to try out new dishes, from other Indian regions as well as from international cuisines. I am no exception. I am often more eager to cook a totally new ingredient than to cook a familiar ingredient in an unknown way.

It is only thanks to the Jihva for Ingredients event that I went through my recipe books and notes looking for some untried recipes for mangoes. I selected this one because
a) I have never made it before, which means that it is a learning experience.
b) I have eaten it before, which means that I know what the taste should be like.
I am happy that I 'rediscovered' this dish for myself. It can be prepared fast. It stays fresh in the refrigerator for several days. It is versatile; can be eaten with any meal and has a very intense flavour.

Actually, it's worth mentioning that it falls into a catagory, which is called in Marathi 'Tondilavane'. Meaning a relish or chutney, which
- is served and eaten in small quantities with meals, and which
- makes your tastebuds dance even if you have very little of it . :)

The name itself tells you about the two main ingredients : Methi (fenugreek seeds) + Amba (mango). The rest of them are listed below and also featured in the picture.

Recipe for Methamba

Makes about a cup.

Clockwise from right: whole mango, chopped mango, chopped jaggery, red chilli powder, asafoetida powder, turmeric powder, mustard seeds, fenugreek seeds


Ingredients:

½ cup pieces of raw mango (The mango can be in any stage of ripeness. I have used a quite-ripe-but-still-rather-sour one.)
¼ heaped cup chopped jaggery (The quantity will depend upon the sourness of the mango.)
1 tsp chilli powder (I know it’s a lot, but the relish is meant to have a sharp contrast of sweet and savoury.)
¼ cup water
salt to taste

2 tsp oil
¼ tsp mustard seeds
¼ tsp asafoetida powder
½ tsp fenugreek seeds, coarsely ground

Method:

1. Heat the oil in a heavy-bottomed pan. Once the oil is hot, add mustard seeds and let them splutter.

2. Add asafoetida powder. Add ground fenugreek seeds and wait until they give out their aroma.

3. Add mango pieces. Stir them well, so that they get coated with the seasoning.

4. Add chilli powder and stir again.

5. Add water and cover the pan partly. Let the mango pieces cook in the steam.

6. Now add the jaggery. As mentioned earlier, the preparation IS supposed to have a pronounced sweet taste, so don't worry as to whether you have put too much. Add salt too.

7. Let it simmer for about 8 minutes. The preparation needs to become semi-solid. Once it reaches that consistency, take it off the heat.

8. Let it cool uncovered. Then take it out into a serving bowl.

It keeps fresh outside the fridge for about three days. If stored well-covered in the refrigerator, it should stay fresh for at least a week (which doesn't happen, because it vanishes much before that :).

Methamba

Serve it with any meal. It goes well with parathas, theplas and ragi dosa too.