Tuesday, December 19, 2006

The Unbeatable Root # 1 : Beetroot Tomato Cucumber Raita

IMG_0158

A lifebuoy in a boat? :)

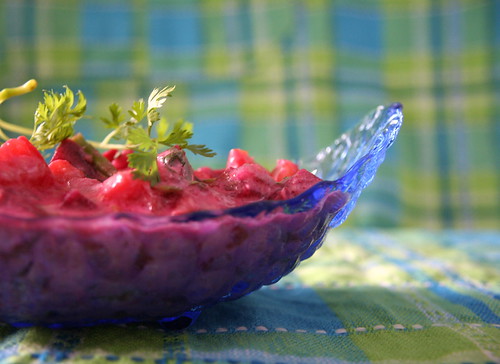
One big misconception that got cleared in mind about two years back is that beetroot contains lots of iron. Just like almost everybody else around me, I too used to think beetroot would be a great weapon against Anaemia. But nope, it isn't. It has lots of goodness in it, but no iron.
Like it has Folate in it. A nutrient that is of utmost importance just before and after conception. And a lot of fiber, which is of great importance throughout one's life.

The recipe that I have got for you today includes two more virtuous vegetables - cucumber and tomato. Healthy? No doubt. My own recipe idea? No d...... No. :) The original recipe is by Tarla Dalal. But it's a great one, I tell you. Have a look.


IMG_0155


Recipe for Beetroot Tomato Cucumber Raita

Serves 4.

Ingredients:

1 cup fresh yogurt, beaten
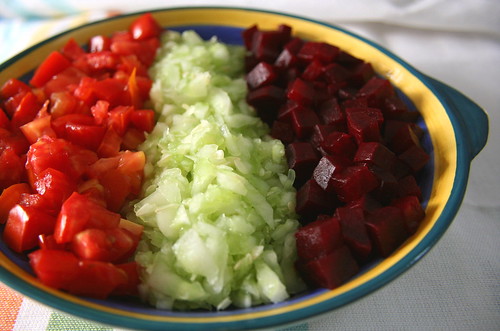
1 beetroot, boiled and cut into cubes
1 cucumber, chopped
1 large tomato, chopped
2 tbsp roasted, skinned, coarsely crused peanuts
1 green chilli, chopped
2 tbsp grated fresh or dessicated coconut (optional; I use seldom.)
1 tsp sugar
salt to taste

1 tbsp oil
1 tsp cumin seeds
a pinch asafoetida

coriander leaves for garnishing

Method:

1. Mix all ingredients in the first list (upto salt).
2. Heat oil in a Tadka ladle. Take the ladle off the heat and add cumin seeds. Once they splutter, add the asafoetida.
3. Let the Tadka cool a little, then add it to the Raita and mix it well.

Serve with Parathas for brunch or as an accompaniment to any meal.

By the way, this dish has had a 100% success rate at my place so far. None of the times that I have made it when entertaining guests, have I had to put any leftovers back into the fridge. (I make it so complicated!! I could have just said that the bowl is polished off clean. Any idea where you can take Creative Writing classes, Guys?)

Thursday, December 14, 2006

Indian Winter # 1 : Garlic Greens Chutney

IMG_0202

Garlic Greens Chutney decorated with a garlic greens braid

Although garlic is available (in almost the whole world?) all year around, the green chive-like shoots on garlic are to be seen in the markets here in Pune only during winter which is from November to January. When you spot these and some more veggies in the markets, you know it is winter.

Growing garlic greens is rather easy, I have heard. I have also been planning to do it for some time now. But I guess, I don't have a green thumb like Inji Pennu. I don't know whether it's the lack of dedication or interest or just the lack of enough water(?), but my plants often die prematurely. :( Shammi, maybe you relate to me?
Well, anyway, the point is that I cook with garlic greens only when they are available in the market, which they are right now. Lots of them. Among other things, what I also made with them is this chutney. Let me add that this one is entirely my creation. I mean, ok, it's just a simple recipe and no diagram for making rockets, but heck, it's mine!!!

By the way, in case you want to grow garlic greens at home, Martha Stewart has got some help to offer.


IMG_0198

(Left to right) Garlic greens with fresh cloves at one end and roasted, skinned peanuts

Recipe for Garlic Greens Chutney

Makes 1 cup.

Ingredients:

7-8 stalks of garlic greens
½ cup roasted, skinned peanuts
½ cup beaten yogurt
1 large chilli
1 tsp chopped ginger or ginger paste
a pinch sugar
salt to taste

1 tsp oil
½ tsp cumin seeds

coriander leaves for garnishing (or a braid made with three green garlic stalks)

Method:

1. Wash the garlic greens. Remove the roots at the end and discoloured stalks, if any.
2. Mix all ingredients in the first list (i.e. upto salt) in a grinder and grind until you have a smooth paste. Take this paste out into a serving bowl.
3. Heat the oil in a Tadka ladle. Once hot, add the cumin seeds to it and take the ladle off heat. The cumin seeds will pop in the hot oil. Let the oil cool a little.
4. Add the Tadka to the garlic greens-peanut paste. Either mix and serve OR leave the Tadka on top; it makes for an interesting garnish.

Serve this chutney as an accompaniment with any meal. In case you don't mind having garlic for breakfast, you could serve it with Idlis or Dosas too.

Notes:

1. In case you do not have access to garlic greens, you could use regular garlic too. The chutney will still taste good. However, if you can make garlic greens available for yourself, then I'd highly recommend it, because the greens lend a unique depth of flavour to the chutney.

2. If you have much more garlic greens on hand than what this chutney requires, try using them in place of regular garlic in any dish. You won't regret, I guarantee.
I would like to send this first post in my series 'Indian Winter' to Kalyn for her Weekend Herb Blogging. I know, it's gonna be a 'Holiday Special' edition this time around, but then we don't have holidays here in India. :(

Wednesday, December 13, 2006

Announcing two new series...

In addition to the already running 'Ton of Protein' series, I would like to announce two more. They are

1. Indian Winter : Indian 'Winter' ? 'What's that?', you might wonder. We know Indian Summer, but winter...does it even exist? Well, yes. Although it isn't as *wintery* as the winters outside the tropics, it sure does exist. This month, we have already had a minimum temperature of 10.1°C here in Pune. Now you are convinced, aren't you? :)
So, what will this series have? Basically, I will blog about vegetables and preparations that are typical to winter here. How the series develops in the course of time will have to be seen.

2. The Unbeatable Root : I plan to paint the town red with this one. :)
Leaving wordplay aside (Did I hear you say 'Thank God!'?), this series will feature recipes with the Beetroot.

Hope you like them both.

Wednesday, December 06, 2006

Jihva for Jaggery : Carrot Jaggery Parathas

IMG_0193

Carrot Jaggery Parathas served with Ghee

Jaggery was introduced to me when I was a toddler, as is the case with many children in Maharashtra/India. ‘Gool Toop Poli’ (jaggery, Ghee and chapati) is a staple for toddlers and young children. And why should it not be, considering that it is nutritious as well as quick to put together. Moreover, children always eat with more gusto, if the food is sweet. Well, at least I used to and so does my daughter. :)

Coming to these Parathas, I had found the recipe more than two years back in the supplement of a Marathi daily. I had cut it out then, but never really managed to try it out. When Kay asked us all Food-Bloggers to "try a recipe with jaggery that we've never tried before", I knew I had to grab that envelope,which carries all the recipe cuttings I have made from various sources. The original author has called this preparation 'Thalipeeth', which in my opinion is not the right word. Also, I have reduced the quantity of jaggery in it by half, because the Parathas would have become too sweet otherwise. The rest of the recipe is like this.

Recipe for Carrot Jaggery Parathas

Makes approx. 8 Parathas of 12 cms. diameter

Ingredients:

250 g. OR 3 medium carrots (approx. 2 cups when grated)
125 g. jaggery (approx. 1½ cups when grated)
1¼ cups wheat flour (Please refer to Step 6 for the quantity.)
some more wheat flour OR rice flour OR oil to roll the Parathas
a generous pinch of salt (or to taste)
6-7 tbsp oil

Ghee to serve the Parathas with

Method:

1. Wash, peel and grate the carrots. Grate the jaggery separately.
2. Heat 1 tsp oil in a pan and add the grated carrots to it. Stir the carrot gratings and cover the pan. Let cook for 2-3 minutes on medium-high heat.
3. Uncover the pan and add the jaggery to it. Stir to mix well.
4. Take the pan off heat as soon as all the jaggery has melted. Let the mixture cool completely.
5. Take the cooled mixture into a large, shallow dish or a mixing bowl and add salt to it.
6. Now add the wheat flour a little at a time and knead as you go. Add as much wheat flour as the carrot-jaggery mixture allows you to.
7. Knead well to make a dough similar to that of chapati. Add 2 tsp oil to it towards the end.
8. Divide this dough into 8 portions. Dust a rolling board with wheat or rice flour OR oil it. (I oiled the board and the rolling pin.)
9. Roll one portion of the dough to form a circle with a thickness of about ½ centimetre.
10. Roast this circle on both sides on a hot griddle or Tava until tiny, brown spots appear. Sprinkle a little oil on it, if you want the Parathas to become softer.
11. Make more Parathas like this with the rest of the dough.

Serve them warm or at room temperature with Ghee. They taste better after a few hours of making them.

Since these Parathas have no water in them, they keep well for several days. Although I must say that they do not last more than one day, because they are so tasty. :)

They are not only tasty, but highly nourishing too. Carrots provide the much needed carotene and jaggery brings along loads of iron. Wheat flour gives carbohydrates and the oil makes the absorption of some of the nutrients easier. Ghee stops the jaggery from increasing the body's heat and also gives Omega 3 fatty acids.

I think they are great for growing children. Maybe Kay wants to keep this recipe for later? For when Meera grows up and comes home from school tired and hungry? :)