Wednesday, August 30, 2006

Dum Bhindi (Okra marinated in Yogurt)

IMG_0017

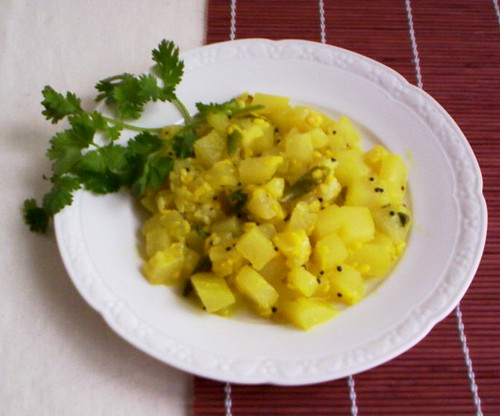
Do you like this picture? Do you find it different? Yes?
Do you know why? No?
Fine, then let me tell you. -tries to hide the extreme gleam, but fails- It...is...because...I...have...a...NEW CAMERA!!!!!! Yay!!!! It's a birthday present from Hubby Dear. Well, I asked for it, but it still is a present. :) :) I am sooooo excited. It is all that I wanted in a camera. The one I used so far did not really do justice to my extraordinarily artistic(!) ideas, you know. ;-) But hey, I still love my old Kodak buddy. It was there for me throughout my 'teething' days. :)

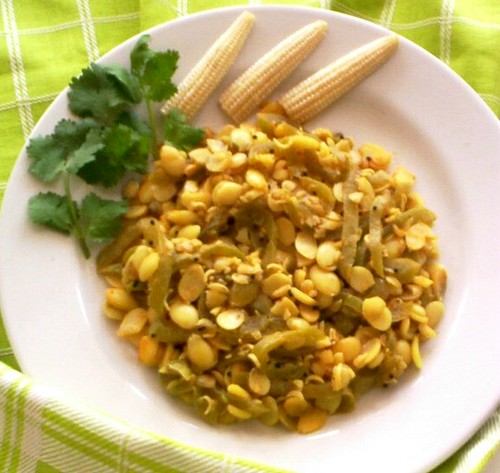
Anyway, coming back to today's dish, the recipe for which I found here. I came across it while looking for different recipes for Bhindi/Okra/Lady's Fingers, because that is one of the few vegetables, which are always fresh and available at my favourite SriLankan shop. Which means that I cook okra at least once a week, if not twice. However, cooking the same vegetable always in the same way is boring for me. Not enough excitement in the kitchen, you see.

Well, then how is this dish? First of all, it is 'Satvik', meaning (amongst other things,) it has no onion or garlic, which makes it perfect for all the religious feasts that we are gonna have until Diwali. Also, the combination of spices used in it makes it very special. The texture of cooked okra in it is not exactly crispy, as many like it to be. It is slightly chewy, but not rubbery. What would attract the people at home (and maybe the neighbours too!) to the kitchen is the aroma of it while it cooks. Sniff sniff...ummmmmmm..... :)

IMG_0012

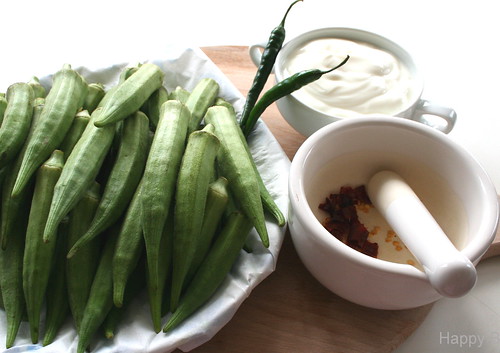
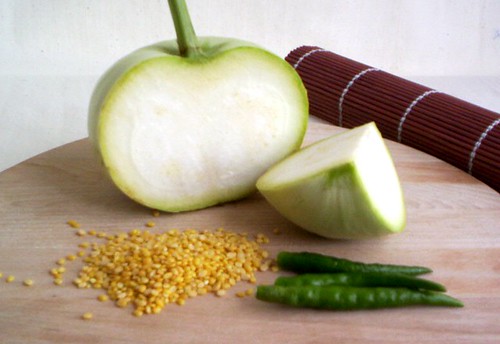
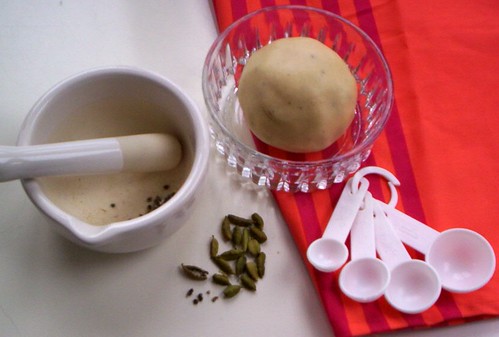
Clockwise from left: Fresh okra, green chillis, yogurt, red chillis being pounded

Recipe for Dum Bhindi

Serves 4-5.

Ingredients:

500 g. Bhindi/Okra/Lady's Fingers
1 cup yogurt
1 tsp Garam Masala (I used store-bought Sabji Masala instead.)
+ some more Garam Masala (I did not substitute this.)
2 red chillis, pounded
2 green chilies, chopped
4 tsp ghee (I used 1 tbsp Ghee and a non-stick pan.)
+ some more Ghee ( a few drops)
4 tsp ginger paste ( I used julienned ginger.1)
¼ tsp turmeric powder
salt to taste

Method:

1. Using a mixer, blend together yogurt, Garam Masala (or Sabji Masala), salt, pounded red chilis and one chopped green chilli. Take it out into a largish pot, which will also accomodate the Bhindi.
2. Wash,wipe, top and tail the Bhindi. Cut it in 1 inch long pieces and make slits in it, making sure that it does not get cut in half.
3. Soak it in the yogurt mixture and let it marinate for about half an hour. Like so.

IMG_0014

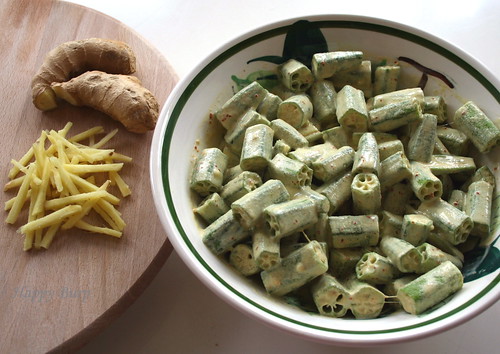
Clockwise from bottom left: Ginger juliennes, whole ginger,
okra marinating in yogurt-spice blend

4. Heat the Ghee in a pan. Add the ginger paste (or juliennes), the other green chilli, turmeric powder and fry it for about a minute.
5. Now add the Bhindi with the marinade, stir, and cook uncovered for 10 minutes.
6. Sprinkle some Ghee and a little Garam Masala on top of the Bhindi. Cover the pan with a lid. Steam-cook on a low heat for 5 minutes.
7. Remove the lid and cook till almost dry. This may take around 15 minutes.

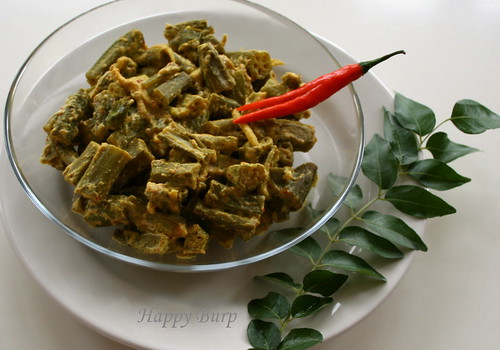
Serve hot with chapatis or Missi Roti or with rice and Dal.

Note:
1. I julienned the ginger or cut it into matchsticks instead of paste, because the paste while frying causes *oil sprays*, leaving the cooking herd, counter-top and your hands very oily. On the other hand, the matchsticks fry rather *peacefully*. Also, they are a pleasure to bite into. :)

This would be my second entry to this month's JFI hosted by Vineela. There could be a third one, if Vineela is ready to accept it late. I have made and photographed the dish, but cannot publish it until Tuesday next week, because I am off on a short holiday. Ciao ciao! (By the way, that's a clue. ;-) ;-))

Monday, August 28, 2006

Make Khawa / Khoya / Mawa at home!

Vineela has chosen Milk as this month's theme for Jihva for Ingredients. Not just milk, but all milk products too. That makes it simple, right? Wrong! That gives you so much choice, that you take about a month to decide what your entry for this event will be. That again has a few hurdles. For example, the main ingredient. You realise that you have always *bought* the main ingredient that goes into the dish, that you fancy making for the D-Day.

Well, now the 'you' in the above story is 'me'. (Oh, stop it, Vaish. We're sick of your non-existent humour.) - ignores and continues - And the ingredient in question is 'Khawa or Khoya or Mawa', which are milk solids obtained by evaporating milk. Which is usually done by the neighbourhood Mithai vendor. Nobody makes it at home, at least in the circles that I know. Unless you are living in Germany...

So, that's what I did. I made Khoya at home. Using an uncomplicated, quick method, that I found here.

Recipe for Khawa/Khoya/Mawa

Makes 1 cup.

Ingredients:

1 cup milk powder (I used the variety with 3.5% fat.)
approx. ¼ cup water
a few drops of ghee

Also:

a pressure cooker / steamer &
a metal vessel that fits into it
a piece of cotton cloth (May I suggest an old handkerchief of your husband? ;-))

Method:

1. Take the milk powder into a shallow bowl/dish for kneading. Add a little water.
2. Start kneading, and add water as you go. We want to knead it into a soft dough as that for chapatis.
3. Finish kneading with a few drops of ghee on your fingers. Shape it into a ball. Like so.

100_6833

Khoya khoya chand...? :)

4. Place this ball in the piece of cloth. Tie the cloth in a bundle. Place this bundle into the metal vessel.
5. Place this vessel into the pressure cooker / steamer and steam for 10 minutes. (Like idlis; without the weight/whistle.)
6. Take the vessel out and let it cool for about five minutes. Untie the bundle.
Khoya is ready for you.


100_6835

Khoya is well-made, if there are lots of tiny holes inside, like a sponge

Before you use this Khoya in any preparation, a few
Notes:

1. First off, let's not forget that this is just a substiute and not the real thing. You can use this homemade Khoya in almost all preparations that ask for this milk product. However, the dish will not have exactly the same texture and taste that it would, had the real Khoya been used.
2. It retains some of the milk powder smell, much of which goes away once cooked (like when cooked with carrots to make Gajar Halwa).
3. One biggest advantage of it is, that it has much less fat compared to the real McCoy. Sounds nice, no? :)

I am sending this post as an early entry to Vineela for this month's JFI. I posted it early coz I thought it might help those who want to make something with Khoya, but have no access to a Mithai vendor.

Tags: , ,

Friday, August 25, 2006

Barfi with Mascarpone Cheese & Sunflower Seeds

100_6844

In the plate: Sinful Barfi &
Fuits of Physalis for those, who do not want to indulge :)

When Katherine of Toast Point announced 'Improved Indian Dessert' as the theme for this month's FMR, I knew that I wanted to make this Barfi. I came across this recipe at the German Maggi website way back in April, and was looking for a good opportunity to try it out since then. I actually even thought of adding mango pulp to it for the first JFI event. Somehow I never came around to doing it. Now when I come to think of it, it seems to be a recipe tailor-made only for this event, because
a) the concept of this dessert (Barfi) is Indian,
b) although it is prepared with a non-traditional technique as well as non-traditional ingredients.
c) I am sure it will appeal to the western palate, or at least the German palate, because the main spice in it is cinnamon, which Germans like
d) and it has seeds & nuts, which Germans just looooooove.

I don't think, I could have come up with a more fitting entry for this event. (Ok, ok, we get the point.) I must make it clear, though, that I have used the original recipe almost unchanged. Only that I have translated it in English here, and also that I converted the measurements from 'weight' to 'cups'. It is common for every German household to have kitchen weighing scales, and hence most of the recipes on German websites and in German books are in grams. It can be rather irritating in the beginning, but the best way to tackle the issue is to buy kitchen scales. :)

Anyway, without further blah blah, let me give you the recipe for

Barfi with Mascarpone Cheese & Sunflower Seeds. (I wish I could write 'Improved' in a yellow oval with serrated edges here. The way they do on shampoo bottles, for example. :))

Makes at least 20 pieces of 0.5 cms thickness, measuring 4.5 cms x 3.5 cms

Ingredients:

250 g. Mascarpone cheese
1 cup sunflower seeds
2 tbsp unsalted, shelled pistachios
4 tbsp soft brown sugar (White sugar should be fine too.)
13 cloves
Seeds from 20 cardamom pods
1 tsp cinnamon powder (I used store-bought.)

Some butter to grease the dish

100_6829

Top row (Blue bowls) L to R: pistachios, soft brown sugar, sunflower seeds
In the plate (Clockwise from top): cinnamon sticks, cloves, cardamom
Below: Mascarpone Cheese

Method:

1. Grind the cardamom and cloves along with some of the sugar to a fine powder. Coarsely chop the pistachios.
2. Grease a shallow (preferably rectuangular) ceramic/glass dish. (The picture below might give you an idea.) Keep it aside.
3. Toast the sunflower seeds in a heavy-bottomed pan. (I used non-stick.) Once a few of them get light brown spots, add the Mascarpone cheese. Keep the heat low.
4. Add the sugar and ground spices. Stir the mixture every now and then.
5. The mixture is ready, when it moves as one mass as you try to stir it. It takes about 5 minutes to come to this stage.
6. Now pour this mixture into the prepared ceramic/glass dish. Sprinkle the chopped pistachios on it. Press the surface flat with the back of a bowl.

100_6832

Mascarpone Barfi almost ready
Needs to be pressed flat and refrigerated yet

7. Let it cool to room temperature. Then cover the dish with aluminium foil/cling film and refrigerate to set for about two hours.

After two hours, the Barfi will be set and ready to be relished. Cut it into square or any desired shapes. Serve them cool or at room temperature as dessert. I think, this Barfi should also make an interesting base for vanilla ice-cream. The way they sell ice-cream with chocolate/date fudge at restaurants in India. (Haven't seen it here in Europe.)

By the way, that reminds me of something. If you have ever been to Lonavala, the hill-station between Pune and Mumbai, and if you have eaten the fudges and chikkis there, it will help you imagine the taste and texture of this dessert. It is somewhere between the two.
80% fudge + 20% chikki = 100% satisfaction. Hehehehe....

Before we part, I'd like to pen down (but wait, I thought I was typing!) a few notes, which will also help me in future.

Notes:
1. Using sunflower seeds in a dessert was new to me. Quite exciting too. Also, I wanted to keep that 'should please the western palate' aspect in mind. However, if I am preparing this Barfi for a pucca Indian crowd next time, I'd use chopped cashews, almonds or mixed nuts instead of the seeds.
2. Also, I'd reduce the quantity of cinnamon by half and increase that of the cardamom by double.

Let me rush a mail to Katherine now...before my heavy eyelids stop me from writing any further. Bye. (Yaaaawwwn...)

Tags: , , , ,

Wednesday, August 23, 2006

Bottle Gourd Curry with Moong Dal & Yogurt

100_6802

The curry is not as yellow as it looks in the photograph.
I think, I went overboard while trying to adjust the contrast. :)

I learnt this recipe from my mother. Also, I have only seen her making this preparation and nobody else. (Although I am sure that somebody in some corner of this world must be making it too. :))
Anyway, when she gave me the recipe, she just mentioned in passing that it is based on a Kerala recipe, although she did not mention which one. (As I have mentioned before, she has studied Home Science, in which the students get to learn a lot of cuisines. Hence the connection.)
Before I started blogging, my knowledge of the cuisine of Kerala was limited to 'Avial'. And I knew that this dish could not have been based on that. So I just left it at that.

Then, a few days back, when Indira blogged about 'Kaalan', a bottle gourd and yogurt preparation from Kerala, I was sure it was the mother of this preparation by my mother. :)
As you can see in the next pic, I made this curry with the beautifully round bottle gourd, which was in the guessing game yesterday. Here's how I prepared it.

Recipe for Bottle Gourd Curry with Moong Dal & Yogurt

Serves 4.

Ingredients:

approx. 500 g. bottle gourd/Doodhi/Lauki (3 packed cups, when diced)
1 tbsp Moong Dal, washed and soaked in about ¼ cup water for ½ hour
4-5 tbsp yogurt, beaten smooth
3-4 green chillis
salt to taste

1 tbsp oil
½ tsp mustard seeds
1/8 tsp turmeric powder
a pinch asafoetida powder

chopped coriander leaves for garnishing

100_6797

Clockwise from top: Bottle gourd, green chillis, Moong Dal


Method:

1. Wash and peel the bottle gourd. (You need not throw away the peels. This chutney can be made using them.)
2. Dice the peeled bottle gourd. Cut the green chillis in ½ inch long pieces.
3. Heat the oil in a pan, and add mustard seeds once it is hot. Once they splutter, add the asafoetida powder.
4. Add the Moong Dal along with the water and quickly cover the pan with a lid. The water tends to jump high at this point, and may burn your fingers.
5. After about two minutes, open the lid, and add turmeric powder and bottle gourd dices to the pan. Stir and add ½ cup of water.
6. Cover and cook the bottle gourd on medium-high heat for about ten minutes.
7. Once the bottle gourd is cooked, add salt, yogurt and green chilli pieces.
8. Cook uncovered for 2-3 minutes, while stirring often, so that the yogurt does not separate too much.

Garnish with chopped coriander leaves and serve warm with phulkas/chapatis or rice & dal.

Tags: , , ,

Tuesday, August 22, 2006

Can you guess it? Bottle gourd / Doodhi / Lauki

100_6796

You know this vegetable. Only that the shape of this one is unusual. Can you guess the name? I'll go have my glass of milk in the meanwhile. ;-)

-------------------------------------------------------

It is bottle gourd, Folks. In a different shape and size. 'Milk' was a clue (Doodhi), although a pretty lousy one. But I tried (!) .....
Thank you all for coming up with interesting guesses, no matter right or wrong. :)

Blog Patrol # 4

The Blog Patrol team has been busy again. Busy checking out recipes by food-bloggers, and then busy trying them out. Here's the report. :) Alphabetically presented.

1. Butternnut squash Subzi/ Kaddu ki Curry by Krithika of Manpasand: Krithika presented this recipe as a part of an informal event: Nigella Awesome. And this dish too was simply awesome. I had never eaten pumpkin/butternut squash paired with Kalonji/nigella seeds before, but I now know that I am gonna make it often. Apart from the earthy aroma of nigella seeds, what makes this curry special is the addition of Amchoor/dried mango powder. Try it out. You won't regret.

2. Eggless maple syrup-pecan cake by Shammi of Food, in the Main...: I took this one along to a typically German 'Kaffee und Kuchen' party with my Italian friends. They loved it. I loved it too. They were surprised to hear that it had no eggs. (They also found it difficult to understand why somebody would * want * to bake a cake without eggs. I didn't try to explain it to them. They don't understand vegetarianism. Never mind. :))
What is important here, is that it is a great cake, and I highly recommend it.

3. Honey Banana Muffins by Nandita of Saffron Trail: I made these muffins almost immediately after Nandita did her post on them. I found the combination interesting, and the fact that there are no eggs in it encouraged me even more. (It's not that I don't eat eggs, but I somehow fancy baking without them. Maybe because they were never a part of my growing-up?)
As for the muffins, they were easy to prepare and were ready to be taken out of the oven in 15 minutes. Ideal as a surprise evening treat for a tired-after-work husband. :) Even better, if the husband makes them as a surprise treat for a tired you!

4. Italian Vegetable Soup with Gnocchi by Meeta of What's For Lunch Honey?: This one too I made almost immediately after Meeta blogged about it. Only that I didn't include it in one of my previous editions of 'Blog Patrol', because every one of them already has at least one dish blogged by Meeta. :) To be honest, whenever I want to cook something non-Indian, I open Meeta's blog. Each and every vegetarian dish of hers that I have tried, has been a success. Especially the Italian ones...mmmmmmm.
As for this dish, Meeta gives us the option of combining various vegetables. The last time I made it, I used one small zucchini, 1 medium carrot, 1 medium red onion and 1 small yellow pepper. Also, I used readymade stock cubes. (Although Meeta graciously asks to refer to a post by me for the recipe of vegtable stock! See the irony of things? :))

5. Tomato Rice by Saffron Hut: A wonderfully aromatic preparation. It smells so delicious while it is cooking, that you don't even have to call your family to the table; you find them waiting there already! :) And it is ready within minutes. Great for those weekend dinners, when you are too tired after a day's shopping. ;-)
By the way, I used 'imported' from India readymade Biryani Masala instead of the Garam Masala suggested by SH. (I wish we knew her name. Calling somebody a 'hut' is just too much.)
Anyway, name or no name, this recipe is a keeper.

Saturday, August 19, 2006

A Ton Of Protein # 9 - Padval Dalimbya (Snake gourd with Hyacinth beans)

100_6688

Left to right:
Dried Indian/Hyacinth/Lablab Beans (Val) & Snake Gourd (Padval)


This preparation is a combination of two rather uncommon ingredients. What I mean by 'uncommon' is that I have seen them, especially the dried Val/Hyacinth/Lablab beans, being cooked only in a few Indian households. More specifically, in families from some regions - particularly the coastal reagions - of Maharashtra and Gujarat. In Karnataka, like at my in-laws' place, they prefer the fresh, shelled Hyacinth beans (called Avrekai). Check out this post by Lavannya for a photograph as well as a recipe with them in it. Our resident gardener, LG aka Inji Pennu grows these beans (like pretty much everything!) in her garden. Here is where you can find out what the flowers and the fresh beans look like.

As for snake gourd, I know, that it is quite common in South India. Many of our fellow bloggers from the southern states of India have blogged about it. However, I am yet to come across a recipe from North India with snake gourd. Please let me know, if you know about any. If you want to see the pretty flower which later turns into a not-exactly-pretty snake gourd, check out this post by LG.

In my opinion, it is the unusual appearance and/or the slightly unpleasant smell that makes people cringe their noses at the mention of Padval or snake gourd. However, I have seen that those very people are happy to eat it when paired with soaked, skinned Val beans or Dalimbya, as we call them in Maharashtra. By the way, one could also use gherkins (Tondli in Marathi) instead of snake gourd in this recipe, which goes like this.

Recipe for Padval Dalimbya

Serves 4-5.

Ingredients:

1 cup/approx. 200 grams dried Val beans (about 2 cups, when soaked & skinned)
approx. 200 grams snake gourd (packed two cups, when diced/sliced)

1/2 tbsp jaggery
1/2 tsp chilli powder
salt to taste
approx. 3/4 cup of water

1 tbsp oil
1/2 tsp mustard seeds
1/8 tsp asafoetida powder
1/8 tsp turmeric powder

chopped coriander leaves or shredded coconut for garnishing

Method:

1. Soak the dried Val beans in water for at least five hours or preferably overnight. Skin them on the following day. If they are well-soaked, it is quite easy to skin them. You have to hold one bean and press it with your fingers. The bean inside the skin just pops out. (It's a lot of fun to do that, actually. Perfect activity for when watching a movie on TV! :))
2. Cut the snake gourd vertically in half. Scoop out the seeds, if there are any. Now cut the halves diagonally in slices. Like in the next picture. (Alternatively, just dice the snake gourd after scooping out the seeds. I slice it like this only because I like it. :))

100_6692

Left to right: soaked & skinned Val beans, sliced snake gourd

3. Heat oil in a pan. Once it is hot, add the mustard seeds. Once they splutter, add the asafoetida powder.
4. Now add the skinned Val beans, turmeric powder and ¼ cup water.
5. Stir once, cover and cook on medium-high heat for 5-6 minutes.
6. Then add the diced/sliced snake gourd, salt and another ¼ cup of water.
7. Cover and cook for about 10 minutes on medium-high heat.
8. Once both - the beans as well as the gourd - are cooked well, add the rest of the ingredients and some more water (if necessary).
9. Turn the heat off after about two minutes.

Garnish with coriander or coconut, and serve warm with chapatis or with rice & dal.

100_6814

Padval Dalimbya garnished with coriander leaves and baby corn

Note:

The trickiest part in making this dish is cooking the beans and the gourd without overcooking them. Because once overcooked, both tend to fall apart * badly *, and the dish ends up as one 'un-pretty' mush. I, after having cooked it umpteen times, still manage to make a mess of it. Yesterday, when I got it right (after many days!), I knew I had to blog about it. :)

I would like to send this post to Kalyn as my entry for her Weekend Herb Blogging. Since Anthony of Anthony's Bachelor Cooking is the host this weekend, I am off to him. Sayonara!

Tags: , , ,

Friday, August 18, 2006

I am touched.

A big 'Thank you' to all of you for having wished me a happy birthday. It's your wishes, which made it a happy day for me. :)

And Anupama, I owe you...

Tuesday, August 15, 2006

Bottle Gourd Peels Chutney

100_6744

Idlis & Bottle Gourd Peels Chutney

One of the themes doing the rounds of food-blogosphere these days is 'Chutneys'. One of the main ingredients of it being peels of vegetables. I have blogged about one such chutney already. Here's another one. But it's not just another chutney, you know. It is not just eco-friendly but also very very tasty. Because it is made with peels of bottle gourd (Doodhi/Lauki).

100_6488

Bottle gourd being peeled

And now that I am back from my trip to the Black Forest (with a postcard for the next BPW event by Meeta ;-)) , I can also share the recipe for this chutney. Here it is.

Recipe for Bottle Gourd Peels Chutney

Ingredients:

Peels of one biggish bottle gourd (I took 1½ cups.)
¼ cup dry-roasted sesame or ¼ cup roasted and peeled peanuts
or ¼ cup roasted Chana Dal (Dariya in Gujarati/Pandharpuri Daale in Marathi)
or a combination of any of these making ¼ cup
(I used 1/8 cup dry-roasted sesame + 1/8 cup roasted & peeled peanuts.)
¼ cup yogurt
2 green chillis (or to taste)
¼ cup chopped coriander leaves
1 tbsp sugar (or to taste, depending upon the heat from the chillis)
salt to taste

1 tbsp oil
½ tsp mustard seeds
½ tsp cumin seeds
heaped ¼ tsp asafoetida powder

100_6729

From left to right: chopped bottle gourd peels, roasted & peeled peanuts, coriander leaves, sesame seeds

Method:

1. Chop the bottle gourd peels and green chillis.
2. Heat the oil in a pan. When hot, add mustard seeds. Once they start popping, add the cumin seeds, and then the asafoetida powder.
3. Add the chopped bottle gourd peels and green chillis. Stir. Sprinkle some water, cover the pan and let them steam-cook. (I usually use a non-stick pan for this, so I do not really need much water. However, if you are using a regular pan, you might need to add about ¼ cup of water, and also keep a close eye.)
4. Once the peels are soft (They fall apart easily when pressed with a ladle.), add sugar, salt and chopped coriander leaves. Sauté until most of the water has evaporated. Turn the heat off, and let it cool.
5. Once it is cool, add it along with the roasted sesame seeds or peanuts or the combination you are using and the yogurt to the jar of your mixie or food processor. Grind it till you get a fairly smooth paste. The chutney is ready!

Serve it with anything of your choice like Idlis, Dosas, spicy parathas or just with any regular meal. This mild-tasting chutney goes well with a lot of things. I served it this time for breakfast, with Idlis...so that I can send it to Nandita for her next 'Weekend Breakfast Blogging' event. :)

100_6743

In case you are in a mood to try out more chutney varieties, you could check out these lovely recipes recently blogged by Madhu of Ruchi, Mythili of Vindu, Priya of Sugar And Spice and Shammi of Food, in the main...

In the meanwhile, here's wishing all of you a Happy Independence Day!

Tags: , , , ,

Wednesday, August 09, 2006

Spiced Chick Peas & Vegetables for Couscous

100_6624

Clockwise from left: cooked chick peas, spring onions, zucchini, red onions, carrots, garlic, store-bought vegetable stock cube

I wrote about a Couscous Paella more than two months back. In my post, I wrote that the Couscous preparation in itself was not tasty enough, so I served the leftovers with a spicy preparation. I also promised then that I'd blog about 'that' preparation soon. I think, I forgot to mention that for me 'soon' can mean anything between two days and two months. :)

Anyway, here's the recipe for that spicy preparation. It is based on one from this German cookbook. Before I start: I have used the vegetables that you can see in the picture above. However, you can use many others in addition to or instead of these. eg. green cabbage, leeks, celery (stems as well as roots), broccoli. I used the ones that I did because I did not want to repeat the vegetables used for Couscous Paella. (Although I ended up repeating carrots. But then, some extra carotene would do no harm, would it? :))

Recipe for Spiced Chick Peas & Vegetables for Couscous

Serves 4. (As an accompaniment to Couscous or rice)

Ingredients:

1 can cooked chick peas (drained weight 240 g.)
2 large zucchini, diced
2 carrots, diced
1 large onion, diced
1 cup sliced spring onion (white as well as green parts)
1 tsp concentrated tomato paste or 1 small tomato, chopped

1 vegetable stock cube
1-2 cloves of garlic, grated
salt & pepper to taste

2 tsp olive oil
½ tsp cumin seeds

Method:

1. Prepare vegetable stock using the cube and according to the instructions on the package.
2. Heat oil in a pan. Sauté the diced onion in it for about two minutes.
3. Add all vegetables apart from tomato pieces/paste. Sauté them for about 5 minutes. Then add tomato pieces/paste.
4. After a few seconds, add the prepared vegetable stock. Bring the mixture to a boil.
5. Add cumin seeds, grated garlic, salt and pepper.
6. Reduce heat, cover the pan and let the vegetables cook for about 10 minutes.

100_6627

Veggie goodness in a pot :)

7. When the vegetables are almost cooked, drain the cooked chick peas from the can and add to the vegetables.
8. Taste and adjust the seasoning before turning the heat off.

Serve steaming hot with warm Couscous Paella or with plain cooked Couscous. Goes well with cooked rice too.

100_6630

Couscous Paella and Spiced Chick Peas & Veggies garnished with orange bell pepper fans

With so many vegetables in it, I am sure, 'sweet' Cate will accept this post as my entry to her ARF/5-a-day Tuesday.


Tags: , , , , ,

Monday, August 07, 2006

My first blogger postcard is here!

I received my first Blogger Postcard! I am so thrilled!!

Thanks, Payal, for the sweet note on the card. And thanks, Meeta, for coming up with this brilliant idea. (Btw, if you want to see what lovely Payal looks like, click here. ;-) )

Now I'm waiting for my postcard to reach the recipient. It's gonna take time, I know. It has a long way to travel after all. All the way to A.... oops, I am not supposed to tell yet. ;-)

Friday, August 04, 2006

Narayan Kataar - My MIL's version of Nan Khatai

100_6779

Nan Khatai isn't what I was planning to make for JFI # 4 : Flour. Because I wasn't planning to make them at all. Because my mother-in-law makes them, and was supposed to bring a big batch for us from India. And she almost did. I mean, she did spend the time and energy to make these biscuits. Only that they never reached us. Why? (Now I've got you curious and all! :))
Because my mother-in-law's checked-in baggage got lost. Blame it on Air India, their baggage handlers or destiny. What remains is that my MIL's bag got lost with all the belongings in it. And most importantly, all the goodies in it. :( We were so looking forward to digging our teeth into those homemade laddoos, biscuits and other snacks. *Sigh*
Never mind. Life is not just about good food. (Or...maybe...er...it is?...um?...?...?)

Well, anyway. To make up for the loss (Read: Unable to push the idea of having these scrumptious biscuits out of my head), I decided to make Nan Khatai with my MIL's recipe and under her supervision for the first time. And they turned out well, although not as good and aromatic as the ones made by her, because she always uses homemade ghee and I used the store-bought variety. Otherwise, they were pucca home stuff and extremely delicious. And also very easy to make. Fattening? Well...yes...but not until you swallow them! ;-)

Recipe for Narayan Kataar

Makes 16 biscuits (of 4 cm. diameter)

Ingredients:

1 cup white flour (Maida)
½ cup powdered sugar (Not necessarily store-bought.
Regular sugar ground at home is perfectly all right.)
9-10 cardamom pods, peeled and the seeds crushed or ½ tsp cardamom powder
heaped ½ tsp baking powder or baking soda/sodium bicarbonate
a small pinch of salt
6-7 tbsp ghee or as required (preferably homemade for that extra 'something')

Method:

1. Sieve the flour and baking powder/soda together into a mixing bowl. If using store-bought powdered sugar, sieve it along.
2. Add the rest of the ingredients apart from the ghee.
3. Add ghee, a little at a time, while mixing and kneading the dough until you have it the consistency of chapati dough. It should be pliable enough to be shaped into a ball. Like in the picture below.

100_6770

In the glass bowl : kneaded Nan Khatai dough

4. Cover the dough well or put it into a container with a tight lid. Keep it in a cool place (not the fridge!) for a few hours or overnight. (I know, this is different. I know, we have already added the baking powder/soda. I know, they always say that you add it just before baking. But this is how my MIL does it, and asked me to do it. And it still worked! She anyway has a thing against rules, you know. :))
5. Preheat the oven to 180°C.
6. Grease/Line a baking sheet. Divide the dough into 16 portions. Shape those portions into round balls and flatten them a little between your palms.
7. Arrange them on the baking sheet well away from each other. Like this.

100_6775

8. Bake in the pre-heated oven for about 15 minutes or until the biscuits develop a few 'scars' on top and are slightly browned at the bottom.
9. Take them out of the oven and let them cool on the baking sheet itself.
10. Once cool, store them in an air-tight container.

Remember to store the container under lock and key. Or be prepared to see it empty after a few hours. :) :) :)

100_6780

Let me rush to Santhi now. Hope she accepts these crisp and flavourful biscuits, although late.


Tags: , , ,

Tuesday, August 01, 2006

Blogger Postcards from the World - This is exciting! :)

100_6771

What I am sending as my first entry to Meeta's Blogger Postcards from the World is a postcard that I bought last Sunday at Schloss Benrath on the outskirts of the city of Düsseldorf. Schloss Benrath is a castle from the late 18th century with a huge park, which measures 612,000 square metres (!) .

My postcard has the aerial view of the castle and the park. I hope, the recipient of this card likes it. (Nope...I'm not telling you the name!)
;-)
Below is a photograph of the castle taken by me. And that is a virtual postcard from me to all of you. Hope you like it! :)

100_6762