Wednesday, November 29, 2006

Peanut Butter Cookies

This is a tale of two butters.
One came from the US and the other was more of a World Citizen. Both had an identity and were rather proud of it.
The one from the US was proud because it had no animal fat. Vegans too could enjoy it. People called it Peanut Butter.
The other was proud of itself because almost everybody in the world knew it. Also, it could be easily made at home too. This was your 'friendly neighbourhood' Butter. Yeah, just plain Butter.
Once they got fighting as to which one was better. Arguments flowed and voices rose. They fought for several hours, but none agreed to give up. Then, when they were too tired to argue any further, they went to the kind(!) girl(!) Vaishali. They asked her to give the verdict. Vaishali, the kind girl(??) she was, convinced them that both were equal. That both were good in their own right, and it was wrong to compare them at all.
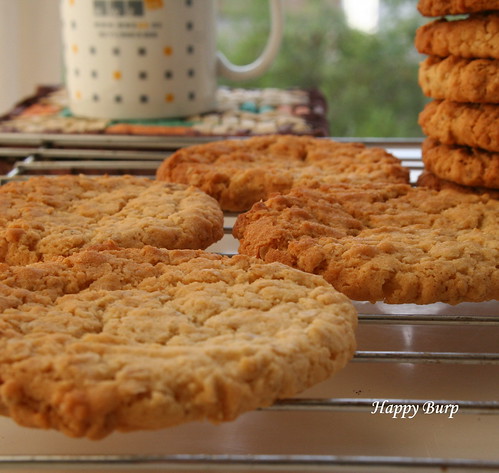
To prove that they were both equal, she gave them equal opportunity and importance. In these cookies. :)

IMG_0051

Recipe for Peanut Butter Cookies
(adapted from this German book)

Makes about 25 fairly large cookies
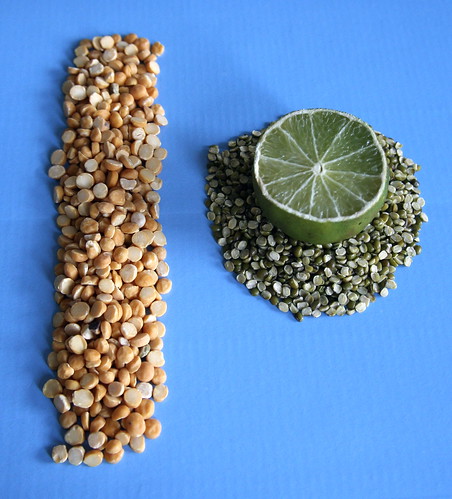
Ingredients:

115 g. butter at room temperature
115 g. peanut butter (Smooth or crunchy doesn't matter.)
115 g. light brown sugar (I use only 100 g. of both sugars.)
115 g. castor sugar (Regular sugar after a whirl in the grinder is ok.)
115 g. oat flakes
85 g. all-purpose flour (Maida)
1 egg, beaten to just mix well
3 drops of vanilla essence
½ tsp baking soda
½ tsp baking powder
a pinch of salt

Method:

1. Preheat the oven to 180°C. Grease a baking sheet with some butter or line it with baking parchment. You'd be able to bake all cookies in one batch, if you have three baking sheets. This, however, is not necessary. I always bake them on one sheet in three batches.
2. In a large mixing bowl, combine both butters and mix well. You could also use your hand-held blender for this recipe.
3. Add the sugars, egg and vanilla essence and mix again.
4. Combine the flour, baking soda, baking powder and salt in a bowl and sieve these into the above mixture.
5. Add the oat flakes and mix thoroughly.
6. Now drop spoonfuls of this mixture well apart from each other onto the baking sheet(s) and press them lightly with a fork.
7. Bake the cookies for 10 minutes or until they are pleasantly browned.
8. Take the baking sheet(s) out of the oven and let cool for 2 minutes.
9. Then transfer the cookies onto a cooling grill and let cool completely.

Once cool, transfer the cookies into an airtight container.

They are great munchies for when you feel peckish at odd hours. Otherwise, offering them for breakfast with a mug of coffee is not a bad idea either. What say, Nandita? Shall I send them to your Weekend Breakfast Blogging #7 then? :)

IMG_0052

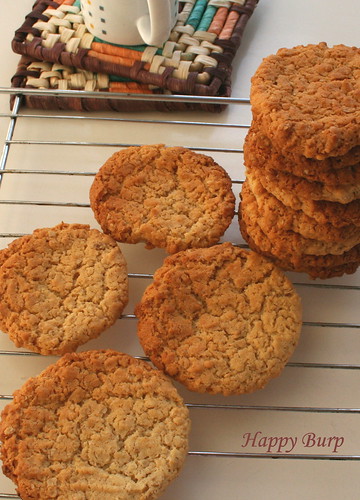
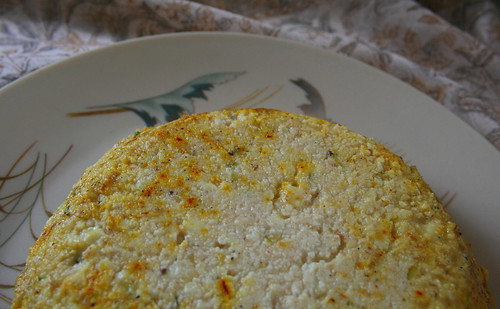
Cookies with Two Butters

Monday, November 27, 2006

Chutney with Fresh Turmeric and Mango Ginger

IMG_0181

I hope that either you already know about these two main ingredients or you have read about them in my earlier post. In case neither, then in a nutshell, Fresh Turmeric is...well...Fresh Turmeric and Mango Ginger or Ambehalad or Curcuma Amada is a rhizome from the ginger family, which gives out, when cut or crushed, the smell of fresh unripe mangoes. What I made using these two ingredients and some more is this.

Recipe for Chutney with Fresh Turmeric and Mango Ginger

Ingredients:

Before I start, let me mention that there are no set measurements for this chutney. You can add ingredients as per availability and liking. The quantities I used this time are as below.

gratings from ¼ of a coconut
100g. fresh turmeric
100g. Mango Ginger (Ambehalad)
50g. ginger (Adrak)
2 green chillis
juice from ½ of a lemon
4 tsp sugar (This ingredient is quite important as it balances the tartness coming from all those rhizomes.)
salt to taste

Method:

1. Wash, peel and chop all rhizomes. You might consider wearing gloves while handling the fresh turmeric, because it stains your hands pretty badly. And the stains take at least three days to go away completely. Want proof?

IMG_0179

2. Combine all ingredients and grind to a fine paste without using any water.

This chutney keeps in the fridge for several days. Serve it as an accompaniment to any meal. Like so.

IMG_0186

Clockwise from left: Fresh Turmeric & Mango Ginger Chutney, salt, Tomato chi Aamti, Cabbage Bhaji, Bottle Gourd Bhaji with Moong Dal and Phulkas

All dishes cooked with turmeric in some form or the other. Cancer isn't even gonna look this way, is it? :)

I'd like to send this post as well as the earlier one containing the info to Kalyn's Weekend Herb Blogging #61. Off to her then...

Wednesday, November 22, 2006

Guess guess...Not any longer...:)

IMG_0175

It is ginger in the above picture. No prizes for guessing that. :)
But do you know the two rhizomes in the following picture? Both are from the same family as ginger, but are still very different.

I am sure, you would have recognised them, had you seen them dried and powdered. Ooops...was that a clue? ;-)

IMG_0178


Ok Guys, it's time to publish the answers. The orange-yellow rhizome in the picture is Fresh Turmeric (Oli Halad in Marathi). The white one, which can be easily mistaken for ginger is Mango Ginger or Curcuma Amada (Ambehalad in Marathi). Although the botanical as well as the name in Marathi have the word 'turmeric' in it, this rhizome has nothing to do with turmeric because it does not have the colour-lending 'curcumin' in it. It is from the ginger family and gives out the smell of unripe mangoes when cut or crushed. That's why the names.

Both rhizomes are often used in pickles. However, what I made with them is a chutney, the recipe for which you'll find in this post.

I would like to send this post as well as the one containing the recipe to Kalyn's Weekend Herb Blogging #61. Hope she finds them interesting.

Wednesday, November 15, 2006

Milk cake OR Why I am not blogging regularly.

IMG_0164

Rich? Oh yes!

Why did I not blog for the last ten days or so? Have I lost the interest? Have I not been cooking? Or have I just been too lazy to take photographs?

Well, none of the above. I haven't been blogging because my broadband connection was down; that's why.
Many of you have asked me in the past one month to write about my experience of moving back to India and how I find life here now. One thing that I would like to point out in this context is that we as a people are laid-back. Please don't misunderstand me. I absolutely respect my country. I wouldn't have come back otherwise. However, every country or community has a few flaws, and they can be corrected only if you step back for a while and watch it like an onlooker. Many of you will agree that living outside India gives you that perspective easily.
And I am sure that many of you will agree with me when I say that 'time' does not put as much pressure on us as it does on some other communities. For example,

- we give unrealistic deadlines. We are always too afraid to say that it will take 'one full week'. We always only use the word 'soon'.

- we never are punctual. Although everybody seems to be in a deadly hurry on the road, nobody reaches anywhere on time. Why the hurry then?

- we do not value others' time. We just don't.

The moral of the story is that I had to live with a dead broadband connection for about ten days. But believe me, I have not been wasting my time during this period. I have been cooking and photographing while cooking quite religiously.

Like I finally managed to try out this dessert, the recipe for which I had for the last three years. Shall I straight away head to the recipe without wasting any more 'time' of yours then? :)

IMG_0161

White goods? :)
Clockwise from top left: condensed milk, plain milk, Paneer

Recipe for Milk Cake
(Can you please please suggest a better name? I know that you are good at it.)

Makes 12 small servings.

Ingredients:

400g. sweetened condensed milk (I used one tin of this.)
250g. finely grated Paneer (I used store-bought.)
½ cup milk OR water (Please see Step 1.)
2-3 tsp castor or powdered sugar (optional; I didn't use.)
2 tbsp Ghee

saffron strands, chopped nuts for garnishing (I used this store-bought blend.)

Method:

1. Combine the condensed milk and grated Paneer in a non-stick pan. In case you are using up the entire tin of condensed milk, add ½ cup of water to it, shake vigorously and add this 'milk' to the pan. Otherwise, add ½ cup of plain milk.(Don't you just admire my sense of 'economy' in the kitchen? :))
2. Add sugar, if using and put this mixture to boil on medium-high heat. Stir continuously.
3. After about 10 minutes, add 1 tbsp of Ghee along the sides of the pan. The mixture of will start getting thicker now. It will move as one mass as you stir.

IMG_0163

4. Take the pan off heat and let it cool for about five minutes.
5. In the meanwhile, grease the sides of a mould with the rest of the Ghee. Spread the saffron strands and/or chopped nuts on it. If you wish, you could add some to the mixture in the pan too.
6. Spread the mixture evenly into the greased mould and allow it to set. No refrigeration is required for it to set.

After about an hour, unmould the 'Milk Cake' onto a decorative dish or platter. Garnish it more, if you wish, cut into pieces/wedges and serve.

IMG_0166

I made this dessert for my younger sister's bridal shower. Or shall I say 'one bridal shower'? There are two more planned in the next 15 days. Is the foodie in me HAPPY or what? :)

Now I need to rush this post to the Festive Food Fair organised by Anna. After all, it has a long way to go. Australia isn't around the corner, is it? :)

Tags: , , , , ,

Sunday, November 05, 2006

A wish fulfilled : Pineapple Coconut Muffins

IMG_0034

Pineapple Coconut Muffins

Do you know what pineapple is called in German? 'Ananas'! Which means, if you know Marathi or Hindi, then you already know a little bit of German. :) :)

Let me leave humour aside now and thank my kid-cousin, Leena for this post. It is because of her that I made these muffins in Düsseldorf. She had come visiting us along with her parents (her mother is my father's cousin) and her brother in September. A fortnight before we left Germany for good. I know, it sounds weird, but weird can be fun sometimes, right? So there.

Leena had come to us with this big wish of baking something with me. She loves baking, and she knows that I do too. And bake we did. Only a bit in a hurry. A few hours before they were to leave our place. Sounds weird again, I know, but she really really wanted to bake, and we hadn't managed it until then because we were busy doing 'Düsseldorf-Sightseeing'.

By the way, lack of time wasn't the only hurdle there. Once I realised that I had to bake something with her, I started looking for recipes. However, every recipe that looked 'do-able' asked for some ingredient or the other that I didn't have in stock. Naturally, because I had kinda started finishing off stuff because of the impending move. What I did have, though, was all-purpose flour. And that is what saved me. The paper bag containing the flour, to be precise. I found this recipe on that bag and guess what (!), I had all the ingredients. Apart from rum, that is. Well, even if I had it, I wouldn't have used it, because two kids were gonna have those muffins. And did they have them? Oh yes, with lots of gusto. And they got a few packed for the journey too. What I got in return was a tried and tested recipe AND my kid-cousin's happy face. A win-win situation, what? :)

Recipe for Pineapple Coconut Muffins

Makes 15 rather large muffins. You might consider making 18 smaller ones.

Ingredients:

200g. all-purpose flour
2 tsp baking powder
50g. dessicated coconut
250g. pineapple pieces (Preferably canned.)
1 egg
150g. brown sugar (White sugar should be ok too.)
100ml oil (I used sunflower oil.)
250g. plain yogurt
1 tbsp rum (I used milk instead.)

Powdered sugar for dusting (optional; I used)

Method:

1. Preheat the oven to 170°C.
2. Sieve the flour and baking powder together. Add the dessicated coconut to it.
3. Beat the egg. (I used a simple fork for it.) Add the sugar, oil, yogurt and rum/milk to it. Cut the pineapple into smaller pieces, in case the ones from the can are largish. Add them to the mixture and stir well.
4. Add the flour mixture and stir until just mixed. You need not use your electric beater here. Just a large spoon is enough.
5. Grease the muffin moulds with butter/oil or line them with paper cups. Fill the batter in them and bake in the pre-heated oven on the middle rack for 20-25 minutes.
6. They are done when a skewer/ knife inserted in the middle comes out clean. Then take out the muffin pan and let it cool for 5-10 minutes.
7. Unmould the muffins and let them cool on a cooling rack.

Dust with powedered sugar, if you like.

Great for breakfast, as evening snack or when on the road. I've got the feedback. :)

IMG_0037

I'd like to send this plateful of muffins to Nandita for WBB #7 Baking for Breakfast and to Meeta for MM #6 Give Thanks. And I thank them for hosting these events. (Enough of your wordplay, Vaishali. It's time to end the post now.)
-takes cue- Ok then, Bye Folks. ;-)

Tags: , , , ,

Thursday, November 02, 2006

A Ton of Protein # 10 - Moong aur Chane ki Dal

IMG_0023

Moong aur Chane ki Dal served with microwave-cooked rice (behind)

When I published my post on Shankarpali, I thought I was 'back'. I was happy that I did not have to stay away from blogging for too long. I was so wrong. And I will be wrong again, if I think that I'll find the time for blogging easily. Nope, it's not gonna be that easy. I'll have to *make* time for it. The reasons being
a) We had a very limited social circle in Germany. Which meant less time spent in socialising. Here in Pune, however, I can socialise with different people everyday and still have others complaining that we don't see each other often enough. :) No, I am not complaining. This is what we came back for. I am just stating facts.
b) Sundays often were 'stay-at-home' days in Germany. Because all shops there are closed on Sundays. Which often translated into me blogging for several hours together. Whereas here in India, Sundays can sometimes be the busiest days.
c) We get Indian newspapers here!!! When it comes to newspapers, I enjoy reading only Indian newspapers. Better still, Marathi newspapers. And if it is Sakal, then I can spend at least an hour reading it. Which I often do. :)

When do I get the time for blogging then? Well, as you can see, I haven't been getting any. But this will change. I'll have to make sure that it does. Wish me luck!

Let me come back to this post now. It's the tenth one in my series of 'A Ton of Protein'. I got the original recipe 'sent' to me in one of the newsletters from this site. (How convenient is that! :)) The recipe does not 'look' very different from the other Dal recipes that you might be having, but it gives lip-smacking results. Maybe it's the green Moong Dal, maybe it's the proportion of spices or maybe it's both. In case you want to find it out yourself, here's the recipe. :)

IMG_0058

'Three' ingredients...'Tenth' post...A 'Ton' of Protein

Recipe for Moong aur Chane ki Dal

Ingredients:

½ cup Moong dal with skin
1 tbsp Chana dal
½ tsp Garam Masala
1 tsp red chilli powder
½ tsp coriander seeds powder
¼ tsp turmeric powder
½ inch ginger, chopped fine
salt to taste
2 cups water
juice from half a lime

1 tbsp Ghee or oil
½ tsp mustard seeds
½ tsp cumin seeds

chopped coriander leaves for garnishing

Method:

1. Pressure-cook both Dals together with 1 cup water.
2. Mix all the spice powders in ½ cup water to make thin paste.
3. Heat Ghee/oil in a pan. Once it is hot, add mustard seeds. Once they start spluttering, add the cumin seeds.
4. Add ginger. Add the paste of spice powders. Fry for a minute. Reduce heat, in case the paste jumps too high as it can cause burns.
5. Then add the Dal, salt and the remaining ½ cup water. Add more, in case you like it thin. Boil it on high heat for about five minutes or until it reaches a consistency of your choice.
6. Once you turn off the heat, add the lime juice.

Garnish with chopped coriander leaves. I happened to have a coil-shaped red chilli in my kitchen, so I used that as well. :)

Serve with rice or Rotis.

Note:

Lime juice added after the Dal is cooked retains all the Vitamin C in it, which helps the body absorb iron from the Dal. (That's my two cents. Just so that I don't feel guilty for reproducing the recipe exactly as I got it. :))