Tuesday, December 19, 2006

The Unbeatable Root # 1 : Beetroot Tomato Cucumber Raita

IMG_0158

A lifebuoy in a boat? :)

One big misconception that got cleared in mind about two years back is that beetroot contains lots of iron. Just like almost everybody else around me, I too used to think beetroot would be a great weapon against Anaemia. But nope, it isn't. It has lots of goodness in it, but no iron.
Like it has Folate in it. A nutrient that is of utmost importance just before and after conception. And a lot of fiber, which is of great importance throughout one's life.

The recipe that I have got for you today includes two more virtuous vegetables - cucumber and tomato. Healthy? No doubt. My own recipe idea? No d...... No. :) The original recipe is by Tarla Dalal. But it's a great one, I tell you. Have a look.


IMG_0155


Recipe for Beetroot Tomato Cucumber Raita

Serves 4.

Ingredients:

1 cup fresh yogurt, beaten
1 beetroot, boiled and cut into cubes
1 cucumber, chopped
1 large tomato, chopped
2 tbsp roasted, skinned, coarsely crused peanuts
1 green chilli, chopped
2 tbsp grated fresh or dessicated coconut (optional; I use seldom.)
1 tsp sugar
salt to taste

1 tbsp oil
1 tsp cumin seeds
a pinch asafoetida

coriander leaves for garnishing

Method:

1. Mix all ingredients in the first list (upto salt).
2. Heat oil in a Tadka ladle. Take the ladle off the heat and add cumin seeds. Once they splutter, add the asafoetida.
3. Let the Tadka cool a little, then add it to the Raita and mix it well.

Serve with Parathas for brunch or as an accompaniment to any meal.

By the way, this dish has had a 100% success rate at my place so far. None of the times that I have made it when entertaining guests, have I had to put any leftovers back into the fridge. (I make it so complicated!! I could have just said that the bowl is polished off clean. Any idea where you can take Creative Writing classes, Guys?)

Thursday, December 14, 2006

Indian Winter # 1 : Garlic Greens Chutney

IMG_0202

Garlic Greens Chutney decorated with a garlic greens braid

Although garlic is available (in almost the whole world?) all year around, the green chive-like shoots on garlic are to be seen in the markets here in Pune only during winter which is from November to January. When you spot these and some more veggies in the markets, you know it is winter.

Growing garlic greens is rather easy, I have heard. I have also been planning to do it for some time now. But I guess, I don't have a green thumb like Inji Pennu. I don't know whether it's the lack of dedication or interest or just the lack of enough water(?), but my plants often die prematurely. :( Shammi, maybe you relate to me?
Well, anyway, the point is that I cook with garlic greens only when they are available in the market, which they are right now. Lots of them. Among other things, what I also made with them is this chutney. Let me add that this one is entirely my creation. I mean, ok, it's just a simple recipe and no diagram for making rockets, but heck, it's mine!!!

By the way, in case you want to grow garlic greens at home, Martha Stewart has got some help to offer.


IMG_0198

(Left to right) Garlic greens with fresh cloves at one end and roasted, skinned peanuts

Recipe for Garlic Greens Chutney

Makes 1 cup.

Ingredients:

7-8 stalks of garlic greens
½ cup roasted, skinned peanuts
½ cup beaten yogurt
1 large chilli
1 tsp chopped ginger or ginger paste
a pinch sugar
salt to taste

1 tsp oil
½ tsp cumin seeds

coriander leaves for garnishing (or a braid made with three green garlic stalks)

Method:

1. Wash the garlic greens. Remove the roots at the end and discoloured stalks, if any.
2. Mix all ingredients in the first list (i.e. upto salt) in a grinder and grind until you have a smooth paste. Take this paste out into a serving bowl.
3. Heat the oil in a Tadka ladle. Once hot, add the cumin seeds to it and take the ladle off heat. The cumin seeds will pop in the hot oil. Let the oil cool a little.
4. Add the Tadka to the garlic greens-peanut paste. Either mix and serve OR leave the Tadka on top; it makes for an interesting garnish.

Serve this chutney as an accompaniment with any meal. In case you don't mind having garlic for breakfast, you could serve it with Idlis or Dosas too.

Notes:

1. In case you do not have access to garlic greens, you could use regular garlic too. The chutney will still taste good. However, if you can make garlic greens available for yourself, then I'd highly recommend it, because the greens lend a unique depth of flavour to the chutney.

2. If you have much more garlic greens on hand than what this chutney requires, try using them in place of regular garlic in any dish. You won't regret, I guarantee.
I would like to send this first post in my series 'Indian Winter' to Kalyn for her Weekend Herb Blogging. I know, it's gonna be a 'Holiday Special' edition this time around, but then we don't have holidays here in India. :(

Wednesday, December 13, 2006

Announcing two new series...

In addition to the already running 'Ton of Protein' series, I would like to announce two more. They are

1. Indian Winter : Indian 'Winter' ? 'What's that?', you might wonder. We know Indian Summer, but winter...does it even exist? Well, yes. Although it isn't as *wintery* as the winters outside the tropics, it sure does exist. This month, we have already had a minimum temperature of 10.1°C here in Pune. Now you are convinced, aren't you? :)
So, what will this series have? Basically, I will blog about vegetables and preparations that are typical to winter here. How the series develops in the course of time will have to be seen.

2. The Unbeatable Root : I plan to paint the town red with this one. :)
Leaving wordplay aside (Did I hear you say 'Thank God!'?), this series will feature recipes with the Beetroot.

Hope you like them both.

Wednesday, December 06, 2006

Jihva for Jaggery : Carrot Jaggery Parathas

IMG_0193

Carrot Jaggery Parathas served with Ghee

Jaggery was introduced to me when I was a toddler, as is the case with many children in Maharashtra/India. ‘Gool Toop Poli’ (jaggery, Ghee and chapati) is a staple for toddlers and young children. And why should it not be, considering that it is nutritious as well as quick to put together. Moreover, children always eat with more gusto, if the food is sweet. Well, at least I used to and so does my daughter. :)

Coming to these Parathas, I had found the recipe more than two years back in the supplement of a Marathi daily. I had cut it out then, but never really managed to try it out. When Kay asked us all Food-Bloggers to "try a recipe with jaggery that we've never tried before", I knew I had to grab that envelope,which carries all the recipe cuttings I have made from various sources. The original author has called this preparation 'Thalipeeth', which in my opinion is not the right word. Also, I have reduced the quantity of jaggery in it by half, because the Parathas would have become too sweet otherwise. The rest of the recipe is like this.

Recipe for Carrot Jaggery Parathas

Makes approx. 8 Parathas of 12 cms. diameter

Ingredients:

250 g. OR 3 medium carrots (approx. 2 cups when grated)
125 g. jaggery (approx. 1½ cups when grated)
1¼ cups wheat flour (Please refer to Step 6 for the quantity.)
some more wheat flour OR rice flour OR oil to roll the Parathas
a generous pinch of salt (or to taste)
6-7 tbsp oil

Ghee to serve the Parathas with

Method:

1. Wash, peel and grate the carrots. Grate the jaggery separately.
2. Heat 1 tsp oil in a pan and add the grated carrots to it. Stir the carrot gratings and cover the pan. Let cook for 2-3 minutes on medium-high heat.
3. Uncover the pan and add the jaggery to it. Stir to mix well.
4. Take the pan off heat as soon as all the jaggery has melted. Let the mixture cool completely.
5. Take the cooled mixture into a large, shallow dish or a mixing bowl and add salt to it.
6. Now add the wheat flour a little at a time and knead as you go. Add as much wheat flour as the carrot-jaggery mixture allows you to.
7. Knead well to make a dough similar to that of chapati. Add 2 tsp oil to it towards the end.
8. Divide this dough into 8 portions. Dust a rolling board with wheat or rice flour OR oil it. (I oiled the board and the rolling pin.)
9. Roll one portion of the dough to form a circle with a thickness of about ½ centimetre.
10. Roast this circle on both sides on a hot griddle or Tava until tiny, brown spots appear. Sprinkle a little oil on it, if you want the Parathas to become softer.
11. Make more Parathas like this with the rest of the dough.

Serve them warm or at room temperature with Ghee. They taste better after a few hours of making them.

Since these Parathas have no water in them, they keep well for several days. Although I must say that they do not last more than one day, because they are so tasty. :)

They are not only tasty, but highly nourishing too. Carrots provide the much needed carotene and jaggery brings along loads of iron. Wheat flour gives carbohydrates and the oil makes the absorption of some of the nutrients easier. Ghee stops the jaggery from increasing the body's heat and also gives Omega 3 fatty acids.

I think they are great for growing children. Maybe Kay wants to keep this recipe for later? For when Meera grows up and comes home from school tired and hungry? :)

Wednesday, November 29, 2006

Peanut Butter Cookies

This is a tale of two butters.
One came from the US and the other was more of a World Citizen. Both had an identity and were rather proud of it.
The one from the US was proud because it had no animal fat. Vegans too could enjoy it. People called it Peanut Butter.
The other was proud of itself because almost everybody in the world knew it. Also, it could be easily made at home too. This was your 'friendly neighbourhood' Butter. Yeah, just plain Butter.
Once they got fighting as to which one was better. Arguments flowed and voices rose. They fought for several hours, but none agreed to give up. Then, when they were too tired to argue any further, they went to the kind(!) girl(!) Vaishali. They asked her to give the verdict. Vaishali, the kind girl(??) she was, convinced them that both were equal. That both were good in their own right, and it was wrong to compare them at all.
To prove that they were both equal, she gave them equal opportunity and importance. In these cookies. :)

IMG_0051

Recipe for Peanut Butter Cookies
(adapted from this German book)

Makes about 25 fairly large cookies

Ingredients:

115 g. butter at room temperature
115 g. peanut butter (Smooth or crunchy doesn't matter.)
115 g. light brown sugar (I use only 100 g. of both sugars.)
115 g. castor sugar (Regular sugar after a whirl in the grinder is ok.)
115 g. oat flakes
85 g. all-purpose flour (Maida)
1 egg, beaten to just mix well
3 drops of vanilla essence
½ tsp baking soda
½ tsp baking powder
a pinch of salt

Method:

1. Preheat the oven to 180°C. Grease a baking sheet with some butter or line it with baking parchment. You'd be able to bake all cookies in one batch, if you have three baking sheets. This, however, is not necessary. I always bake them on one sheet in three batches.
2. In a large mixing bowl, combine both butters and mix well. You could also use your hand-held blender for this recipe.
3. Add the sugars, egg and vanilla essence and mix again.
4. Combine the flour, baking soda, baking powder and salt in a bowl and sieve these into the above mixture.
5. Add the oat flakes and mix thoroughly.
6. Now drop spoonfuls of this mixture well apart from each other onto the baking sheet(s) and press them lightly with a fork.
7. Bake the cookies for 10 minutes or until they are pleasantly browned.
8. Take the baking sheet(s) out of the oven and let cool for 2 minutes.
9. Then transfer the cookies onto a cooling grill and let cool completely.

Once cool, transfer the cookies into an airtight container.

They are great munchies for when you feel peckish at odd hours. Otherwise, offering them for breakfast with a mug of coffee is not a bad idea either. What say, Nandita? Shall I send them to your Weekend Breakfast Blogging #7 then? :)

IMG_0052

Cookies with Two Butters

Monday, November 27, 2006

Chutney with Fresh Turmeric and Mango Ginger

IMG_0181

I hope that either you already know about these two main ingredients or you have read about them in my earlier post. In case neither, then in a nutshell, Fresh Turmeric is...well...Fresh Turmeric and Mango Ginger or Ambehalad or Curcuma Amada is a rhizome from the ginger family, which gives out, when cut or crushed, the smell of fresh unripe mangoes. What I made using these two ingredients and some more is this.

Recipe for Chutney with Fresh Turmeric and Mango Ginger

Ingredients:

Before I start, let me mention that there are no set measurements for this chutney. You can add ingredients as per availability and liking. The quantities I used this time are as below.

gratings from ¼ of a coconut
100g. fresh turmeric
100g. Mango Ginger (Ambehalad)
50g. ginger (Adrak)
2 green chillis
juice from ½ of a lemon
4 tsp sugar (This ingredient is quite important as it balances the tartness coming from all those rhizomes.)
salt to taste

Method:

1. Wash, peel and chop all rhizomes. You might consider wearing gloves while handling the fresh turmeric, because it stains your hands pretty badly. And the stains take at least three days to go away completely. Want proof?

IMG_0179

2. Combine all ingredients and grind to a fine paste without using any water.

This chutney keeps in the fridge for several days. Serve it as an accompaniment to any meal. Like so.

IMG_0186

Clockwise from left: Fresh Turmeric & Mango Ginger Chutney, salt, Tomato chi Aamti, Cabbage Bhaji, Bottle Gourd Bhaji with Moong Dal and Phulkas

All dishes cooked with turmeric in some form or the other. Cancer isn't even gonna look this way, is it? :)

I'd like to send this post as well as the earlier one containing the info to Kalyn's Weekend Herb Blogging #61. Off to her then...

Wednesday, November 22, 2006

Guess guess...Not any longer...:)

IMG_0175

It is ginger in the above picture. No prizes for guessing that. :)
But do you know the two rhizomes in the following picture? Both are from the same family as ginger, but are still very different.

I am sure, you would have recognised them, had you seen them dried and powdered. Ooops...was that a clue? ;-)

IMG_0178


Ok Guys, it's time to publish the answers. The orange-yellow rhizome in the picture is Fresh Turmeric (Oli Halad in Marathi). The white one, which can be easily mistaken for ginger is Mango Ginger or Curcuma Amada (Ambehalad in Marathi). Although the botanical as well as the name in Marathi have the word 'turmeric' in it, this rhizome has nothing to do with turmeric because it does not have the colour-lending 'curcumin' in it. It is from the ginger family and gives out the smell of unripe mangoes when cut or crushed. That's why the names.

Both rhizomes are often used in pickles. However, what I made with them is a chutney, the recipe for which you'll find in this post.

I would like to send this post as well as the one containing the recipe to Kalyn's Weekend Herb Blogging #61. Hope she finds them interesting.

Wednesday, November 15, 2006

Milk cake OR Why I am not blogging regularly.

IMG_0164

Rich? Oh yes!

Why did I not blog for the last ten days or so? Have I lost the interest? Have I not been cooking? Or have I just been too lazy to take photographs?

Well, none of the above. I haven't been blogging because my broadband connection was down; that's why.
Many of you have asked me in the past one month to write about my experience of moving back to India and how I find life here now. One thing that I would like to point out in this context is that we as a people are laid-back. Please don't misunderstand me. I absolutely respect my country. I wouldn't have come back otherwise. However, every country or community has a few flaws, and they can be corrected only if you step back for a while and watch it like an onlooker. Many of you will agree that living outside India gives you that perspective easily.
And I am sure that many of you will agree with me when I say that 'time' does not put as much pressure on us as it does on some other communities. For example,

- we give unrealistic deadlines. We are always too afraid to say that it will take 'one full week'. We always only use the word 'soon'.

- we never are punctual. Although everybody seems to be in a deadly hurry on the road, nobody reaches anywhere on time. Why the hurry then?

- we do not value others' time. We just don't.

The moral of the story is that I had to live with a dead broadband connection for about ten days. But believe me, I have not been wasting my time during this period. I have been cooking and photographing while cooking quite religiously.

Like I finally managed to try out this dessert, the recipe for which I had for the last three years. Shall I straight away head to the recipe without wasting any more 'time' of yours then? :)

IMG_0161

White goods? :)
Clockwise from top left: condensed milk, plain milk, Paneer

Recipe for Milk Cake
(Can you please please suggest a better name? I know that you are good at it.)

Makes 12 small servings.

Ingredients:

400g. sweetened condensed milk (I used one tin of this.)
250g. finely grated Paneer (I used store-bought.)
½ cup milk OR water (Please see Step 1.)
2-3 tsp castor or powdered sugar (optional; I didn't use.)
2 tbsp Ghee

saffron strands, chopped nuts for garnishing (I used this store-bought blend.)

Method:

1. Combine the condensed milk and grated Paneer in a non-stick pan. In case you are using up the entire tin of condensed milk, add ½ cup of water to it, shake vigorously and add this 'milk' to the pan. Otherwise, add ½ cup of plain milk.(Don't you just admire my sense of 'economy' in the kitchen? :))
2. Add sugar, if using and put this mixture to boil on medium-high heat. Stir continuously.
3. After about 10 minutes, add 1 tbsp of Ghee along the sides of the pan. The mixture of will start getting thicker now. It will move as one mass as you stir.

IMG_0163

4. Take the pan off heat and let it cool for about five minutes.
5. In the meanwhile, grease the sides of a mould with the rest of the Ghee. Spread the saffron strands and/or chopped nuts on it. If you wish, you could add some to the mixture in the pan too.
6. Spread the mixture evenly into the greased mould and allow it to set. No refrigeration is required for it to set.

After about an hour, unmould the 'Milk Cake' onto a decorative dish or platter. Garnish it more, if you wish, cut into pieces/wedges and serve.

IMG_0166

I made this dessert for my younger sister's bridal shower. Or shall I say 'one bridal shower'? There are two more planned in the next 15 days. Is the foodie in me HAPPY or what? :)

Now I need to rush this post to the Festive Food Fair organised by Anna. After all, it has a long way to go. Australia isn't around the corner, is it? :)

Tags: , , , , ,

Sunday, November 05, 2006

A wish fulfilled : Pineapple Coconut Muffins

IMG_0034

Pineapple Coconut Muffins

Do you know what pineapple is called in German? 'Ananas'! Which means, if you know Marathi or Hindi, then you already know a little bit of German. :) :)

Let me leave humour aside now and thank my kid-cousin, Leena for this post. It is because of her that I made these muffins in Düsseldorf. She had come visiting us along with her parents (her mother is my father's cousin) and her brother in September. A fortnight before we left Germany for good. I know, it sounds weird, but weird can be fun sometimes, right? So there.

Leena had come to us with this big wish of baking something with me. She loves baking, and she knows that I do too. And bake we did. Only a bit in a hurry. A few hours before they were to leave our place. Sounds weird again, I know, but she really really wanted to bake, and we hadn't managed it until then because we were busy doing 'Düsseldorf-Sightseeing'.

By the way, lack of time wasn't the only hurdle there. Once I realised that I had to bake something with her, I started looking for recipes. However, every recipe that looked 'do-able' asked for some ingredient or the other that I didn't have in stock. Naturally, because I had kinda started finishing off stuff because of the impending move. What I did have, though, was all-purpose flour. And that is what saved me. The paper bag containing the flour, to be precise. I found this recipe on that bag and guess what (!), I had all the ingredients. Apart from rum, that is. Well, even if I had it, I wouldn't have used it, because two kids were gonna have those muffins. And did they have them? Oh yes, with lots of gusto. And they got a few packed for the journey too. What I got in return was a tried and tested recipe AND my kid-cousin's happy face. A win-win situation, what? :)

Recipe for Pineapple Coconut Muffins

Makes 15 rather large muffins. You might consider making 18 smaller ones.

Ingredients:

200g. all-purpose flour
2 tsp baking powder
50g. dessicated coconut
250g. pineapple pieces (Preferably canned.)
1 egg
150g. brown sugar (White sugar should be ok too.)
100ml oil (I used sunflower oil.)
250g. plain yogurt
1 tbsp rum (I used milk instead.)

Powdered sugar for dusting (optional; I used)

Method:

1. Preheat the oven to 170°C.
2. Sieve the flour and baking powder together. Add the dessicated coconut to it.
3. Beat the egg. (I used a simple fork for it.) Add the sugar, oil, yogurt and rum/milk to it. Cut the pineapple into smaller pieces, in case the ones from the can are largish. Add them to the mixture and stir well.
4. Add the flour mixture and stir until just mixed. You need not use your electric beater here. Just a large spoon is enough.
5. Grease the muffin moulds with butter/oil or line them with paper cups. Fill the batter in them and bake in the pre-heated oven on the middle rack for 20-25 minutes.
6. They are done when a skewer/ knife inserted in the middle comes out clean. Then take out the muffin pan and let it cool for 5-10 minutes.
7. Unmould the muffins and let them cool on a cooling rack.

Dust with powedered sugar, if you like.

Great for breakfast, as evening snack or when on the road. I've got the feedback. :)

IMG_0037

I'd like to send this plateful of muffins to Nandita for WBB #7 Baking for Breakfast and to Meeta for MM #6 Give Thanks. And I thank them for hosting these events. (Enough of your wordplay, Vaishali. It's time to end the post now.)
-takes cue- Ok then, Bye Folks. ;-)

Tags: , , , ,

Thursday, November 02, 2006

A Ton of Protein # 10 - Moong aur Chane ki Dal

IMG_0023

Moong aur Chane ki Dal served with microwave-cooked rice (behind)

When I published my post on Shankarpali, I thought I was 'back'. I was happy that I did not have to stay away from blogging for too long. I was so wrong. And I will be wrong again, if I think that I'll find the time for blogging easily. Nope, it's not gonna be that easy. I'll have to *make* time for it. The reasons being
a) We had a very limited social circle in Germany. Which meant less time spent in socialising. Here in Pune, however, I can socialise with different people everyday and still have others complaining that we don't see each other often enough. :) No, I am not complaining. This is what we came back for. I am just stating facts.
b) Sundays often were 'stay-at-home' days in Germany. Because all shops there are closed on Sundays. Which often translated into me blogging for several hours together. Whereas here in India, Sundays can sometimes be the busiest days.
c) We get Indian newspapers here!!! When it comes to newspapers, I enjoy reading only Indian newspapers. Better still, Marathi newspapers. And if it is Sakal, then I can spend at least an hour reading it. Which I often do. :)

When do I get the time for blogging then? Well, as you can see, I haven't been getting any. But this will change. I'll have to make sure that it does. Wish me luck!

Let me come back to this post now. It's the tenth one in my series of 'A Ton of Protein'. I got the original recipe 'sent' to me in one of the newsletters from this site. (How convenient is that! :)) The recipe does not 'look' very different from the other Dal recipes that you might be having, but it gives lip-smacking results. Maybe it's the green Moong Dal, maybe it's the proportion of spices or maybe it's both. In case you want to find it out yourself, here's the recipe. :)

IMG_0058

'Three' ingredients...'Tenth' post...A 'Ton' of Protein

Recipe for Moong aur Chane ki Dal

Ingredients:

½ cup Moong dal with skin
1 tbsp Chana dal
½ tsp Garam Masala
1 tsp red chilli powder
½ tsp coriander seeds powder
¼ tsp turmeric powder
½ inch ginger, chopped fine
salt to taste
2 cups water
juice from half a lime

1 tbsp Ghee or oil
½ tsp mustard seeds
½ tsp cumin seeds

chopped coriander leaves for garnishing

Method:

1. Pressure-cook both Dals together with 1 cup water.
2. Mix all the spice powders in ½ cup water to make thin paste.
3. Heat Ghee/oil in a pan. Once it is hot, add mustard seeds. Once they start spluttering, add the cumin seeds.
4. Add ginger. Add the paste of spice powders. Fry for a minute. Reduce heat, in case the paste jumps too high as it can cause burns.
5. Then add the Dal, salt and the remaining ½ cup water. Add more, in case you like it thin. Boil it on high heat for about five minutes or until it reaches a consistency of your choice.
6. Once you turn off the heat, add the lime juice.

Garnish with chopped coriander leaves. I happened to have a coil-shaped red chilli in my kitchen, so I used that as well. :)

Serve with rice or Rotis.

Note:

Lime juice added after the Dal is cooked retains all the Vitamin C in it, which helps the body absorb iron from the Dal. (That's my two cents. Just so that I don't feel guilty for reproducing the recipe exactly as I got it. :))

Thursday, October 19, 2006

My favourite Diwali Treat : Shankarpali

IMG_0118

Shankarpali - Always in the foreground for me :)

One of the biggest pleasures of being back in India? The FOOD. And the best part of it is that you get it even without moving a finger. Like when your mother cooks it for you. Or like when somebody just drops in, because they were *in the area*, and gets steaming hot Batata Wadas from the shop *at the corner*. It is bliss, I tell you, sheer bliss. :)

All the fat that I had lost during shifting from Germany to India is slowly creeping back again. And there is more on the way, I know. Because there are still many more goodies to be cooked and eaten yet. It's Diwali, after all. :) What Vee, the JFI host for this month, says here is true. I am indeed gonna have to "go to the darned gym and melt off all those calories put on in the name of Diwali".

If not anybody else, my mother will definitely agree. Because she saw me gobbling up those Shankarpali yesterday. Well, they are my favourite after all. I can eat them by the kilos. Literally. :) Then how could I resist them while they were fresh and still warm? And hey, I also *needed* them. As refreshments. I was doing the frying, you know. By the way, this is the first post on this blog with 'frying' involved. Does that mean, that my return to India make this blog a little less healthy then? We will see. :)

Recipe for Shankarpali

Makes about 1.5 kg (!) of these crispy little babies.

Ingredients:

1 cup oil or Ghee (We used oil.)
1 cup milk
1 ¼ cup sugar (This amount of sugar makes moderately sweet Shankarpali. If you like your sweets to be really sweet, you could consider using more.)
a pinch of salt
approx. 5 cups all-purpose flour (Please refer to the instructions below.)

Oil or Ghee for deep-frying (We used oil, but I like the taste more when we use Ghee.)

Method:

1. Mix the first three ingredients in a heavy-bottomed pan and heat. Turn the heat off, as soon as the mixture comes to a boil.
2. Pour it into a wide, shallow dish. Once it is not too hot to touch, add the salt. Also, add the flour, a little at a time. Please do not add all the flour now. We are going to need only as much as the oil-sugar-milk mixture takes in.
3. Go on kneading and adding the flour till you have soft dough which is pliable and not sticky. Keep this dough aside, covered, for about half an hour. This also gives you the time to make the rest of the preparations. :)
4. Now assemble all the necessary tools. You will need a rolling pin, a rolling board, a knife or a wheel that looks like a pizza-cutter (see picture below), a skillet/Kadhai and a slotted spoon for frying, another wide & shallow dish to take out the fried Shankarpali onto. Please take out a couple of additional small plates, just in case.
5. Now pour some oil/Ghee into the skillet. The quantity will depend upon how big and deep your skillet is. Heat the oil.
6. Knead the dough lightly. Take a fistful of it and roll it into a round ball using your palms. Oil the rolling board lightly and roll this ball on it into a circle. Like in the following picture. Do not dust the rolling board (or stone as in our case) with flour like we do for Chapatis.

IMG_0114

7. Cut this rolled out 'Chapati' into small squares or diamonds with a knife or a cutting wheel like in the next picture. The one we have used has a serrated edge. We call it 'Kaatani' in Marathi.

IMG_0115

8. Deep-fry these pieces. Please make sure that the oil is not too hot. It should not smoke. That can result into Shankarpali fried dark brown on the outside and uncooked on the inside.
You could fry as many as you want at one point. It only depends (again) upon the size of the Kadhai. We used a smallish Kadhai, so we fried half of a batch every time (that's half of the pieces in the above picture).
9. Take them out of the oil and onto the shallow dish, when they look light brown. They will continue cooking a little even after they are taken out of the oil.
10. Make more Shankarpali as explained from Step 6 to Step 9 until the dough gets over.

Let the fried Shankarpali cool completely on a shallow dish. Then store them in a dry container with a tight lid.

Enjoy them with a cup of tea or with the rest of the Diwali goodies. Like so. :)

IMG_0119

Clockwise from top left: Besan Laddoo, Chakli, Shankarpali

Wednesday, October 18, 2006

I am back...

...well, sort of. I mean, I am back in Pune, India. And I also have access to the internet now. However, when exactly I'll be able to publish my next post is still a question. I have my fingers crossed. :)

In the meanwhile, let me wish you all a very Happy Diwali.

Tuesday, September 26, 2006

Bye to a kitchen...

IMG_0054

I am soon going to say 'Bye' to this kitchen. I wonder whether I can say 'Auf Wiedersehn' (See you again!) to the birthplace of many posts on my blog. :(

IMG_0055

Don't miss the printout of a recipe and some more scribbled ones on the fridge :)

At the same time, I am looking forward to going back to *our own* kitchen in Pune, which my husband and I designed to suit our needs. The only thing that I won't have in that kitchen is this view.

IMG_0091

These trees are green throughout the year. (Apart from when it snows. Then they look white. :)) The 'green' of them is soothing, isn't it?

Friday, September 22, 2006

Surprise Inside! Jam-in-the-hole Muffins

IMG_0082

Oh yes, the muffin does have a surprise inside. If you have read the title of the post, then you certainly know what exactly is inside. :) What you don't know, though, is the other surprise this post has got for you. Well, it's not a surprise really; it's more of a news. And the news is that we are moving back to Pune, India. We had it on our minds since June this year. Then we slowly started working towards it, and now it's already time to pack bags. Literally, because we are scheduled to leave Germany in a week's time. That's soon, isn't it?
Right now, we are in the process of winding up here. Selling/Giving away the stuff that we can't take with us. (If you are reading this and are in the Düsseldorf area, please drop me an e-mail. I am sure you can make use of many things that I have.)

As far as my kitchen is concerned, I am trying my best to use up the stuff, so that I don't have to throw it away. Which is also why my posts these days have different combinations and at times weird recipes. These muffins also had a few diverse ingredients (which weren't there in the original recipe) going into it. For example, semolina. You'll know more when you read the recipe.

I found the original recipe in a 'Cake Special' issue of this German magazine. I was anyway keen on trying it out, and that's when Alanna announced the theme for Sugar High Friday 23: Surprise Inside! When I read the theme, I knew I HAD to make these. Actually, this recipe, with the jam in it, also has a sort of hangover of the previous SHF i.e. No. 22.

In case you are not one of those, who scrolled straight down to see what's inside the muffin, then here's one picture for you. :)


IMG_0085


Recipe for Jam-in-the-hole Muffins (The original has a boring name: Breakfast Muffins. Yawn.)

Makes 12.

Ingredients:

280g. all-purpose flour/ Maida (I used a combination of flour, cornflour and extra-fine semolina 1)
2½ tsp baking powder
½ tsp baking soda /sodium bicarbonate
a pinch of salt
8g. or about 2 tsp vanilla sugar
60g. butter
1 egg
300g. plain yogurt (That is two of these yogurt cups.)
5 tbsp milk
12 tsp any jam (The original asks for Strawberry Jam. I used one with red currants made by me at home using this recipe by Ulrike.)

Store-bought blanched, slivered almonds for decoration (optional; I used)

Method:

1. Preheat the oven to 180°C.
2. Sieve the flour, baking powder, baking soda and salt together into a bowl. Add the sugar and vanilla sugar to it. (In case you want to use vanilla essence, add it at Step 4.)
3. Melt the butter on gentle heat until just liquidy. I did this in the microwave, in a glass bowl which I later used for mixing the batter. (Economic use of vessels!) Let the melted butter cool a little.
4. Then beat the butter and egg until frothy. You could use your electric beater for this; I didn't. :) To this, add the yogurt and milk.
5. Add the flour mixture to this and stir until just mixed. Let's not forget that these are muffins and not a cake. Which means that you need not use your electric beater here. Just a (wooden) spoon is fine.
6. Line the moulds in the muffin pan with paper cups. I did not do it, and ended up with a few scratches on the pan while unmoulding the muffins. :(
7. Distribute half of the batter in the cups. Place a teaspoonful of the jam on it. Like so.

IMG_0079

8. Distribute the rest of the batter on top and even it out. If using slivered almonds, place them on top of the batter now.
9. Bake in the pre-heated oven on the second rack from below for about 25 minutes, or until a skewer inserted comes out clean.
10. Then take the muffin pan out of the oven and let it cool (preferably on a cooling rack) for 15 minutes.
11. Then unmould the muffins gently and let them cool further on the cooling rack.

Enjoy the muffins with a glass of milk, if you like. Perfect for brunch. Or as an after-school treat for children. Please make sure that you store them under lock and key, though, because they disappear fast. Here's proof. :)

IMG_0086


Notes:

1. Sorry, I cannot give you the measurement of the flour in cups because I did not have enough flour. I used cornflour and extra-fine semolina as well. I just made sure that all of it together weighed 280 grams. Why did I use different flours? See, this is why you shouldn't have scrolled down straight to the second picture without having read the introduction. :)
2. We call the extra-fine semolina 'Zero number Rawa' in Maharashtra. Elsewhere too?

Tags: , , , ,

Wednesday, September 20, 2006

Can you guess the main ingredient? - Polenta Idlis

IMG_0075

Cornmeal Idlis served with No-Coconut Chutney (green) by Asha &
Peanut-Onion Chutney (brown) by Latha

You guessed it right!!! Are you smart or are you smart?! It is indeed coarse cornmeal or Polenta or Makai ka Rawa. I was sooooo sure that it was hard to guess. (Meaning: I would have never guessed it right, had this been a guessing game on someone else's blog.) Well, I underestimated you, Darlings. :)

IMG_0061

Coarse cornmeal / Polenta/ Makai ka Rawa

The recipe is quite simple. I just followed a recipe for Urad Dal-Semolina/Rawa idli that I have got from my mother-in-law. Why did I use Polenta then? Well, I bought it a few months back because I wanted to try making (guess what!) Polenta, the Italian staple. Somewhere down the lane, I totally forgot about it. When I found the pack of Polenta again, I just instinctively wanted to make Idlis with it. (This happens just too often to me, don't you think?) So, Idlis is what I made with them. Here's how.

Recipe for Polenta Idlis (Or Rawa Idlis, for that matter)

Serves 4. (No point in giving the number of Idlis here. As you can see, mine are the 'giant' versions.)

Ingredients:

1 cup Urad Dal
2 cups Polenta (or wheat Rawa/ semolina)
1/2 tsp Methi/ fenugreek seeds (optional; I always use)
water, as required
salt to taste

Method:

1. Soak the Urad Dal and Methi seeds (if using) in water for approx. 8 hours or till a point, where you see tiny bubbles on the water (and the Urad Dal starts giving a slightly unpleasant smell).
2. Then grind it to a fine paste. By fine I really mean fine. Leave it again to ferment; overnight, if you plan to make Idlis for breakfast the following morning. If you are left with some of the water in which the Urad Dal was soaked, keep it aside too. It will be useful in making the batter thinner, once the Polenta/Rawa is added.
3. In a piece of cloth as big as a handkerchief, tie the Polenta or Rawa in a bundle. Put this bundle in a vessel and steam it in your pressure-cooker / steamer for about 15 minutes. Like so.


IMG_0071

Steamed Polenta

4. Take the bundle out and let it cool. Once cool, add it to the fermented Urad Dal batter. Add salt and mix well. The batter should be the consistensy of Milkmaid condensed milk. (Do you Guys think of another equivalent?) If the batter is too thick, add the Urad Dal water that you have kept aside the earlier evening.
5. Oil the Idli stand/cups in which you want to make Idlis. I usually use steel bowls/Katori (Hindi)/Vaatya (Marathi) because I don't have my Idli stand here. You can see those bowls here and here.
6. Steam the batter in a pressure cooker/steamer for 10 minutes. Take the stand/bowls out and wait for about five minutes. This makes unmoulding them easier.

Unmould Idlis and serve warm with chutney or Sambar. As you can see in the caption for the first photograph, I served them with two chutneys blogged by Asha and Latha.

I would like to send this post to Nandita's Weekend Breakfast Blogging. Let's see what she says. :)

Tags: , , , , , , , , , , ,

Tuesday, September 19, 2006

Suspense...

There was a hissing sound coming out of the chamber. As though something were trying to escape through a hole. I went closer. There was a knob. I turned it. The hissing sound started dying, a little at a time. Then it stopped.

I opened the chamber. A strong smell hit my nostrils. Strong and overwhelming. I stretched my hand to touch what was inside…sssssss…I pulled it back with a jolt. I had burnt my finger.
I waited. I was not going to give up.
After a few moments, I touched it again, and pulled it out quickly. It made a ‘thud’ and rested. The smell still emanating from it, but no more sound.

I knew I had to do something. I knew it. I reached out for a knife. Yes… a knife is what I needed. I looked at ‘it’ with the knife in my hand. “Is it time?” I asked myself. I had burnt my finger once. Then...something in me said “Yes”. I held the knife firmly and dug it into ‘it’. I took it out and dug it again…and again…and again…until…


…until I had unmoulded all Idlis from the stand.

Monday, September 18, 2006

My Latest Kitchen Acquisition and Pasta with Ricotta & Mushrooms

100_6252

This kitchen tool is my latest kitchen acquisition. It helps you drain water from the pan after you cook 'Pasta'. What you do is that you hold it at the upper rim of the pan as though it were the lid. The *wings* on its two sides help you hold it with the handle grips of the pan. You hold the pan and the perforated *lid* on the sink, as away from you as possible, and then drain the water. Which also means that you do not have to use a colander for that job. The pasta can stay in the same pan in which it was cooked. Isn't it handy?

Since it is so good, I put it to use immediately as well as frequently and made a few dishes with pasta, which will feature here in the next few weeks. Today is the lucky(!) day for

Spinach Tagliatelle with Ricotta & Mushrooms
(I found the original recipe in German here.)

Serves 2-3.

Ingredients:

250g. Ricotta Cheese
300g. Tagliatelle (I used the ones with spinach. You could use plain noodles too.)
200g. mushrooms, sliced thin
4-5 fat cloves of garlic, chopped fine
2 tbsp olive oil
Parsley or any other herb (I didn't use any.)
1 tbsp tomato paste (optional; not in the original recipe)
about 1/4 cup milk (I used white wine instead. Hic.)

salt and pepper to taste

Method:

1. Take approx. 3 litres of water in a pan and put it to boil. Add a little salt to it. (I often add a vegetable stock cube instead; that gives the pasta some more taste of its own.) Once the water starts boiling, add the pasta and cook on high heat. The time taken to cook the pasta 'al dente' is normally written on the pack.
2. In the meanwhile, heat oil in a pan. Sauté the chopped garlic and sliced mushrooms in it.
3. Stir the Ricotta cheese with the milk/wine to make it smooth and slightly thinner. Pour it over the mushrooms. Add the tomato paste, if you like. I add it to give the sauce a nice tang.
4. Add salt and pepper to it and cook on very low heat. If using any herb, add it now.
5. By now the Tagliatelle should be cooked. Drain the water from it. (This is where my new baby comes in handy. :))
6. Serve the cooked Tagliatelle onto individual plates. Pour the creamy Ricotta sauce over it. Sprinkle some more pepper over it, if you like.

Serve with a salad on the side.

100_6605

Green Tagliatelle with Ricotta & Mushrooms

(By the way, I bought the tool and also took the photographs in this post before I got my new camera. So, the pictures aren't as great as I'd love them to be. Clicking them all over again could have been an option, but I am too lazy for that. :( )

And no, this post isn't being sent to any event. Isn't that strange?

Tags: , , , , ,

Friday, September 15, 2006

Pumpkin Walnut Cake

IMG_0046

Pumpkin Walnut Cake

Did you know that pumpkin is a berry? The largest berry, actually. I didn't know that until I started looking for more information on pumpkins. Why did I look for more information? Because Meeta has chosen it as the theme for this month's From My Rasoi. A very apt theme for the month of September, isn't it? (Having said that, I must mention again that pumpkins are available in India throughout the year and not just around Halloween.)

What I learnt more about pumpkins is that they were around even 12000 years ago, and were very much a part of man's diet in the Ice Age. They are supposed to have originated in South America. (Which makes me think that every second fruit or vegetable that I know has its roots in the Americas. What in the world did our ancestors eat before the 'New Land' was discovered?)
Also, how did they make many of the Indian string instruments before that? If I am not wrong, it is dried pumpkins that they use in making them. e.g. Sitar or Veena. Actually, the main chamber in them is called 'Bhopla' in Marathi or 'Kaddu' in Hindi. Both are words for pumpkin in those languages. That asks for another 'Google search', I guess. :)

IMG_0031

Hokkaido pumpkins

As for today's recipe, I didn't really have to do a 'search' for it. Because I found it in a German cookbook that I had borrowed from the library, after I saw the first pumpkins in the markets here. :) This book is dedicated to only pumpkins, squashes and melons. All from the same family. Some of the recipes in this book looked far-fetched to me; maybe included only to make the list of recipes longer. For example, Melon Soup with Pesto. Doesn't sound too great to me. I am happy eating melons as they are.
However, this recipe with pumpkin and walnuts turned out wonderful. And what aroma...ummmm...! By the way, I used a Hokkaido pumpkin for it. As you can see in the pictures in this post, the skin as well as flesh are bright orange. Which indicates high carotene content. That is also the reason why they are preferred in making bottled baby food. Apart from the sweet and nutty taste, of course. The name of this variety hints at its Japanese roots. However, I haven't managed to find out more about its origin. Maybe one of you knows?

IMG_0039

Recipe for Pumpkin Walnut Cake

Makes a fairly large cake. (Mine weighed 870 grams.)

Ingredients:

300g. or 4 loosely packed cups grated pumpkin
75g. or 3/4 cup powdered walnuts
1 egg
100 ml. or 1/3 cup oil (I used sunflower oil.)
250g. or 2½ cups all-purpose flour/Maida (I used 150g. flour and 100g. cornflour. Only because I wanted to use up the rapidly-aging cornflour.)
200g. or heaped 3/4 cup sugar (I used soft brown sugar. For the same reason as above. :))
1/4 tsp salt
1 tsp powdered cinnamon (I used store-bought.)
1 tsp vanilla sugar
1 heaped tsp baking powder

butter/oil to grease the mould (I didn't use any. It's a silicone mould.)
powdered/icing sugar for dusting (optional)

IMG_0041

Clockwise from top left: silicone Bundt mould,
batter for cake getting ready, grated pumpkin waiting to be a part of the batter
:)

Method:

1. Pre-heat the oven to 180°C. Grease a cake mould and keep aside.
2. Separate the egg : the egg white into a small bowl and the yolk into a bigger bowl, which you will also use for mixing the batter. If you are not confident of separating the egg only with your hands, you might want to invest in a separator, like Shammi.
3. Stir the egg yolk, sugar, vanilla sugar, oil and cinnamon until mixed well. Add the grated pumpkin and stir again.
4. Sieve the flour, baking powder and salt into the bowl. Then add the powdered walnuts to it. Stir the batter well to mix all ingredients.
5. With an electric beater, beat the egg white to resemble firm snow. Like so.

IMG_0043

6. Add this 'egg snow' to to the batter and stir gently.
7. Pour the batter into the prepared cake mould and bake for about 50 minutes. The cake is ready when a knife or skewer inserted in the middle of it comes out clean. (You don't really have to think to write this sentence, do you? :))
8. Once the cake is done, turn off the oven (Duh!) and take out the mould. Let the cake cool in it for 10 minutes.
9. Then unmould it onto a cooling wire rack. Once cooled, you could dust it with some icing sugar. I too did after taking the photograph. :)

Make this for you Halloween party and see all *ghosts* gathering around the table. ;-)
In the meanwhile, I'll go call Meeta to have a look at it. :)

Tags: , , , ,

Thursday, September 14, 2006

Things to Eat Before You Die (, although I don't want you to die really.)

The Traveller's Lunchbox has come up with this idea of compiling a list of a food-bloggers' top picks. It is about things you've eaten and think that everyone should eat at least once before they die. Sounds nice, doesn't it? Thanks a lot, Mandira, for tagging me.

Since I grew up in Pune...or as my husband once said, since my life has always revolved in a radius of 3 kilometers in a certain part of Pune, all my food memories and longings are connected to this city, that I call my home. (By the way, I am sure you have noticed that I wrote '...my husband once said...'. He is being punished so severely for that one occasion that he will perhaps never say that or anything alike ever again. Trust me. :))

Following is the list of foods or food destinations that I keep going back to. And I will do so until the last breath leaves my body. (What melodrama! Straight out of a Hindi tear-jerker. :))

1. Mango Ice-cream at Buva Ice-creamwale: Yummy yummy yummy ice-cream. It's a modest place in the heart of the city. (Near 'Udyan-Prasad' Mangal Karyalay, for those interested.) The decor inside hasn't changed in the last 30 years (that's how long I have been going there). Neither have the people. Most important of all : The taste hasn't changed. It is still the same taste and texture that I have in my oldest of memories. I am looking forward to making more memories there with my grandchildren. :)

2. Bedekar Misal: This is another one of those old-world joints in the heart of Pune city. If I am not wrong, the restaurant has a different name. I don't remember it, because everyone calls it Bedekaraanchi Misal. Now, Misal, as the name suggests, is a dish made by mixing lots of things. You can see the recipe for it here. But you know what, don't bother making it at home. Just pay a visit to Pune and have it at Bedekars'. You will regret, if you don't. :)

3. Shrewsbury Biscuits by Kayani Bakery: This is an item that many non-Puneites too know of. These famous biscuits make a perfect gift to take home, if you are visiting the city. Only that you have to make sure that you are at the bakery by 7 a.m., if you want to make sure that you get them. :) Read more about the bakery and the biscuits here.
The one thing that I'll want to do before I die is: Sprawl on the sofa in the living room at my parents' place, my sister beside me, both of us giggling like mad without reason, MTV playing on TV, and me munching on Shrewsbury biscuits. BLISS.

4. Kajukand: This is again something that memories are made of. When I was a child, my father used to bring me these sweet, pink squares made of cashews, sugar and with a hint of rosewater. These candies are healthier and cheaper, no doubt. They are also very simple, true-to-the-earth. For me, a symbol of the simple, middle-class life that we had. A life devoid of brands, luxury or affluence. Something that you don't really go looking for in supermarkets. It's the traditional-looking Maharashtrian shops that sell those. Try them out. You'll like them.

The last item on the list is purely a personal pleasure.

5. Tea made by my husband: You would perhaps not find anything special in it. Or maybe you would. Me, I'll want to have it till the last moment. The very last one.

I'd like to read what Anupama (I always tag her, don't I?), Linda and Mythili want us to eat before we die. :)

Wednesday, September 13, 2006

Away from the grind : Didir Dosa

100_6847

I bought some Urad dal flour back in January. I bought it because I had read a recipe then, which required it. After some days, when I again saw the recipe to make that dish, I realised that I didn't really fancy making it. (Does this happen to you too?) As a result, the Urad dal flour stayed in the pack, unopened, at the back of the cabinet...until I saw it again, when I emptied the cabinet to clean it thoroughly. This time I was determined to use it, and started looking for recipes on the net.

This thing called the internet is perhaps one of the best things to have happened to mankind in the recent years. (Now that was a 'pearl of wisdom', Maa Vaishali Devi!) Although I did not find too many recipes, which ask for Urad dal flour (perhaps there aren't too many anyway?), the one that I found is reeeaaaally good. It is for this Dosa, Didir Dosa. I found the same recipe at a few sites. The one site, which I like the most, is this. The only thing that none of the sites told me is *why* the Dosa is called so. I am sure that one of you will know. :)

This Dosa has two very good qualities.
1) It requires no grinding at all. Which means that bachelors or people on the move or people who are just starting a household and do not have all the kitchen gadgets yet can also make great Dosas.
2) Moreover, the no-grind batter gives you perfect Dosas. I think the pictures are proof enough. :)

The recipe is very uncomplicated too. Let me tell you how.

Recipe for Didir Dosa

I do not really remember how many Dosas I made, but it made four adults so full that they almost skipped lunch. :)

Ingredients:

3 cups rice flour
1 cup Urad flour
salt to taste
water for the batter

oil for the griddle/Tava when making Dosas

100_6821

Rice flour & Urad flour - Can you tell which is which? :)

Method:

1. Mix both flours and salt. Add enough water to make a soft, lump-free paste. Please make sure that it isn't too runny.

100_6823

Batter to be fermented yet

2. Leave the batter to ferment for at least 8 hours or overnight. Once the batter rises, check the taste again for salt.

100_6824

Risen batter

3. For making Dosas, heat a Tava. Pour a ladleful of the batter in the centre and spread it with the back of the ladle moving in concentric circles. Spread a few drops of oil at the edges of the Dosa. For step-by-step fotos, see here. Once the edges of the Dosa start *lifting themselves* from the Tava/griddle, slide a spatula beneath it, fold it in half and take it out.

If you want to serve it like the 'Topi Dosa' that they serve in Udupi restaurants in India, make one cut in the Dosa from the centre through to the edge. Fold it with both hands to make it look like a party hat. Like this.

100_6851

'Topi' Dosa

Serve it with this chutney or any other chutney of your choice. I served it with this.

I'd like to take this 'hat' along to Nandita's. For her Weekend Breakfast Party...er...Blogging. :)

Saturday, September 09, 2006

Another Meme!

100_6866_0001

Trappeto Beach. You wanna be there, don't you? :)

Thanks for tagging me, Nabeela. I love writing memes. :)
I am thinking about: at least ten other things right now.
I said: too many mean things to my husband during the first year of our marriage. :(
I want to: lose at least 10 kilograms.
I wish: I could paint and sing.
I regret: not having studied with enough dedication.
I hear: the dishwasher in the background as I am writing this.
I am: Vaishali.
I dance: with my upper body when I hear a catchy number on the car radio.
I sing: to my daughter to put her to sleep. Difficult to believe, but I do.
I cry: easily.
I am not: as snobbish as I appear to be.
I am: still Vaishali. How many more times do I have to tell you?
I write: my grocery lists in Marathi.
I confuse: between 'paraan' and 'pairi', the words for day-after-tomorrow and day-before-yesterday in Konkani.
I need: to get rid of my habit of procrastinating things.
I tag: Anupama.

Friday, September 08, 2006

Spaghettini with Zucchini / Bottle gourd and its leaves

100_6884

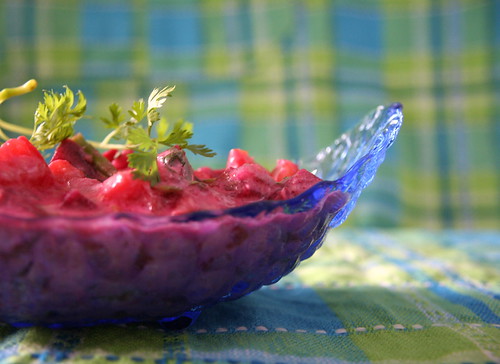
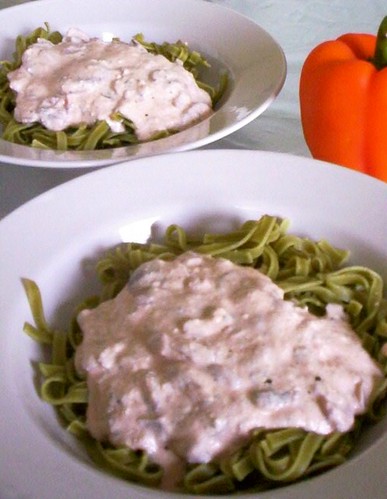
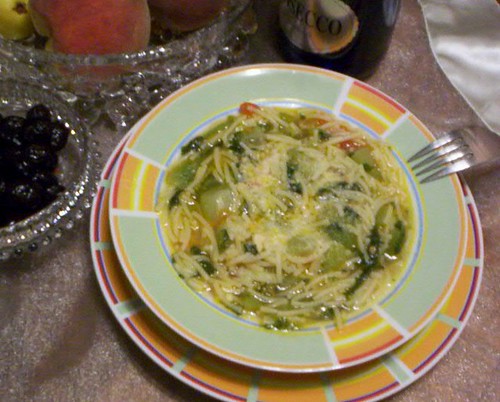
Spaghettini with Italian bottle gourd and its leaves
It needs to be eaten with a spoon.
I realised this only after I clicked the photo with a fork on the side.
:(

You might think that I am crazy about bottle gourd. Considering my latest posts, you have reason enough to. However, to be honest, this one is just a coincidence. Well, let me begin from the beginning.

As you know, I went on a holiday last week. As many of you guessed it right here, it was Italy. More precisely, Sicily. ('Mafia' is the first word that comes to your mind? You are a well-read person then. :)) We stayed in the village of Trappeto, which is a part of the Palermo province. We went there on an invitation by this Italian friend of mine, Nina. She has a house there; it's her hometown. Although she is very much a resident of Düsseldorf for over forty years now, she enjoys staying in Sicily in the summer months. I don't blame her; Sicily is indeed beautiful. Will write more about it in another post.
One of the highlights of our stay there was Italian food. Home-made as well as restaurant-made. What I observed was that, like in India, in Italy too home-cooked food is quite different from restaurant food. Until then, I somehow very naïvely thought, that Italians cooked at home what they served in restaurants, or vice versa. But no. I found the home-cooked food much less spicy and much more wholesome. Like this dish. It is a perfect one-dish meal with a good amount of carbs, fibre, Vitamin C and lots more goodness in it. You'll agree when you see the recipe.
Before that, a few notes:
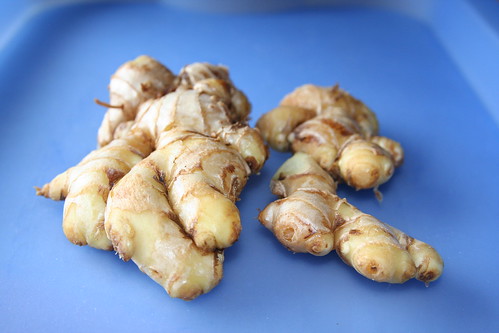
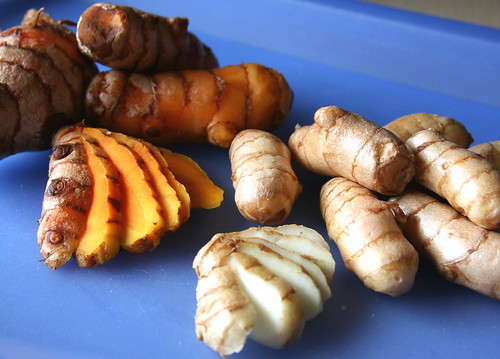
The 'Zucchini' that is used in this dish is actually bottle gourd in a different shape. (Maybe we could call it bottle-snake-gourd-zucchini. Or better still, zucchino, because that is the singular!) What they mean, when they call something a zucchino in Sicily, is this bottle gourd. The dark green zucchini that we know, are not to be seen there.
Also, the leaves are of the same vine, on which this gourd grows. They are sold regularly at the vegetable vendors there. Since I was sure, that I wouldn't find them easily outside Sicily, I asked Nina for a substitute. Well, there is no substiute really. Unless you want to try it out with spinach, she says. I haven't tried making this at home with spinach yet. Maybe you want to?
Besides, the Spaghettini that we used in this dish is like Spaghetti, but with slightly thinner and much shorter strands. If you don't have it at home, feel free to break regular spaghetti in 2-inch long strands. For this, you just have to hold the bunch of spaghetti that you want to use vertically in both hands and give it several twists. What you get is Spaghettini. Simple? :)

100_6876

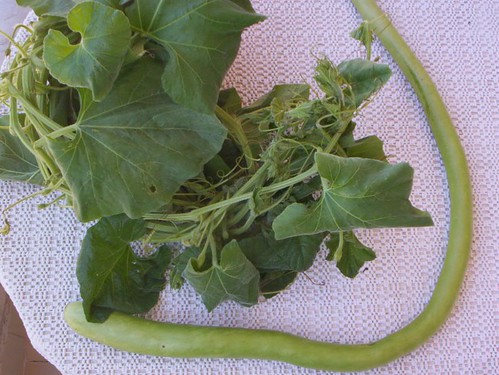
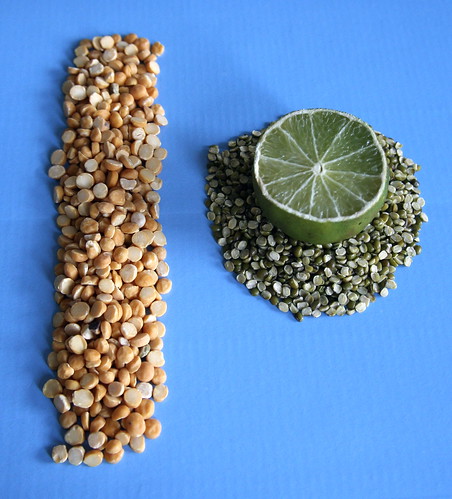
What they call zucchino in Sicily (R) and its leaves (L).
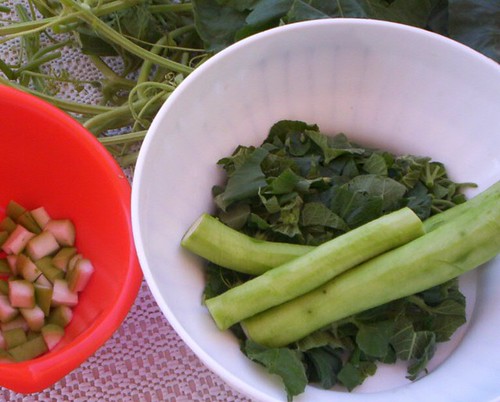
Only the smaller, tender leaves were used in the dish.

Recipe for Spaghettini with Zucchini/Bottle gourd and its leaves

Serves 5.

Ingredients:

One long Italian bottle gourd or a medium-size regular bottle gourd or two small dark green zucchini, as we know them
Leaves of the bottle gourd vine (Only the tender ones at the tip should be picked.)
250 g. Spaghettini (or spaghetti crushed as explained above)

2-3 tbsp olive oil
7-8 cloves of garlic, peeled and cut
4-5 tomatoes

water for cooking
salt & pepper to taste
grated Pecorino or Parmesan cheese to sprinkle

Method:

1. Coarsely chop the tender leaves picked from the bottle gourd vine. Soak them in salted water for the tiny insects/worms to settle at the bottom. In case using spinach, first wash the leaves with plain water and then chop them coarse.
2. Peel the bottle gourd/zucchini. In case you are wondering what to do with the peel, see here. Chop it in bite-sized pieces.

100_6877

Left to right: chopped bottle gourd, peeled bottle gourd and
picked & chopped bottle gourd leaves

3. Take the leaves out of the salt-water solution and give them a quick rinse.
4. Take lots of water in a large pan and bring it to boil. Then add the leaves as well as the chopped zucchini to it.

100_6879

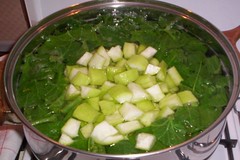
5. Cook uncovered until the zucchini pieces are soft.

100_6880

6. Drain the cooked vegetables reserving the water in which they were cooked.
7. Now place the tomatoes in a shallow dish and pour some boiling water over them. Let them rest like that for a couple of minutes, then take them out into a plate and peel them. The peel will come out easily. Roughly chop these tomatoes.
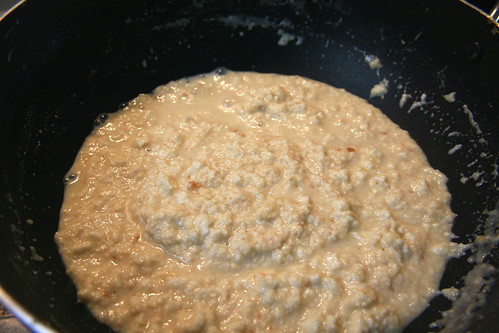
8. Heat the oil in a pan. Add the garlic pieces. Once they turn a shade darker, add the peeled, chopped tomatoes and salt. Cook uncovered on high heat. Mash it with the back of a ladle while it is cooking.

100_6878

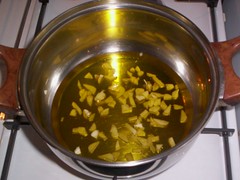
Olive oil ready to sizzle the garlic
(That's a lot of oil, but Nina is not scared.
It is locally pressed oil from locally grown olives.
It can do no harm, she believes.)

9. In the meanwhile, heat the water in which the veggies were cooked. Once it starts boiling, add the spaghettini and some salt. Cook it uncovered until al dente. Once cooked, drain much of the water from it, reserving some in the pan.
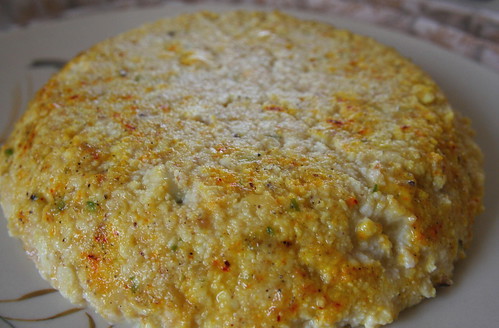
10. The tomato sauce must be ready now with a smooth, homogenous consistency. Add it to the pan with the Spaghettini. Add the cooked veggies too. The dish should be rather soupy. Give it a stir and check the taste for salt.
11. Ladle it into deep dishes/bowls. Sprinkle crushed pepper and grated Pecorino or Parmesan cheese over it.

Serve hot with some olives and warm Ciabatta bread on the side. Mmmmmmm....... Buono.... :)

I think, this makes a fitting entry for Meeta's Monthly Mingle with 'Holiday Cuisine' as the theme this time. Here I come, Meeta.....

Tags: , , ,