Did you hear the siren around your blogs in the past few days? If you did, not to worry. It was the ever-friendly 'Blog Patrol' doing its rounds on duty. :) And this is what it has come up with. Read on!
1. Baingan ka Bharta: I have always eaten Baingan Bharta made the Maharashtrian way. My North Indian friends somehow never made it for the feasts they threw or for packed lunches that they got to work. Although I did order this a couple of times in restaurants in India, looking at the pool of oil in the dish, I never went ahead and touched it. (Goose-pimples at the sight and pimples on the face after consumption! No, don't want 'em.)
So, I decided to wait until I would come across a decent recipe of this dish. I think my quest has ended now, because I have found this one by Meenakshi of Hooked on Heat. It has a very appetising aroma of ginger and Garam Masala. The Bharta also has a vey creamy texture (which makes it easy to gobble it up effortlessly). Just one thing: I think one tomato is enough in this one (as opposed to what has been suggested in the recipe), but that could also depend upon personal taste. All in all, a great recipe. Thanks Meena.
2. Gherkin-Cashew nut Upkari: This rather unusual combination made me curious, and one look at the recipe convinced me that it should work. (Does this happen to you, too? That you read a recipe, and you kinda know already whether or not it's gonna give a good outcome.)
The outcome of this one left me licking my fingers. My two cents: I cooked the gherkins in just enough water, so that I didn't have to drain them. One observation: This dish tastes equally good without the onions too. Give us more of thse, Ashwini!
3. Mango Pachadi: Again one of those, where you know that the recipe will definitely work. The dish turned out exactly the way it looks in the photograph given by Revathi, which means that the instructions given by her are accurate. Good work there! The Pachadi strikes a nice balance between sweet, sour & savoury. A tasty accompaniment with any meal.
4. Potato Salad & Oven Baked Veggies: I am clubbing these two because Meeta herself suggests them as one menu. I, too, like an obedient follower made these two together for a dinner and offered them with readymade Ciabatta bread. My husband's colleague at work was for dinner with us that night. All of us couldn't help but just go on with our 'oohs' and 'aahs'. The aroma of the herbs coming out of the oven makes you keep wondering why the darn thing should take half an hour to bake. The salad is a perfect accompaniment (or shall I say 'a perfect something to keep your salivating mouth busy while you are waiting for the veggies to out of the oven').
I hope all of you get to try out all these dishes. After all, most of us live to eat. Or do we not?
Saturday, April 29, 2006
Thursday, April 27, 2006
A Ton Of Protein # 2 - Moong Dal Kosumbari
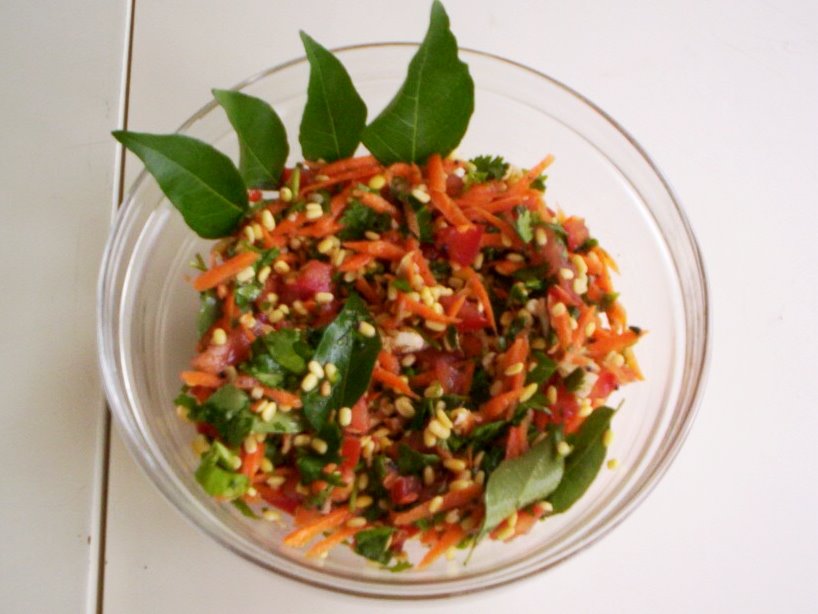 Moong Dal Kosumbari
I had this dish from Karnataka for the first time a little over a year ago. End of March 2005 it was. I had it at a get-together arranged by my parents-in-law in Bangalore, India. Although the catering was done by a contractor, the food had a 'cooked-at-home' taste. It was served on banana leaves and comprised of some 10 different items. All just too good to resist. And...then...I...*drool* *drool* *drool*
So, where was I? Aah yes, the Kosumbari and why I liked it as soon as I had the first morsel.
a) It uses uncooked Moong Dal in a salad with carrot and tomato. Very exotic for my tongue.
b) It uses no chillis. Only powdered pepper for the heat. Exotic again.
c) Raw curry leaves. Hmmm...very exo...well, you get the point.
The best part of it is that I didn't have to ask anybody for the recipe. I just knew it once I ate the dish. However, since I can't give you the taste of it and ask you to guess the ingredients, I'll just go ahead and list them for you here.
One note before we start: Please do not forget to add ginger to this dish, because otherwise it can be a little difficult to digest, since the Moong dal isn't cooked. The ginger should make it easily digestible, though.
 Clockwise from left: tomato, ginger, curry leaves, Moong dal, lime, grated carrot, coriander leaves
Recipe for Moong Dal Kosumbari - My second recipe for A Ton Of Protein
Serves 3-4.
Ingredients:
¼ cup Moong dal (split, skinned green gram)
1 carrot
1 tomato
2 tbsp grated coconut (optional)
¼ tsp powdered black pepper
1 loosely packed cup coriander leaves
8-10 curry leaves
½ tsp lime juice
1 tsp finely chopped fresh ginger
½ tsp sugar (optional, and the quantity depends also upon the sourness of lime and tomato)
salt to taste
1 tsp oil
¼ tsp mustard seeds
Method:
1. Soak the Moong dal for one hour in just enough water (about ½ cup), so that you do not have to throw away the excess later.
2. After an hour, grate the carrot. Chop the tomato fine. Chop the coriander leaves. You could tear the curry leaves with your fingers, if you like. I don’t do this, because I am not happy ruining their pretty shape.
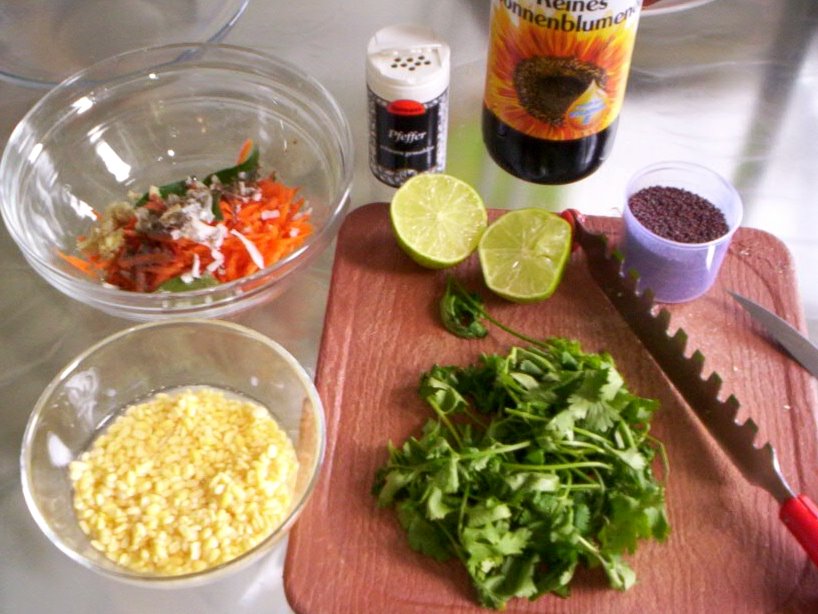
Clockwise from bottom left: Soaked Moong dal, grated coconut and carrot, powdered pepper, lime, oil, mustard seeds, coriander leaves
3. Mix all the ingredients mentioned in Step 2 in a serving bowl. Add grated coconut, if using. Add the seasoning (salt, sugar, pepper).
4. Drain the Moong dal and add it to the rest of the ingredients. Mix thoroughly.
5. Now heat oil in a pan or a Tadka Ladle. Once it is nice and hot, add the mustard seeds and let them pop. Once they stop popping, add this Tadka to the salad.
Serve as a side dish with phulka/chapattis/rice and some curry.
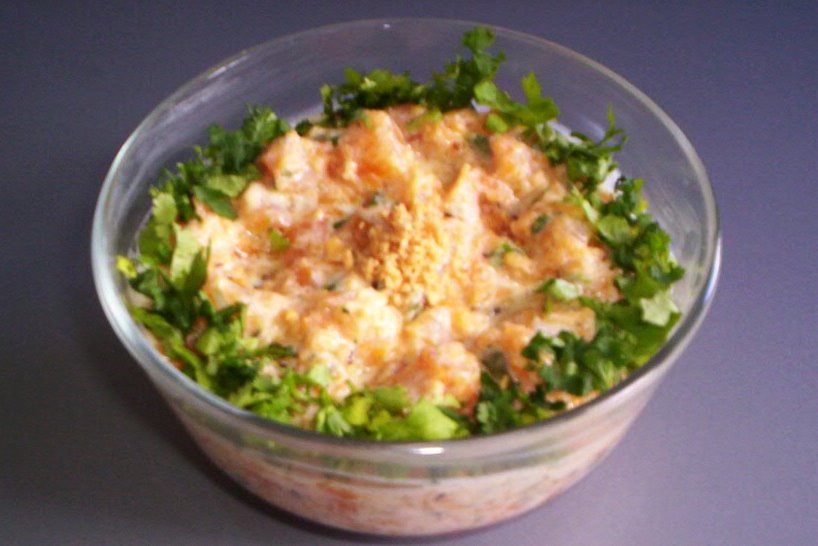
This Kosumbari can also be prepared with half a cup of Moong sprouts and grated & drained cucumbers. Do you know what I do? If I prepare the Kosumbari with carrot for lunch, and if there are leftovers, then I cover them and put them into the fridge. In the evening, I add the required amount of Moong sprouts & grated cucumber to it and adjust the seasoning. This way, I don't have to make a new dish from scratch and my leftovers get used in a semi-new avtaar. So smart, no? :) :)
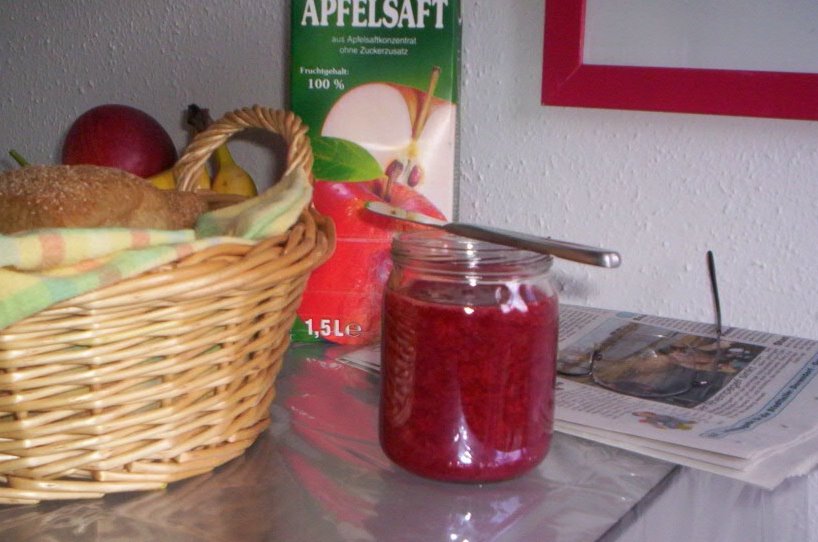
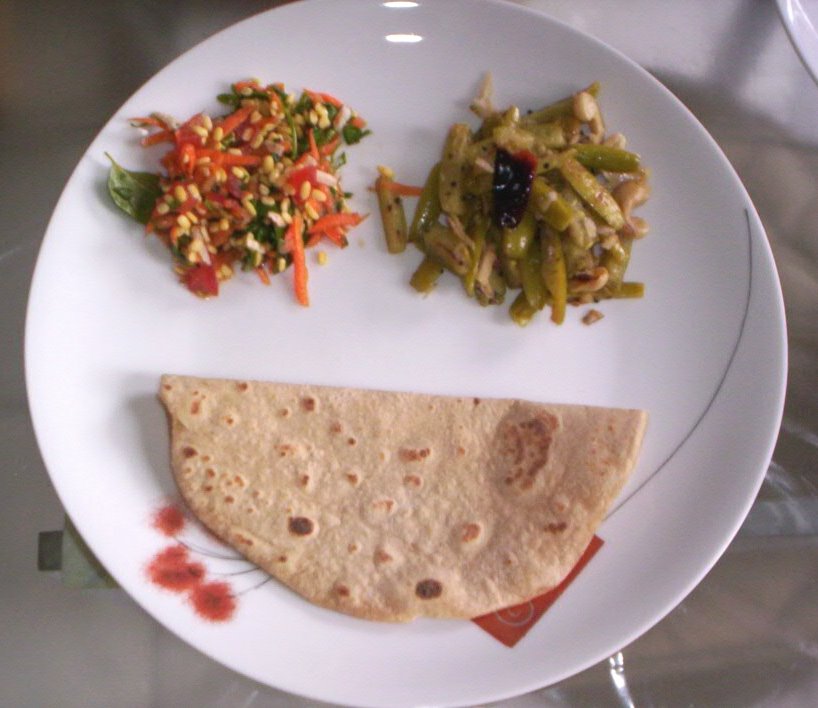 Moong Dal Kosumbari served here with chapati and Gherkin-Cashew nut Upkari by Ashwini
Wednesday, April 26, 2006
Pizza L'Amour
I hadn't planned to blog about this pizza, when I started making it last night. (That should explain the lack of quality in the pictures.) It was just going to be like any other pizza. Also, I was kinda in a hurry because it was already close to dinner time and my husband and I were both hungry. The dough for my pizza base has done a good 'second rising' and was wating to be rolled out.
And that's where is the 'twist in the story'. As I started rolling it out, my hands just started moving as though they a mind of their own. Before I realised what was happening, I had a heart-shaped pizza base. How did my hands do it? Or was it my innermost love that guided my hands? (I can almost hear my husband laughing out loud when he reads this.) Whatever it was, I had a heart shaped pizza base in front of me. And I loved it. I think, this is perhaps the best advantage of making your own pizza base. You can 'shape' it. Why not have a shaped pizza for a birthday party instead of a cake? Or maybe for a theme party? If shaping is too difficult, cutting it in the desired shape should be possible. Hmmm...I need to work more on this idea. In the meanwhile, you can have a look at my lovely pizza base.
And that's where is the 'twist in the story'. As I started rolling it out, my hands just started moving as though they a mind of their own. Before I realised what was happening, I had a heart-shaped pizza base. How did my hands do it? Or was it my innermost love that guided my hands? (I can almost hear my husband laughing out loud when he reads this.) Whatever it was, I had a heart shaped pizza base in front of me. And I loved it. I think, this is perhaps the best advantage of making your own pizza base. You can 'shape' it. Why not have a shaped pizza for a birthday party instead of a cake? Or maybe for a theme party? If shaping is too difficult, cutting it in the desired shape should be possible. Hmmm...I need to work more on this idea. In the meanwhile, you can have a look at my lovely pizza base.
 Pizza base with a heart!
Now that I am anyway blogging about it, I will just go ahead and also give the recipe.
Recipe for Pizza Base (Large)
Ingredients:
2 cups plain flour (Actually, I mixed 1 cup plain flour and 1 cup chapati atta, hence the colour, but I won't recommend it.)
2 tsp fresh yeast, crumbled
1 tsp each of sugar, salt and olive oil
Method:
1. Mix all the ingredients apart from the olive oil and knead into a soft dough using lukewarm water.
2. Add olive oil and knead again.
3. Cover the dough with a wet cotton cloth and wait until it doubles in size. This depends only on the warmth in the air. In summer, it can be super fast whereas in winter, it can take ages.
4. Press the dough to remove all the air. You will actually hear the air going out with a 'phuss' here. Knead the dough again.
5. Allow it to prove again, but maybe not necessarily until doubled in size.
6. Roll out the dough into any shape of your choice. Alternatively, roll it out into a big round and then cut it into shapes of your choice.
Please make sure that you roll out the base either on a baking sheet/silicone sheet or on baking paper. Otherwise, lifting the rolled out base from any surface is very difficult.
For the Sauce and Topping
Method:
I used a readymade pizza sauce this time, but I do make my pizza sauce too. Will post about it in future. I am again in a hurry right now. Sorry!
1. Preheat the oven to 200°C (390°F?).
2. Spread the pizza sauce evenly over the base. Top it with any vegetables of your choice. I used vertically sliced baby corn (outlining the topping in the picture), halved black olives, sliced green peppers and baby onions.
3. Sprinkle any grated cheese of your choice generously. I used Gouda. You could use the same or Cheddar, Edam or in fact, any hard cheese.
4. Bake the pizza in the preheated oven on the middle rack for 15 to 17 minutes. The cheese should melt and the base should look well hardened and slightly brown.
Enjoy your homemade pizza with a few shots of Tabasco over it. In the meantime, I 'll send it to Sweetnicks for ARF/5-a-day Tuesday #17. And I was thinking that I won't have an entry for it this time.
 Pizza L'Amour !
Monday, April 24, 2006
A Ton Of Protein # 1 - Saar Upkari
 Red skinned potatoes & chick peas
This is one of the first Konkani dishes that I tried out after marriage. It is also perhaps one of the easiest to prepare. This concept of a two-in-one dish was really new to me then and I loved it. I still quite like it for the very same reason actually.
Shall we just get on with the recipe then?
Recipe for Saar Upkari - My first recipe for 'A Ton Of Protein'
Serves 2.
Ingredients:
½ cup of any pulse/beans (I have used white chick peas/Kabuli Chana)
3 small potatoes or 1 large potato
1 green chilli
salt to taste
1 tsp oil
¼ tsp mustard seeds (preferably the tiny red variety)
1-2 dried red chillis
6-7 curry leaves
a pinch of asafoetida
Method:
1. Soak the beans for approx. 6 hours or overnight. You could use any beans for this preparation e.g. all types of chick peas (white/red/green), kidney beans, read beans, Moong beans, horse gram/kulith, Haricot beans ('baked beans' fame).
2. Combine the soaked beans with diced potatoes. Again, you could use yam/Suran or tapioca root instead of potatoes.
3. Pressure-cook the two with lots of water. You could use the same water in which the beans were soaked or use fresh water. Everybody has a different theory regarding this, so just do your own thing.
Also, this is a very forgiving dish, so don't worry too much about the quantities. Neither of the vegetables/pulses nor of the water. Just make sure that the vessel can contain it all. :)
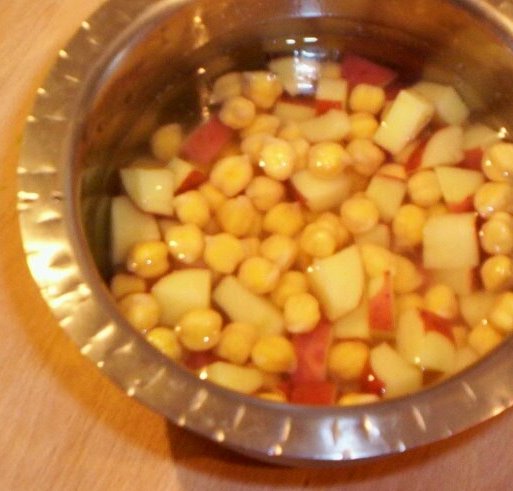 Soaked chick peas and diced potatoes ready to be pressure-cooked
4. Once the mixture is cooked, take it all out into a pan, in which you can now boil it. Mash a few beans and potato pieces. Let them loose their shape. That's how they are supposed to look - without any sharp outlines.
5. Slit the green chilli in the middle without breaking it into two and add it to the mixture. Add some more water, if necessary. Add salt to taste.
6. Boil the whole thing for about five minutes. Now keep a lid ready for this pan, but don't cover it yet.
7. Take the oil in another pan or tadka ladle.
8. Once the oil is hot, add the mustard seeds and wait until they start spluttering.
9. Now add the red chillis, broken into two or three pieces each. Add the curry leaves and asafoetida. Turn the heat off.
10. Add this tadka to the beans/vegetable mixture and cover the pan immediately. Turn off the heat. Let the flavours blend into each other for a few minutes.
11. Before serving, separate Saar (the watery part of this curry) from Upkari (the cooked beans and vegetables).
12. Serve Saar in bowls for drinking. Beware: The first swig always makes you cough!
Serve the Upkari with chapatis or with rice.
 Diagonally from left to right: Upkari & Saar
PS: The tadka can be made also with oil, mustard seeds and 3-4 cloves of garlic. The rest of the ingredients are not necessary then. Those who love garlic, will just love this version of Saar Upkari. Garlic flavoured Saar is perfect for winter evenings!
Sunday, April 23, 2006
A Ton Of Protein
 The word 'Protein' written with Moong Dal in Devanagari script
My introduction to protein, the term, was first in early school years, in the lesson on nourishment in our Science book. Of course, then it was just one of the things that I had to ‘learn’ for the tests. Once I started cooking (after marriage), I tried to learn more about the body’s requirement of nutrients, amongst which also proteins, because I am a vegetarian and it is said to be easy for a vegetarian diet to lack sufficient protein.
Proteins received highest importance when I was pregnant. I and many others (basically vegetarians) were strictly warned by the gynaecologist at the pre-natal classes that we must include proteins in every meal of the day. That’s when I started reading more about this important nutrient and also started checking out more dishes with lentils and beans. I rather stuck to everyday Maharashtrian and Konkani dishes, because they could be easily included into my everyday meals. I happened to collect quite a few recipes in that quest. I was in Pune, India then and making many international dishes with not-so-easily-available ingredients was not an option really.
Through this series ‘A Ton Of Protein’, I hope to blog about (at least) one dish with lentils/beans/sprouts every week. I must mention one thing here. Protein from vegetable sources is not considered to be ‘first-class’ protein. It always needs to be accompanied by some kind of cereals to be upgraded. So, even if I forget to mention it, please make sure that you always enjoy the dishes with rice, rotis, bread or anything made of cereals (and you know that I don’t mean the breakfast cereal here).
So, come on. Let’s build our muscles with ‘A Ton Of Protein’!
Friday, April 21, 2006
Blog Patrol # 1
Does this title sound intimidating? I think it's an impressive title. :) Anyway, the post is meant to be friendly, and is simply a round-up of the recipes by fellow food bloggers that I have tried out in the last few days. Some recipes were entirely new to me and some were better recipes for familiar dishes. Here they are, listed in alphabetical order. I haven't clicked any photographs for these, because the authors have. And they have clicked some really good ones. (Did I hear somebody calling me lazy?)
1. Cream of Broccoli Soup: I had a recipe for this soup sitting on my hard disk, but never really felt motivated to go ahead and try it out. After Saffron Hut did a post on it, I had enough motivation (read 'more than enough saliva in the oral cavity'). I tried out her version and was it good! It was great even without the pepper, which means that it is good also for infants and small children. (I have a seventeen-month-old fussy daughter, remember?)
2. Palak Paneer: I have numerous recipes for this one, none of which has satisfied me so far. The other day, when I wanted to make Palak Paneer, I just knew that only a fellow food blogger would have the solution for this. As I was doing a search on Blogger, I came across this one by Indira of Mahanandi and I was sure that I had found the 'right' one. Moreover, using roasted cashews really intrigued me. I have used soaked cashews in Punjabi/Moghlai preparations so far. But roasted cashews was something totally new and exotic. I was glad that I tried out this one. The spinach gravy was creamy and very, very aromatic. I know what I am gonna cook, whenever I want to impress my guests at dinners.
3. Tart Ratatouille with goat's cheese: Does this happen to you? That you read a recipe and you know at that instant that you are gonna like the outcome. This was one such recipe. I knew I had to try it out as soon as I read this one by Meeta of What's For Lunch Honey?. And it was indeed very good. I made my own pizza base for this. (Now then, who was calling me lazy?) Otherwise, I stuck to Meeta's recipe through and through. It is a hearty dish with a lot of vegetables. Her recipe would serve 3 to 4 persons. I reduced the amount of vegetables to 2/3 for the two of us and had the Tart as a one-dish meal. Mmmmmm....
4. Tuesday Soup: I have tried out several recipes by Nupur of One Hot Stove. I am happy to confirm that ALL have turned out well. I have chosen this one for this round-up, because I have made it something like 5976 times so far. Ok, I am exaggerating, but I have really made it quite often since January 2006 (that's when I got to know about food-blogging in general and Nupur's blog in particular). I have also tried adding different ingredients to it e.g. sweet corn kernels, sweet potato, asparagus (my current love interest!) and it has given fantastic results every time. I have also used a fistful of moong dal sometimes and offered the soup with lots of crusty bread to make it a simple yet filling dinner. I don't use the garnishes in Nupur's recipe, especially the croutons, but you could go ahead and use them. This soup again is fit for infants and small children (that's without the pepper and the croutons). By the way, did I mention that I always pressure-cook it? I do, and it is super-fast.
Hope you too try these out. In case you have done already, please let me know.
Tuesday, April 18, 2006
Fresh Strawberry Jam
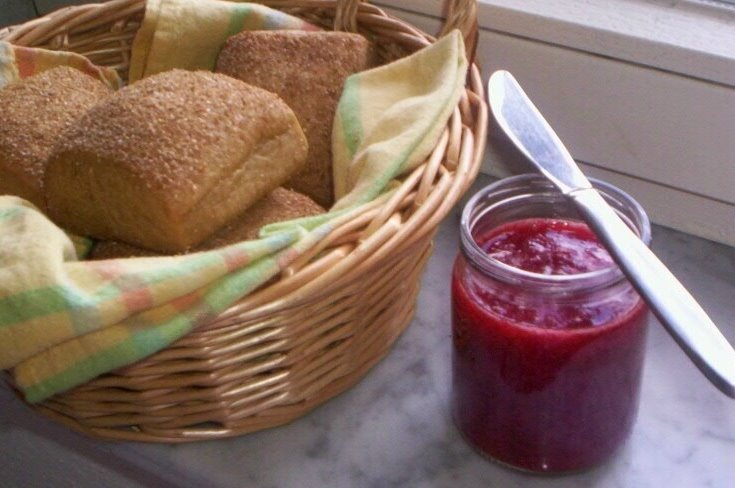 Fresh strawberry jam served with some Roggenkrüstchen (rye bread rolls)
Jam is one of the few products that I don't really enjoy in India. Most of the marmelades/jams of the leading brands are far too sweet for comfort, have artificial colours and flavourings and taste rather synthetic. The preserves here in Europe are much more fruity and natural. But the best jam, I think, is the one made at home.
I make a fresh batch of this one with strawberries every few days. Also because it disappers much rapidly. :) It is based on a recipe by Tarla Dalal and is extremely easy to make. It is great as a change from the routine Muesli and milk breakfast that we have on weekdays. Moreover, I think it is versatile because apart from its primary use as a bread spread, I mix it with plain yoghurt (that makes delicious flavoured yoghurt) and also use it in smoothies, especially when I don't have fresh fruit for that. I think it will be great as a filling in Victoria Sandwich Cake too. I haven't tried it like that yet, though.
Anyway, here is the recipe for Fresh Strawberry Jam
Ingredients:
2 cups strawberries (approx. 500 g., considering that the cook will pop a few of them into the mouth while cutting them, like yours truly does :)
3 to 4 tbsp sugar (the quantity depends largely on the sweetness of the strawberries)
1 to 2 tsp lime juice
 Clockwise from left: lime, strawberries, sugar cubes (these are only for aesthetic purposes; I used regular sugar in the preparation)
Method:
1. Chop the strawberries fine.
 Chopped strawberries, two cups
2. Mix them with the sugar in a pan and cook. Stir the mixture often while mashing the strawberries with the back of the ladle. Please make sure that you cook it on low heat, otherwise the mixture can easily burn, like this. (And to think this is my 'n'th batch.)
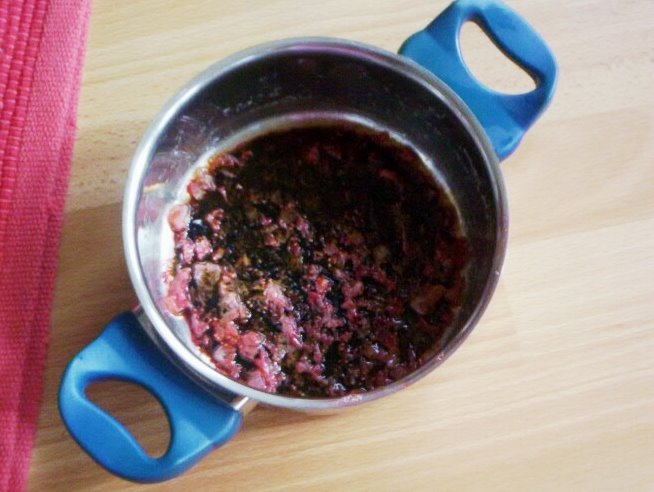 Burnt Strawberry Jam :(
3. Take off heat once the mixture is thick. Cool.
4. Add some lime juice. Check the taste. Add some more, if required.
5. Fill in a sterilised bottle. Store in the refrigerator.
Enjoy this 'No preservatives, all natural, low-sugar' jam with some fresh bread rolls or on toast. A great way to kickstart your day!
This is my entry for ARF/5-a-day Tuesday #16.
Tags: strawberry, strawberries , Fruit , jam
Wednesday, April 12, 2006
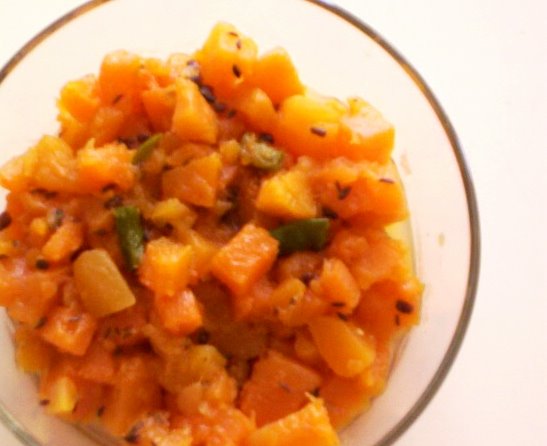
Red Pumpkin Raita (For some, Laal Bhoplyache Bharit)

Pumpkin: before & after
Red pumpkin or Laal/Tambda Bhopla (Marathi) or Kaddu (Hindi) is poor man’s source of carotene in India. Other sources (like apples, carrots) normally happen to be rather expensive when not in the peak of season. Red pumpkin, however, is ‘in season’ throughout the year unlike in the Western countries, where it is typically an Autumn appearance. I get my supply of this vegetable after Halloween from a Turkish vegetable vendor nearby. In case it is not available in your area, Butternut Squash can be used as a substitute.
My childhood memories of this vegetable are of a story, which goes ‘Chal re bhoplya tunuk tunuk’. It is about a clever old woman, who on the way to her daughter’s place happens to be passing through a jungle. A fox sees her, and sees her as his lunch. He tells her that he wants to eat her. (What a sophisticated, polite fox!) She tells him that he wouldn’t enjoy it much because she is all bones and skin. However, she gives him the idea, that he could perhaps eat her on her way back. Because then she would be well-fed by her daughter. The convinced fox lets her go. After a few days, when the clever old woman has to come back, she takes a large pumpkin from her daughter and carves it in a way, where she can be inside the pumpkin with her head, arms and legs sticking out. The pumpkin practically looks like a round torso then. When she sees the fox again in the jungle, she just runs and the fox never manages to catch her because she is in that too-large-to-grab pumpkin. While running, she keeps telling the pumpkin to go faster, which is ‘Chal re bhoplya tunuk tunuk’.
Do you have any such stories from your childhood? Please let me know.
In the meanwhile, the recipe for Red Pumpkin Raita.
Serves 4.

Clockwise from left: cumin seeds, fenugreek seeds, green chillis, coriander leaves, asafoetida
Ingredients:
approx. 500 grams red pumpkin (once cut, the pieces should be about three cups full)
1 tbsp oil
¼ tsp fenugreek seeds (optional)
½ tsp cumin seeds
a generous pinch asafoetida
1-2 chopped green chillis
¼ cup beaten yoghurt
1 tsp sugar
salt to taste
4 tbsp crushed roasted peanuts (readymade roasted peanuts are fine; in case you want make them from scratch, read this post by Indira of Mahanandi )
some chopped coriander leaves for garnishing
Method:
1. Peel and chop the pumpkin coarse. Cook it with some water till soft. Alternatively, pressure-cook the pumpkin without water for 5-7 minutes. Wait till the pressure dies down. Take out the cooked pumpkin pieces and keep aside.
The cooked pumpkin keeps well in the refrigerator for several days, if stored in an air-tight container. It comes in handy, whenever you need to make Raita.
2. Heat the oil in a pan. Add the fenugreek seeds, if using. Add cumin seeds and wait until they pop. Add the asafoetida.
3. Now add the green chillis and the pumpkin pieces.
4. Sauté the mixture on medium heat until the pumpkin pieces start falling apart while stirring.
5. Turn the heat off.
6. Take the sautéed pumpkin out into the bowl, in which you want to serve it. Let it rest partly covered until cooled down.
7. Once it is cool, add the sugar, crushed peanuts, yoghurt and salt to taste.
8. Garnish with coriander leaves.
9. Serve at room temperature or chilled with rice / chapattis and any kind of curry. Goes well with spicy rice preparations like Biryanis, too.
Tags: Pumpkin, Butternut squash, Raita
Tuesday, April 11, 2006
Too healthy to be true - Asparagus Spinach Soup

I bought half a kilo of Asparagus the other day and started making new dishes / experiments with it. I have already posted the recipe for Asparagus Bruschetta with Goat’s Cheese, which is an appetizer. Now follows a soup.
This recipe is based on a similar one from a German book. It is cooked in a typical German way. Which means that vegetable stock (Gemüsebrühe) is a must. Germans rarely cook their soup without stock made with a typical combination of vegetables, which they call Suppengrün (literally meaning greens for the soup). Supermarkets stock portions of Suppengrün bundled together in the vegetable section. This bundle contains a stick of leek, a piece of celeriac, a carrot or two and a couple of parsley sprigs. This combination is stocked pre-cut in the freezer section too. Of course, like most things, this too has a short-cut, which is those universal vegetable stock cubes. But as the catchline for Bru coffee in India goes – ‘Real pleasure can’t come in an instant.’
 Framing the picture: asparagus spears; In the frame (from left to right): spinach leaves, tomato, carrot, leek, red onion, celeriac, parsley
Now, then, to the recipe for Asparagus Spinach Soup
Serves 3-4
Ingredients:
For ½ litre vegetable stock (in case not popping a stock cube into the soup)
1 small red onion
1 medium carrot
about 50 g. celeriac (or celery sticks, if that is more common in your area)
1 stick of leek
1 small tomato
2 parsley sprigs
1 bay leaf
a pinch grated/powdered nutmeg
crushed pepper to taste
For the soup
200 g. green asparagus (about 7 spears)
a handful of fresh spinach leaves
2 shallots / 1 onion
1 tbsp olive oil
¼ cup milk
salt and pepper to taste
grated Parmesan cheese for garnishing
Method:
1. For the vegetable stock, peel the onion. Wash the rest of the vegetables. Chop all of them fine.
2. Transfer into a pan with ¾ litre of water. Bring it to a boil. Add the parsley, bay leaf, nutmeg and pepper. Simmer partly covered on low heat for about 45 minutes to an hour.
3. While the stock simmers, wash the asparagus and spinach.
4. Cut and discard the fat ends of the asparagus. Cut the tops about 1.5 inch long. Cut the rest of the asparagus in 1 inch long pieces.
5. Chop the spinach.
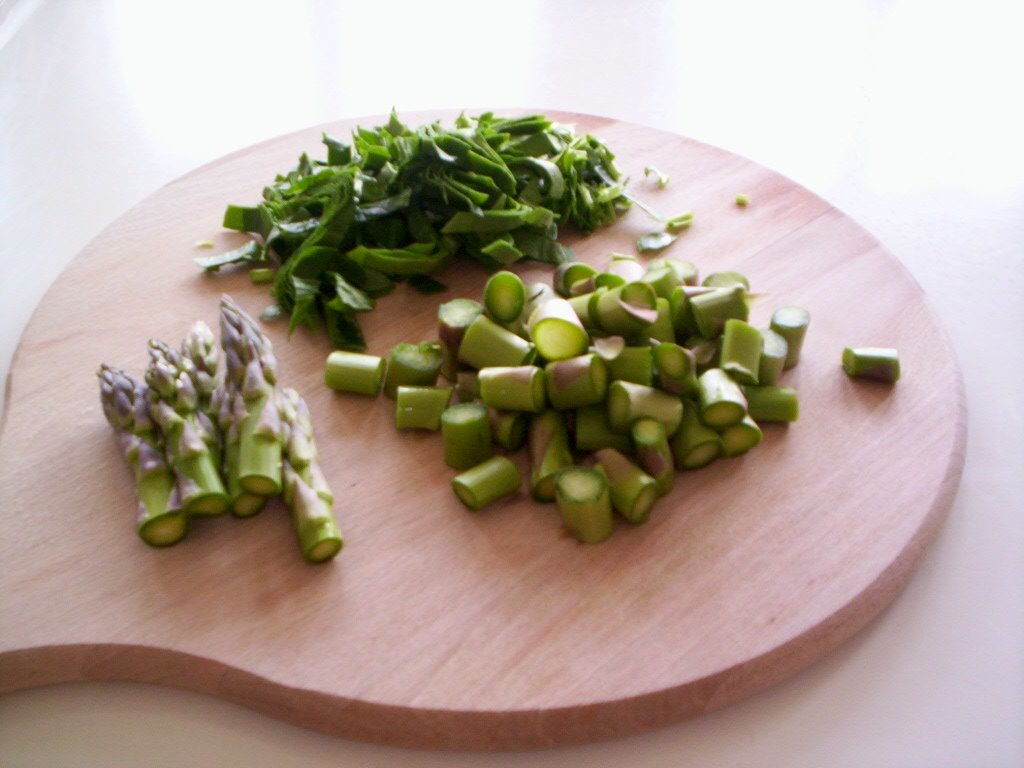 Clockwise from top: chopped spinach, chopped asparagus, asparagus tops
6. Peel the shallots/onion and chop fine.
7. Once the stock has simmered enough, strain it and gather the clear stock. If you like your soups broth-like, retain some of the strained vegetables. Otherwise, the strained vegetables should be discarded. Do not worry, though. About an hour of simmering is enough for the nutrients from the veggies to dissolve into the water.
8. Now, heat the oil in a pan big enough to accommodate the whole of the soup. Sauté the shallots/onion in it till translucent.
9. Add the asparagus tops & pieces and the chopped spinach.
10. Steam them in the covered pan for 2-3 minutes.
11. Open the pan and fish out the asparagus tops. Set them aside for garnishing.
12. Add the stock to the pan and cook the whole mixture for five minutes.
13. Add milk, salt and pepper. Turn off the heat.
14. Puree the soup with a hand blender or in the blender attachment of a mixer.
15. Serve hot garnished with asparagus spears at the sides and grated parmesan on top. (There is no parmesan to see in my photograph. I added loads, but it all kept sinking to the bottom of the dish. Titanic, anyone?)
I think this soup is a great delicacy to offer when entertaining. And more so, if entertaining a pregnant woman. Asparagus and spinach – both are rich in Folic Acid, which is something a would-be mother can never have too much of.
By the way, this is my entry for Sweetnicks’ ARF/5-A-Day Tuesday # 15.
Saturday, April 08, 2006
The oils that I use
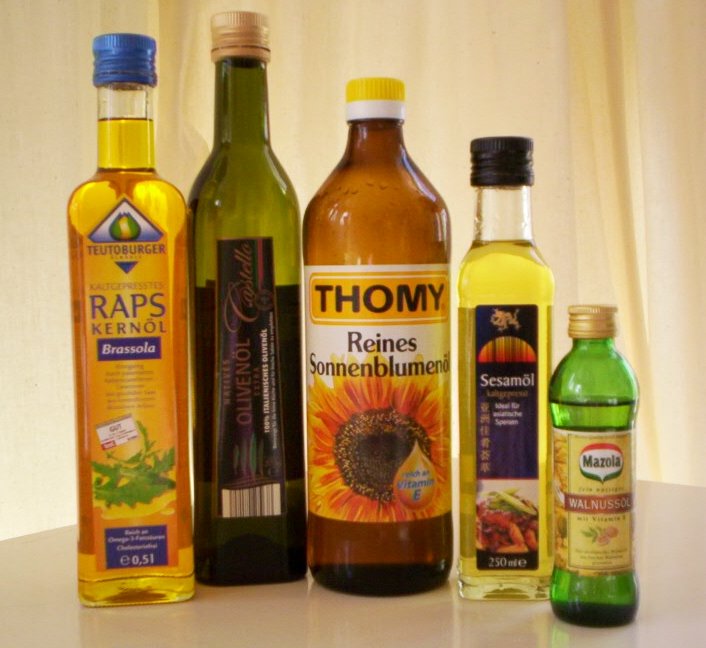 From left to right: rapeseed oil, extra virgin olive oil, sunflower oil, sesame oil, walnut oil
It is roughly since three years that I use several different oils in my kitchen. The most important reason behind this is to maintain a good omega-3 to omega-6 fatty acids ratio in my diet and that of my family. I somehow feel that this could be one of the keys to a healthy life. I could be totally wrong and/or research may show after a few years that changing your oils has no effect on your health, good or bad. Or it might so appear that oils are bad altogether. Anyway, until something like this would come up, I’ll continue using different kinds of oils.
What do I use them for and why?
Rapeseed oil:
This one has a very low saturated fat content. No choking of arteries here. However, it has a strong smell (like its Indian sibling - the ‘mustard oil’) and can hardly be used raw. I use it mainly in dishes where the strong aroma of the spices or ingredients would never allow the smell of the oil peep its head out.
Extra virgin olive oil:
This one is known as the ‘cardio healthy’ oil, because its extended use maintains arterial elasticity. I use it mainly in non-Indian dishes and salads.
Sunflower oil:
This one is apparently not as healthy as it is made out to be. It has a rather high omega-6 count. I use it only because it has a neutral taste/flavour e.g. while making tadka for dishes like Yoghurt Kadhi, where a smelly oil could interfere with the delicate aroma of the rest of the preparation. I also use it for baking for the same reason.
Sesame oil:
This one is for the sake of authenticity in Chinese dishes. This one too has healthy properties, but I don’t exactly know which.
Walnut oil:
I like the flavour of it in salads. Anyway, it’s not advisable to heat it because it then tends to turn bitter.
Apart from these, I used to use coconut oil in India, mainly in Konkani dishes. I know it has a high saturated fat content, but it also has a better omega-3 count, which arrests the production of cancer-causing free radicals. Ghee, too, has these properties and that’s why it is advisable to consume it in small quantities regularly.
Now that I am writing this here that I realize that it all sounds too technical. However, it has become a way of life for me. I do the things mentioned above without thinking about them consciously.
Which oils do you use? I would love it, if you wrote it in your comments or published a post on it on your blog.
Friday, April 07, 2006
A Foodblogger’s Meme Around the World
Yoohoo! My first meme! And actually I got a double invitation for this one. One from Ashwini and the other from Sonali. I am really excited about this. I feel like I am officially 'accepted' in the blogger community now.
By the way, I have published a post on 'Asparagus Bruschetta with Goat's Cheese' today. Please scroll down to check it out.
1. Please list three recipes you have recently bookmarked from foodblogs to try:
Tart Ratatouille by Meeta
Eggless maple syrup-pecan cake by Shammi
Banana Nut Muffins by Saffron Hut
2. A foodblog in your vicinity:
What's for lunch Honey? by Meeta in Weimar, Germany
3. A foodblog (or more) located far from you:
All of them located in the US, Canada, India...well, those outside Europe.
4. A foodblog (or several) you have discovered recently (where did you find it?):
I have found out many recently through comments at my own blog and comments and links at other blogs. A few I could mention off hand would be
Anthony's Kitchen
Kitchenmate
Saffron Trail (Found her only today!)
Taste Corner
What's for lunch Honey?
5. Any people or bloggers you want to tag with this meme?
I think Deccanheffalump of The Cook's Cottage hasn't been tagged yet. I'll tag her.
Asparagus Bruschetta with Goat's Cheese
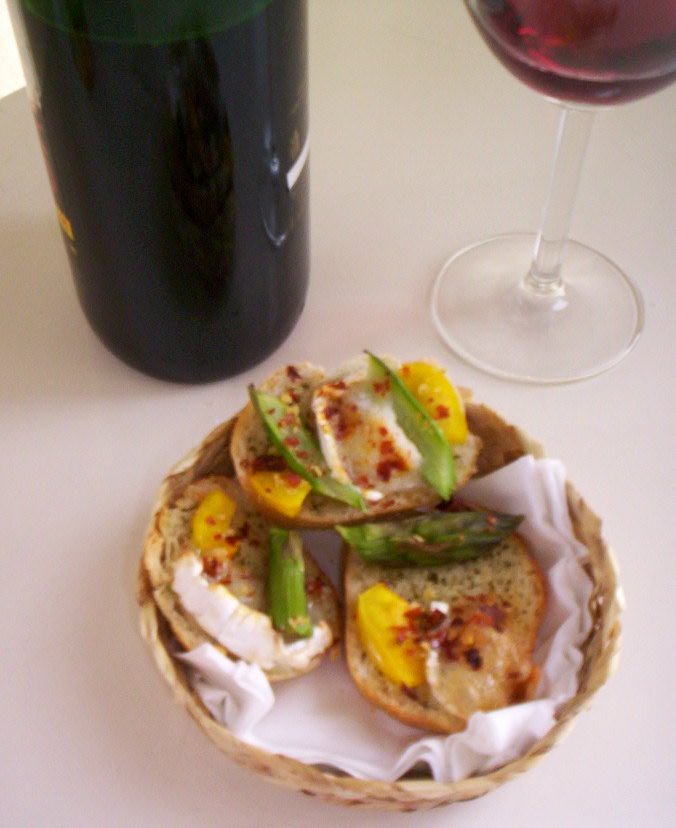
Sugarapsa. Wondering what that is? It’s just asparagus written backwards. :)
I bought Asparagus for the first time the other day. I have eaten it before, but have never tried cooking with it. That’s because it’s a spring/summer vegetable and I am in Germany only since November last year. Last week was the first time I saw asparagus in the supermarkets. It’s not the German produce yet. That will come out only around May and the first batch will be celebrated the way first mangoes are in India. Germans’ passion is for white asparagus, though I have chosen the green variety for my experiment.
I have already tried using it in three different dishes. I want to blog about all of them, but for starters I have chosen an appetizer recipe. (Got the joke? Hee hee hee) It is based on a recipe by the same name (without the goat’s cheese part) by Tarla Dalal, but I have changed it in the procedure as well as in the ingredients section. Here it goes.
Asparagus Bruschetta with Goat’s Cheese
Makes 16 pieces.
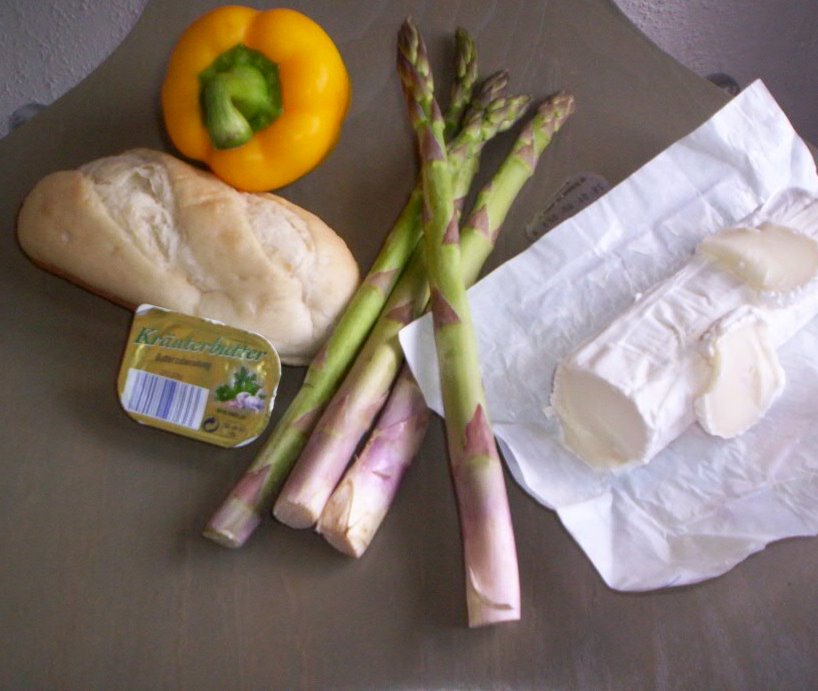
Clockwise from right: goat's cheese, asparagus spears, readymade herb butter, ready-to-bake baguette, yellow pepper
Ingredients:
1 long ready-to-bake baguette (or two short ones as I have used)
3-4 asparagus spears
1 tiny yellow pepper (I used half of a large one)
approx. 40 g./ 4 tsp readymade herb butter (or you could make it at home by mixing butter with some garlic and dried parsley)
approx. 50 g. goat’s cheese (mozzarella should be fine too)
1-2 tsp crushed dried chillis/paprika
Method:
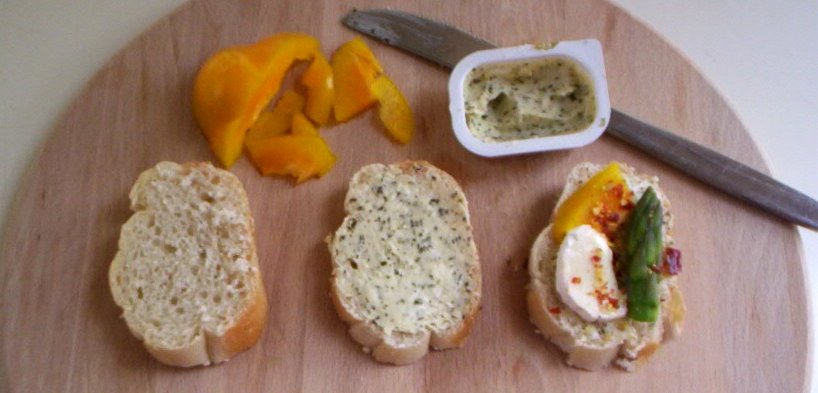 From left: plain baguette slice, with herb butter, with all toppings
1. Prepare the herb butter, in case not using readymade product.
2. Pre-heat the oven to 200°C (395°F?).
3. Cut the asparagus spears in 1 to 1.5 inch long pieces.
4. Put them in a microwave safe dish and sprinkle some water over them. Microwave them on HIGH for about a minute.
5. Cut the yellow pepper into strips.
6. Cut the ready-to-bake baguette vertically into slices. Spread the herb butter on them.
7. Arrange the slices butter side up on a baking tray. Arrange the asparagus pieces, yellow pepper strips and pieces/slices of the goat’s cheese on the buttered baguette slices. Sprinkle the crushed dried chillis/paprika on them. Your raw bruschettas are ready.
8. Now bake them in the oven for about 10 minutes or until the cheese melts.
Serve them as appetizers. In case offering red wine to go with it, I would recommend the ‘Vin de Pays d’Oc Grand Sud Grenache’. I think it goes well with all Indian, Italian, Mediterranean dishes, basically dishes with a robust flavour.

By the way, I would like to send this recipe as my entry to My Dhaba's Virtual Cooking Competition.
Wednesday, April 05, 2006
Mulyachi koshimbir (Radish raita)
 A bunch of red radishes
This one is a very ‘everyday’ Maharashtrian dish. Something that you would see on the table at my parents’ place every few days, but rarely when there would be guests coming around for lunch/dinner. Radish or Mula (in Marathi) or Mooli (in Hindi) is a vegetable which many people do not like or avoid. I guess it is because of the strong smell it emanates and also because of the bad breath that may stay with you for some hours. I have no problems with the former, and the latter is anyway something that others will have a problem with. Well, tough luck, guys! I will have my radish when I have to.
Now, Koshimbir or Raita is something that Nupur of One Hot Stove has already written about. So, I will proceed straight to the recipe.
Recipe for Mulyachi Koshimbir (Radish Raita)
Ingredients:
A bunch of red radishes (mine had 24 of them)
½ cup yoghurt
salt to taste
some coriander leaves for flavour & colour
1 tsp oil
¼ tsp mustard seeds
2-3 green chillis
Method:
1. Clean, wash and grate the radishes. A food processor with a grater attachment (or an enthusiastic/obedient husband) will come in handy. My radishes yielded 1 1/2 cups gratings. You could take the same amount of white radish instead of the red variety.
2. Squeeze the gratings lightly in your palm and transfer them to the bowl in which you would like to serve the Koshimbir. (I know there will be loss of nutrients when you squeeze out the juice, but if this is not done, the Koshimbir will be totally watery and unenjoyable.)
3. Add the yoghurt to the radish gratings. Add salt and chopped coriander leaves.
4. Cut the chillis in pieces a centimetre long.

5. Heat oil in a pan/tadka ladle.
6. Once the oil is hot, add the mustard seeds. Let them splutter.
7. Add green chillis and take the pan/ladle off heat. This way the chillis won’t discolour.
8. Let the pan cool down. This is VERY necessary as otherwise the hot oil can ruin the taste because it would make the yoghurt bitter.
9. Mix the Koshimbir well. Garnish with some more chopped coriander leaves, if you like.
10. Serve as a side dish with rice and dal or chapatis at room temperature . Or chilled in summer (What’s that? We don’t get it here in Germany).
If chilling/storing in the fridge, make sure that it is tightly covered, otherwise it will transfer its strong smell onto other food stuff.
Tags: Radish, Raita
Monday, April 03, 2006
Nutella Frosted Cupcakes with a difference
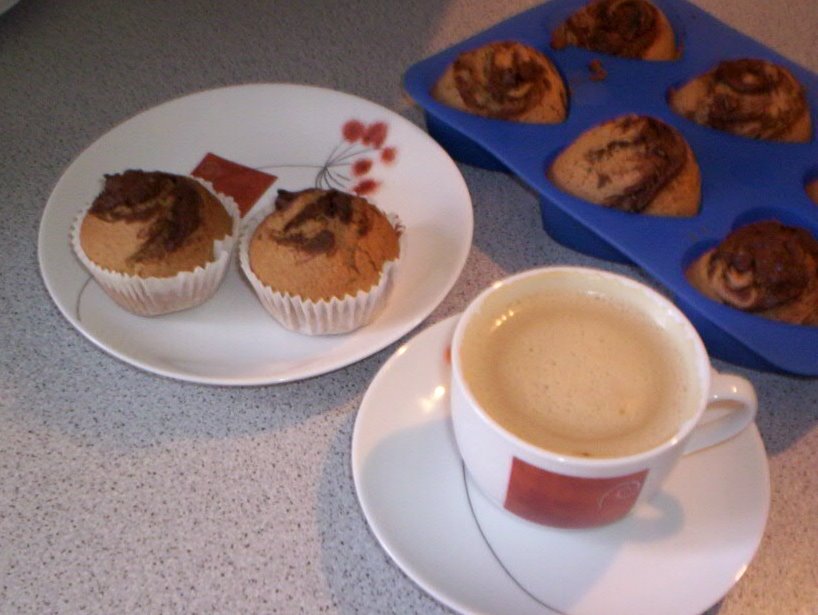
It’s hubby dear’s birthday today. I had decided to make Shammi’s Pecan Maple Syrup Cake , but didn’t have any maple syrup or plain flour at home. Moreover, I didn’t get the time to do any grocery shopping on Friday or Saturday. Germany being Germany, everything is closed on Sundays. As hubby says, God too doesn’t work here on Sundays. Unless He likes to work in petrol pumps for a change.
So, I was left with no choice but to change my plans. In came the self-frosting Nutella cupcakes by Nic of Baking Sheet. I tweaked the recipe a little to suit my preferences though. I used whole-wheat flour (not the very coarse variety, but a kind somewhat similar to Chapati Ata, only a couple of shades darker), since I avoid using plain white flour as much as possible. I am happy to confirm that it didn’t make much difference to the taste, neither to the texture. I didn’t have enough butter at home, so I used whatever little I had and added some sunflower oil, but I think I didn’t add enough because the muffins were dryish (but certainly with less calories..now I feel a little better). I didn’t sift the flour, because I didn’t feel the need for it. I forgot to add the salt, which was not for any specific preferences but purely out of forgetfulness. Now, who’s got older? My husband or me?
All in all, I was happy with the outcome. I am sure, the muffins would have turned out better, had I used the given amount of butter. Otherwise, they went very well with a cup of coffee. More so, because I offered them to hubby as refreshments after he vacuumed the house. And that he did despite it being his birthday. So touching, no? –sob-
Recipe for Nutella Frosted Cupcakes
Makes 12.
Ingredients:
3 tbsp softened butter + 4 tbsp oil (The original recipe asks for 10 tbsp/140 grams butter)
3/4 cup white sugar
3 eggs
1 tsp vanilla sugar (1/2 tsp vanilla in the original.)
1 3/4 cups (200 grams) whole-wheat flour (As per the original, sifted plain white flour)
1/4 tsp salt
2 tsp baking powder
Nutella, approx. 1/3 cup (Do not bother measuring this. Scoop it straight out of the jar as you need it.)

Method:
1. Preheat oven to 325°F (165°C). Line 12 muffin tins with paper liners.
2. Cream together butter and sugar until light for approx. 2 minutes.
3. Add in eggs one at a time, until fully incorporated.
4. Add vanilla.
5. Stir in flour, salt and baking powder until batter is uniform and no flour remains.
6. Using an ice cream scoop, fill each muffin liner with batter. The muffin moulds should be 3/4 full, if you're not using a scoop.
7. Top each cake with 1 1/2 tsp Nutella. Swirl Nutella in with a toothpick, making sure to fold a bit of batter up over the Nutella.
8. Bake for 20 minutes.
9. Cool them in the tray for about five minutes.
10. Remove to a wire rack to cool completely.

One note of caution: Please make sure that you use the recommended amount of Nutella and NOT less, because it is not just for frosting or for flavour, but also contributes towards the sweetness of the muffin. The rest of the batter is otherwise rather ‘unsweet’.

Tags: Chocolate , Nutella , Muffin , Muffins , Cupcake , Cupcakes
Subscribe to:
Posts (Atom)